Learn how you can use QuickBooks Bill Pay for QuickBooks Online.
Combine bill payments with your accounting process so your bills data moves seamlessly within QuickBooks. You can schedule an online bill payment and we’ll send the funds for you. Or, if your vendor doesn't accept online payments, we can mail a physical check for you.
Note: QuickBooks Online offers multiple bill pay services. Check which bill pay service you have.
Learn about:
- Subscription options and fees
- How payment processing works
- Schedule a bill payment with QuickBooks Bill Pay
- Schedule a partial bill payment
- Schedule multiple bill payments in one step
- View or edit your vendor’s payment information
- How vendors are notified when you schedule a bill payment
- See your bill payment details
- Payment processing times
- How to cancel a scheduled bill payment
- How to make a stop-check request
- How to cancel your Bill Pay subscription
- QuickBooks Bill Pay Terms of Service
- Support hours for payments experts
Subscription options and fees
To subscribe to Bill Pay, see which offer is right for you.
Note: If you're a QuickBooks Bill Pay Elite user, learn more about setting up roles and permissions.
How payment processing works
When you schedule a payment to a vendor:
- On the Withdrawal Date, we collect the funds from your Funding Source.
- We send the payment out to your vendor using your selected payment method. For payments sent via Check, we print and send the check out in the mail.
The check number is available after it’s mailed to the vendor. Once a check is mailed, you'll be able to view the check number on the Bill Pay Payments page.
Schedule a bill payment with QuickBooks Bill Pay
- Sign in to your QuickBooks Online company file.
- Select Expenses, then Bills (Take me there).
- Create a new bill or select an existing bill.
- Select Schedule Payment or Save and Schedule Payment depending on what type of bill you’re reviewing:
- If you create a new bill, you will have the option to schedule the bill right away by clicking Save and Schedule Payment.
- For an unpaid bill, schedule directly fromExpenses (Take me there), Vendors (Take me there), or Bills (Take me there).
- Choose which bank account you want to use as your funding source and withdraw funds from. Banks you’ve already connected to your QuickBooks account will appear as options, but you can also choose Add a bank account. The full amount of the bill appears by default, but you can select Edit if you want to schedule a partial payment.
- If you choose to Add a bank account:
- Find and select your bank.
- Enter your account's user ID and password, and we'll connect it immediately.
- If needed, you can enter your bank account info manually:
- Select Enter account info manually.
- Fill the bank details and select Continue.
- Within 3 business days, we’ll send you 2 small deposits. The amount will show up in your usual bank transactions.
- Monitor your bank account for the 2 deposits from Intuit. Once the deposits appear in your bank account, go back to schedule a payment for the relevant bill.
- You'll see the bank name and account number. Select Verify this account.
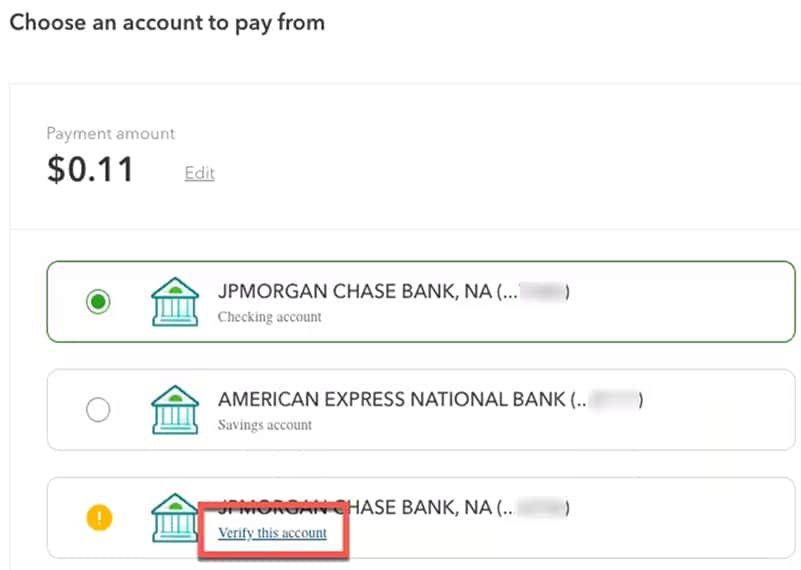
- Enter the amounts of the deposits, and you're all set.
- If you choose to Add a bank account:
- In the Payment account in QuickBooks dropdown ▼, select the corresponding account from your QuickBooks chart of accounts to sync your payment information accurately in your QuickBooks Online account. Or, select + Add new to create a new account in QuickBooks to track your bill payment information.
- Select Next.
- Choose which payment method your payee prefers and complete the required fields:
- Bank transfer (ACH): You’re required to enter the payee’s bank account number and routing number.
- Print check: You’re required to enter the payee’s address. The memo field is optional.
- For Withdrawal date, select the date when you want the funds to withdraw from your bank account, up to 90 days in advance.
- Select Next.
- Review the payment instructions, then if everything looks correct, select Schedule payment. If you need to fix anything, select Back. If you decide not to schedule this payment, you can select Cancel.
When you schedule a bill payment, both you and the payee will receive an email confirmation. You and the payee will both get another email confirmation once the bill payment is complete.
Note: Currently, Bill Pay supports US payments in USD only.
Schedule a partial bill payment
You can schedule payment for a bill in full or schedule a partial payment with QuickBooks Bill Pay. Scheduling a partial payment gives you more flexibility to pay your vendors. This option allows you to divide a single bill into several payments to accommodate flexible payment options such as installments and milestone payments. You also have the option of selecting a different payment method for each scheduled payment.
When you schedule a partial payment, QuickBooks tracks and displays the remaining balance on the Bill Page.
To schedule a partial bill payment with QuickBooks Bill Pay
- Sign in to your QuickBooks Online company file.
- Select Expenses, then Bills (Take me there).
- Select Schedule Payment for the relevant bill.
- Select Edit, then enter the amount you’d like to pay.
Schedule multiple bill payments in one step
With QuickBooks Bill Pay, you can save time and schedule multiple bill payments in one step. To schedule multiple payments in one step:
- Sign in to your QuickBooks Online company file.
- Select Expenses, then Bills (Take me there).
- Create a new bill or go to your existing unpaid bills in the unpaid tab.
- Mark the bills you want to pay using the checkboxes to the left of each bill.
- Select Schedule payments.
Note: You can also select New then Pay Bills, mark the bills you want to pay, and then select Schedule payments.- Select the bank account you want to use as your funding source. If you don’t have an account, you can select Select account to add an account.
- If you want to update to a different bank account, select Change account.
- Select Manage for each payment to update the delivery details/withdrawal date. If the vendor already has delivery details, we’ll use them again.
Note: when you update vendor details for one bill, the details will be updated for all other bill payments to the same vendor. - You can select apply to all to apply a withdrawal date to all payments in a batch.
- Select continue.
- Review the payment, then if everything looks correct, select Schedule payments.
You and your payees will get email confirmations when the bill payments are scheduled and processed.You can see all your Bill Pay payments status on the Bill Pay payments page, (Expenses then Bills) page.
View or edit your vendor's payment information
Note: any new or additional info you add for your vendor in the Bill Pay service, will update existing payment information for such vendor.
Here's how to view and edit a vendor's payment information in case they aren't in the QuickBooks Business Network:
- Sign in to your QuickBooks Online company file.
- Select Expenses, then Vendors (Take me there).
- Locate the appropriate vendor by searching or looking through the vendor list.
- Once you select a vendor, you may view and edit their info.
How vendors are notified when you schedule a bill payment
We email your vendor twice.
First email will notify the vendor that you scheduled a bill payment to be sent to them.
Second email will notify the vendor that the payment is on its way and when to expect the bill payment.
We don't notify your vendors in case of payment cancellations or failures. Make sure to reach out to them directly if there are any issues with your scheduled bill payment.
See your bill payment details
You always have access to your bill payments, including their status, on the Bill Pay payments page.
From the Bills page, you may see all paid and unpaid bills. In the Paid tab, you will see all bill payments that have been completed.
Payment processing times
Standard Delivery times:
- ACH: 3-5 business days
- Check: 8-10 business days
Delivery times can vary due to third party delays or risk reviews.
Faster ACH Payments
Eligible QuickBooks Bill Pay users can choose Faster ACH Payments to schedule bill payments to be paid in 1 business day (excluding weekends and federal holidays). For example, if you schedule a bill payment with the Faster ACH payment for Tuesday, December 12th, it'll be paid out to your vendor on Wednesday, December 13th.
Note: In some cases due to the vendor's financial institution, this payment might be reflected in the vendor's bank account on Thursday, December 14th.
Faster ACH Payments are subject to an additional $10 processing fee for each bill payment.
Note: Payments can only be scheduled as early as next business day (excluding weekends and federal holidays). Delivery times can vary due to third-party delays or risk reviews. Faster ACH Payments don't count toward your monthly ACH payments in our QuickBooks Bill Pay subscription tier.
How to cancel a scheduled bill payment
You can only cancel a scheduled bill payment before 12am of the withdrawal date noted in the confirmation email sent to you after you schedule a Bill Payment.
To cancel a scheduled bill payment:
- Sign in to your QuickBooks Online company file.
- Select Expenses, then Bills (Take me there).
- Select Show Bill Pay payments.
- Choose the scheduled bill payment from the list, then select View details.
- Select Cancel this payment.
How to make a stop check request
Note: You can do this only before the check is deposited.
If the bill payment is in “scheduled” status: Go to the bill payment page, and select Cancel.
If we have already processed the bill payment, the check is already printed and sent. Please sign in to your QBO account, select Help, and follow the steps to contact us.
We recommend you contact the vendor and let them know you voided the check.
Once voided, you may schedule a new payment directly to the vendor using the Bill Pay service.
How to cancel your Bill Pay subscription
- Sign in to your QuickBooks Online company file.
- Go to Settings
 and select Account and settings.
 - Select Billing & subscription.
- Find QuickBooks Bill Pay and select Unsubscribe.
QuickBooks Bill Pay Terms of Service
By accessing and using the QuickBooks Bill Pay service, you agree to the terms and conditions set forth in the Bill Pay Terms of Service.
Support hours for payment experts
Get in touch with our Support team through the Help panel, we’re here to help.
MON–FRI: 6 AM – 6 PM (PT)
SAT–SUN: Closed
QuickBooks Bill Pay: QuickBooks Bill Pay account subject to eligibility criteria, credit, and application approval. Subscription to QuickBooks Online required. Money movement services are provided by Intuit Payments Inc., licensed as a Money Transmitter by the New York State Department of Financial Services. For more information about Intuit Payments' money transmission licenses, please visit https://www.intuit.com/legal/licenses/payment-licenses/.