Learn how to get checks into QuickBooks Desktop and process them with QuickBooks Payments.
Check scanning is no longer supported in QuickBooks Desktop. If customers pay you with e-checks or send paper checks, you can still use QuickBooks Payments to process them. This feature is available for users who can process ACH bank payments.
We'll show you how to get customer payments into your bank account and record checks on your QuickBooks Desktop chart of accounts.
Step 1: Process check payments
If you already sent your customers an invoice, we recommend they pay for their invoices online. This makes it easier to record the payment.
Paper checks and e-check payments are now recorded the same way in QuickBooks Desktop. If you haven't sent an invoice yet, follow these steps to create a sales receipt.
- Sign in to your QuickBooks Payments account from QuickBooks Desktop.
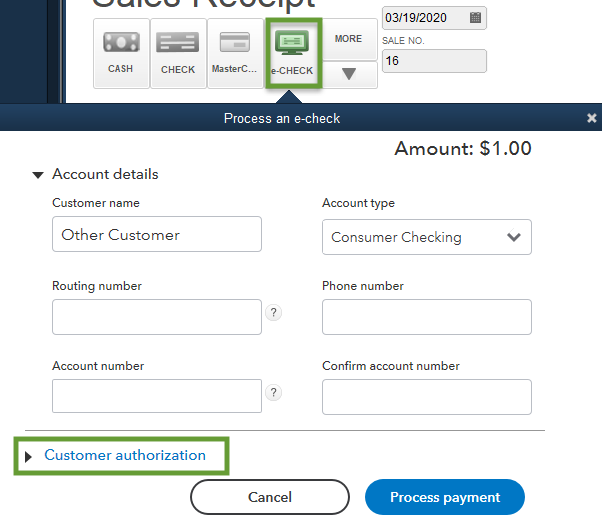
- Go to the Customers menu and select Enter Sales Receipts.
- In the Customer : Job ▼ dropdown, select the customer or job.
- Add products and services you're selling, quantities, rates, and amounts as needed.
- For the payment method, whether it's an e-check or paper check, select e-check.
This opens a payment process window:
- In the Customer name field, enter the check writer's name. This may be different than the customer on the sales receipt.
- In the Account Type ▼ dropdown, select the type of checking account the check is from. Note: This is should be the business or personal checking account the customer is paying you coming from, not where you plan to put the money.
- Enter the Account number and Routing number on the check. This info should be on the check your customer gave you.
- Select the Customer authorization ▼ section. Then select how your customer authorized the check.
- After you enter the check info, select Process Payment. This takes you back to the sales receipt.
- On the sales receipt, make sure the Process payment checkbox is still selected.
- When you're finished, select Save and close.
Step 2: Record a bank deposit for the checks
After you finish recording the checks, select Make Deposits. Then follow these steps to combine the payments into a single record.
You can also wait until after QuickBooks puts the payments into your bank account. Your bank may record the payments from QuickBooks a specific way. If you wait, use your bank statement to decide which payments to combine in QuickBooks Desktop.