- Mark as New
- Bookmark
- Subscribe
- Permalink
- Report Inappropriate Content
Create, modify, and print checks
Checks are written orders to a bank to pay the amount listed on the check to the person depositing the check. They’re considered as good as cash.
|
In this article:
|
Write a check
Regular checks
In QuickBooks Desktop, you use regular checks to pay for a fixed asset, inventory and non-inventory part, service, other charges, and any expense you track. You can also use this form to put money into a petty cash account or pay credit card dues. To write checks, go to the Banking menu and select Write Checks.
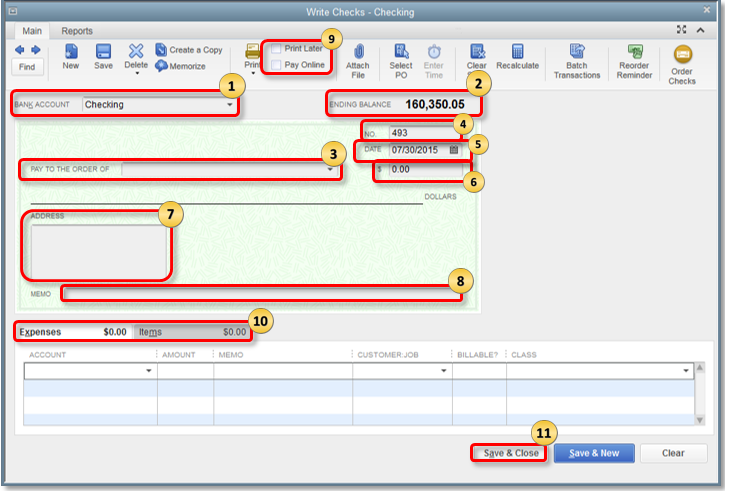
- Bank Account: Account where the money will be taken from.
- Ending Balance: Balance of the given bank account as of the date of writing the checks.
- Pay to the Order of: Should be the Payee Name or whoever the check was issued for.
- No.: In QuickBooks, the number is assigned depending on the check number preference you set.
- Date: Use the date when you issue the check.
- Amount: Check amount in numbers. Below the Pay to the order field will automatically show the Dollar amount in words.
- Address: The payee address is automatically populated from the payee name setup.
- Memo: This field can be left blank but mostly, it is used as an unofficial note for additional details like the account information, the period, and what the payment is for.
- Print Later or Pay Online: Put a checkmark in the Print Later checkbox if you need to print the check at a later time or the Pay Online checkbox if you will process an online payment.
- Expenses or Items tab
- Use the Expense tab to enter shipping charges, liability (in cases of payments for liabilities/loans), and other expenses not associated with any item in QuickBooks.
- Use the Item tab to choose the appropriate item on the drop-down list.
- Select Save & Close.
Other Check forms
- Bill Payment Check: Generated when you select the Pay Bills option in QuickBooks Desktop.
- Sales Tax Checks: Checks created to pay your sales tax liabilities.
- Paycheck: Checks issued to an employee in payment of salary or wages.
- Payroll Liability Checks: Checks created to pay or remit payroll taxes you withheld from employees or whatever your company owes as a result of your payroll. These include 401(k) contributions, Health Insurance contributions, Union dues, and Garnishment for child support.
Delete or void a check
Before you start, be sure you understand the difference between deleting and voiding a check.
|
Voiding a check changes the amount of a check to $0.00. VOID is added to the Memo field. You can always re-enter a voided check. Do this if you want to keep a record of the check in QuickBooks. Deleting a check removes the record of the transaction from QuickBooks. It’ll be like it never happened. You can’t undo this, but you can re-enter a deleted check. |
Void a written check
- Select the Banking menu, then select Use Register.
- From the drop-down, choose the account you used to write the check.
- In the Bank Register, select the check.
- Select the QuickBooks Edit menu, then select Void Check.
- Select Record.
Void a blank check
- Create a check with the amount of $0.00.
- Enter a payee name, and assign an account in the Expenses section.
- Select the Edit menu then Void Check.
Delete a check
- Select the Banking menu, then select Use Register.
- From the drop-down, choose the account you used to write the check.
- In the Bank Register, select the check.
- Select the QuickBooks Edit menu, then select Delete Check.
- Select Record.
Print checks
- From the Write Checks window, select the Print icon then select:
- Check- To print a single check. When you choose this option, you will be prompted to enter a Printed Check Number.
- Batch - To print multiple checks you marked for Print Later. When you choose this option, you will be redirected to the Select Checks to Print window. Put a checkmark on the check/s you want to print then select OK.
- On the Print Checks window:
- Select the Printer name and Printer type.
- On the Check Style section, choose if you want to print the check as Voucher, Standard, or Wallet.
- If your pre-printed checks already have your company name and address on it, uncheck the checkbox Print company name and address.
- Check and make sure all other settings are correct.
- Select Print.
You can get secure checks guaranteed to be compatible with QuickBooks at Intuit Market.
Currently, QuickBooks doesn't have the functionality to print Magnetic Ink Character Resolution (MICR) fonts on checks. You can check Intuit Marketplace for a third party software package designed to print MICR font.
Memorize a check
For detailed steps on memorizing checks, see Create an automatic recurring payment (check) to a vendor.
Print the check register
- Select the Edit menu, then select Use Register.
- From the drop-down, choose the account then select OK.
- Select the Print icon at the top of the register.
- Enter the date range you want to print.
Note: If you want to print the split detail, place a checkmark in the box Print splits detail. - Select OK, then select Print.
Create a user role to write checks without seeing confidential information
When setting up users in a role to write checks, QuickBooks requires users to have access to a bank account. If you are using QuickBooks Desktop Enterprise and you don't want a user to see sensitive or confidential transactions in the bank register such as payroll, create a bank sub-account. This gives you the ability to limit which of your bank accounts a given user can write checks from or view.
-
- Create a sub-account of the main checking account.
- Go to the Lists menu, then select Chart of Accounts.
- In the Chart of Accounts window, right-click anywhere and select New.
- For the Account type, select Bank then Continue.
- In the Account Name field, enter A/P Check Register or anything that distinguishes it from other bank accounts.
- Put a checkmark in the Sub account of box then select the account where funds will be drawn in transactions.
- Select Save & Close.
- Create a user role.
-
- Sign in as the QuickBooks Admin.
- Select the Company menu, then select Users then Set up Users and Roles.
- Select the Role List tab.
- Create a new role, or duplicate one similar to the access needed for the user.
- Modify the role:
- Select the + in front of Banking.
- Allow Full access to Create Checks.
- While still in the Banking area, select the + sign in front of Bank Registers.
- Select +next to the main checking account.
- Highlight the newly created sub-account, and allow View and Print access.
- Continue to modify the role for access to other duties as needed.
-
- Create a sub-account of the main checking account.
This method could be reversed to keep payroll or other confidential transactions in a sub-account accessible only to users who need access to the information. Specified users could be given access to the primary account for various register activities and not be able to see the confidential transactions from the sub-account.
Common issues and unexpected results
Check number is always the same
When you write a check, the check number is always the same even after saving a check with a different number. The next check number is stored in the Check Number Queue therefore, the queue is damaged and must be repaired. Try the following solutions to fix the issue:
- Resolve data damage on your company file.
- Write a check again. If the number is still wrong, save the check with the correct number.
Class field missing from the check register or Write Checks Window
When you open the check register or Write Checks window, the option to include class information is missing. Checks and Deposits don't have source classes. You can add target classes by using the Splits button at the bottom left of the check register window.
If you open the register and the Class field, Restore, or Record buttons are missing, close out of the window and reopen while holding the Shift key. If this fails to resolve the issue, please check your font DPI settings and screen resolution to ensure they are optimized to display QuickBooks properly.
- Make sure class tracking is enabled.
- From the Edit menu, select Preferences.
- Select Accounting preference.
- Select the Company Preferences tab.
- Select the Use class tracking checkbox.
- Select OK to close the Preferences.
- Open the Register, and select the Splits button in the bottom left corner.
- This will add the option to add a Class.
- If you're not using the recommended Windows default font:
- In Windows, switch the display settings to Smaller - 100% (default).
- In QuickBooks, go to Banking, then Write Checks (and/or Vendors, then Enter Bills).
- In a blank transaction, under the Items and Expenses tabs, adjust the columns to be very narrow.
- Select Save & Close.
- In Windows, switch the display settings back to Medium - 125%.
- In QuickBooks, readjust the check and bill entry form columns as needed.
