Learn how your employees can access their paychecks and W-2s through Workforce. They can also access timesheets through QuickBooks Time.
You won't have to print or mail stubs and forms to your employees. QuickBooks Workforce makes it easy for them to view their paychecks and W-2's. They can also view available time off, and year-to-date earnings. We'll help you invite your employees so they can sign in and start.
Have QuickBooks Online? This article is for QuickBooks Desktop Payroll. If you have QuickBooks Online Payroll, use these steps.
Requirements:
- Make sure you're on the newest QuickBooks update
- Make sure you have the newest tax tables
- Log in as QuickBooks administrator
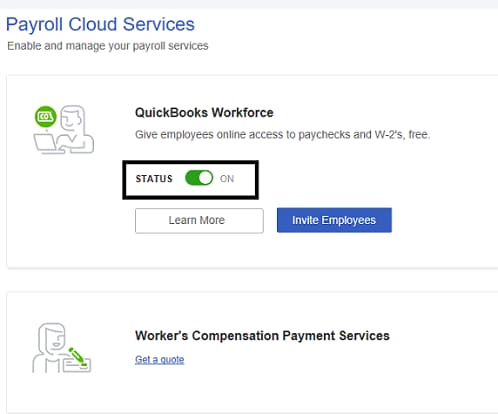
Set up your company file for QB Workforce Admin
- You must use QuickBooks Desktop, have the latest maintenance release and the latest payroll updates.
- In your QuickBooks Desktop company, select Employees, then Manage Payroll Cloud Services. If you don't see the Manage Payroll Cloud Services option, you don't have the latest QuickBooks Desktop release or the latest payroll updates.
- In the Payroll Cloud Services window, under QuickBooks Workforce toggle the status to ON.
- You'll get a prompt to create or confirm a PIN you use to send payroll data.
- Select Save Changes.
- Select Return To QuickBooks in the confirmation window.
- Next time you run payroll, upload your paycheck info to Intuit when you get the prompt.
Note: Before employees can sign in and access QuickBooks Workforce, you need to upload pay stubs. To upload paycheck info after every payroll:
- In your QuickBooks Desktop company file, create paychecks as you normally do.
- In addition to printing checks, make sure to select Send to Intuit on the Confirmation and Next Steps screen.
- On the Send/Receive Data window, select Send. When you get the prompt, enter your payroll service PIN.
- Tip: If you ever forget to select Send to Intuit after you create paychecks, you can always go to Employees then select Send Payroll Data.
- When you set up QuickBooks Workforce for the first time, you'll need to upload historical paychecks for your employees to view their pay stubs prior to setting up QuickBooks Workforce. Refer to QuickBooks Workforce: Upload historical paychecks.
If you're asked to confirm your account information with a code:
When you sign in to QuickBooks Workforce with your Intuit Account login, you may be need to confirm your account info with a confirmation code.
- Select how you would like to receive your code.
- Select Continue and we'll send you the code.
- If you don't have access to the email we list, select Confirm my account a different way to update email your email address.
- Don't leave the screen before you enter your confirmation code. Open another window if you need to.
- It might take a few minutes for the code to arrive in your mailbox. If you still don't see it, check your bulk/junk/spam mail folders. Enter your code and select Continue.
- If you didn't receive a code, select "Didn’t received a code".
- Once we verify your info, we'll automatically sign you in to QuickBooks Workforce.
Invite your employee
Step 1: Log in to your Intuit account in QuickBooks
If you’re already in your Intuit account in QuickBooks, move on to Step 2.
Note: Your Intuit account user ID is different from your company file user ID. Learn more about your Intuit account.
- From the Company menu, select My Company.
- Select Sign in on the top right corner.
- Log in with your Intuit User ID and password.
If you have trouble with your user ID, select I forgot my user ID or password.
Step 2: Send an invite
- From the Employees menu, select Manage Payroll Cloud Services.
Note: If you don’t see Manage Payroll Cloud Services, update your QuickBooks.
- Under QuickBooks Workforce, toggle the status to ON, then select Invite Employees.
- Your employee list will appear. Select the employees you need to give access to, then add their email addresses.
Note: If the invite page doesn’t load, make sure to turn on ActiveX controls in Internet Explorer.
- Select Send Invite. Once send the invite, you should see Invited under STATUS.
What’s next
Resend an invite
If your employee didn't get an email invite, follow the same steps above. Make sure their email address is correct, then select Send Invite again.
Remove employee access
While you can’t remove an employee's access to their own paychecks, you can turn off QuickBooks Workforce’s access to your QuickBooks Payroll. We don't recommend you do this because it affects all your employees. But it's there, just in case.
- From the Employees menu, select Manage Payroll Cloud Services.
- Under QuickBooks Workforce, toggle the status to OFF, then Save.
|
If you cancel your payroll or terminate an employee If you want to turn off employee access because you want to cancel your QuickBooks Payroll, you don't need to. Your employees won't have access to their paychecks, W-2's, and other employee info as soon as you cancel your payroll service. It's the same thing when you terminate employees. Either way, be sure to remind them beforehand to download or print any documents they need for their own records. |
Learn more
If you haven't given paycheck access to your employees before, here's more info you might find helpful.
If you remove or change an employee’s email
Once your employee accepts your invite and signs in to QuickBooks Workforce, they're good to go. If they need to make changes to their email in QuickBooks Desktop Payroll, it won't affect their account or access.
If you delete or have a negative paycheck
A negative check might display as a negative net amount, resulting in a net zero payroll.
Deleted or voided checks get removed from Workforce.
