- Mark as New
- Bookmark
- Subscribe
- Permalink
- Report Inappropriate Content
Turn on Enhanced Inventory Receiving (EIR)
In QuickBooks Desktop Enterprise, Enhanced Inventory Receiving or EIR separates Item Receipts from Bills and creates a new process for receiving and paying Items.
| Important: You can NOT turn off EIR once turned on. Create a backup of your company file before following the steps in this article. Run a test using a copy of your file and weigh if it works with your business process. If your company file is too big, consider condensing your file. |
Answer the following questions. If you answered "Yes" to any of these, EIR might be beneficial for your business.
- Do you receive one bill that covers multiple item receipts?
- Do you pay for items before you receive them and don't want your inventory quantities to increase?
- Do you receive multiple bills for one item receipt?
- Do you want to separate the receiving department (item receipts) from accounts payable (enter and pay bills)?
What happens when you turn on EIR?
- Bills do not increase Inventory Items and Bills created from Item Receipts no longer replace Item Receipts.
- Item Receipts no longer affect Accounts Payable unless you receive a Bill for an open Item Receipt.
- If you receive a Bill that has different costs compared with the connected Item Receipt, QuickBooks will change the item cost on the Item Receipt, even if the Item Receipt is in a closed period.
- QuickBooks Desktop recalculates inventory average cost every time a new Item Receipt is entered. These Item Receipts change the order of inventory transactions within each day and sometimes result to a small rounding error to the average cost.
- An Item Receipt is created for every Bill in your company file that included items, increasing the number of transactions.
- Third-party applications that affect inventory may not work as expected.
Restrictions when using EIR
- You cannot enter negative items in Item Receipts or Bills.
- You cannot enter expenses on an Item Receipt.
- If you create a Purchase Order for non-inventory Items, you must receive them with an Item Receipt to close the PO.
- You can no longer mark items as "Billable" on Item Receipts.
Accounting behind EIR
Inventory Offset Account is a liability account created by QuickBooks Desktop when you turn on EIR. When Bills and Item Receipts are entered, the amount for these transactions are cleared from the Offset account.
QuickBooks Desktop creates the following Journal Entry when you enter an Item Receipt:
| Item Receipt | ||
| Debit | Inventory Asset Account | |
| Credit | Inventory Offset Account | |
QuickBooks Desktop creates the following Journal Entry when you enter a Bill:
| Bill | ||
| Debit | Inventory Offset Account | |
| Credit | Accounts Payable | |
Because of the way QuickBooks Desktop creates these transactions after you turn on EIR, common reports may not look the way they used to.
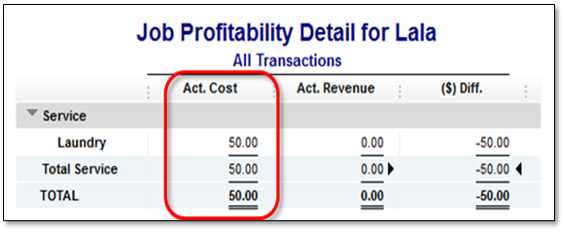
Example: Act. Cost shows 0.00 in Job Profitability Detail report in a company file after turning EIR on.
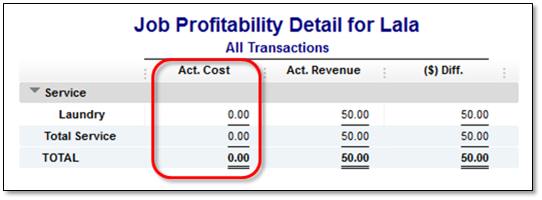
With EIR turned on, the item used in creating bills is associated with Inventory Offset Account (Type: Other Current Liability) instead of the account that you used when you set up the item (Expense or Income Account). The default filter of Job Profitability Detail report is Account: All income/expense and Name: . Thus, adding or changing the Filter “Account” to Inventory Offset Account gives the right amount for Act. Cost column.
How to enable EIR
- From the Edit menu, choose Preferences and select Items & Inventory.
- Go to the Company Preferences tab and select Enable under "Enhanced Inventory Receiving" section.
- Review the warning message and select Continue, then OK.

- You will be prompted to back up your company file.
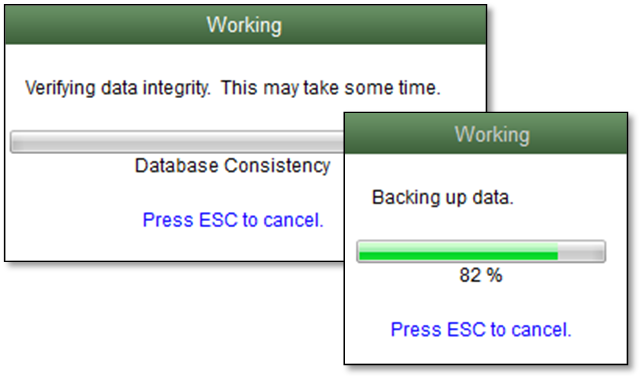
- Depending on the size of your company file, it may take a while to complete this process.

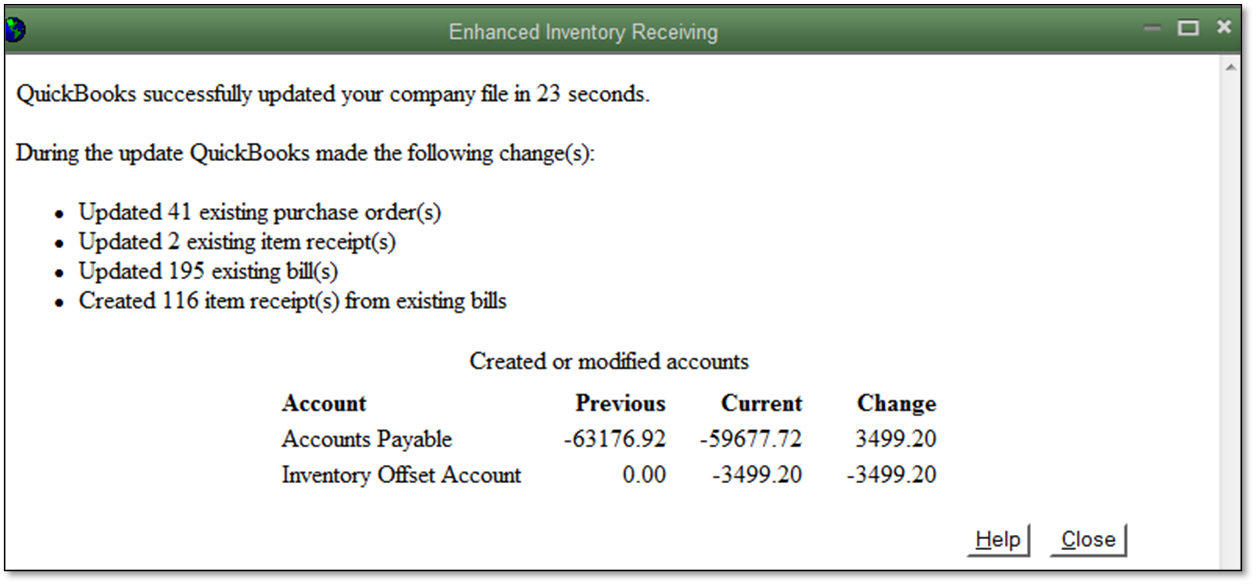
- When finished, QuickBooks Desktop will provide a summary of changes that happened during this process.
New process for receiving and paying for items
There are two ways to receive and pay inventory when EIR is off.
- Single Transaction: Enter a bill that also increases your inventory on hand.
- Two Transactions: Enter an item receipt to increase your inventory and record a bill against the item receipt.
After turning EIR on, you have to record two transactions in any order:
- An Item Receipt to increase inventory on hand.
- A Bill to pay for the Items. Take note that Item Receipts no longer affect your Accounts Payable after turning EIR on. You have to enter a Bill against an open Item Receipt to see the correct value of your Accounts Payable.
| Reminder: This process only applies to Bills. You can still increase your inventory quantities and pay for items in one step using Checks and Credit Card. |
