- Mark as New
- Bookmark
- Subscribe
- Permalink
- Report Inappropriate Content
Record your total daily sales in QuickBooks Online
Find out how to record your total daily sales in QuickBooks Online using a single sales receipt.
You can enter a single sales receipt to report the total daily sales in QuickBooks if you use a separate Point of Sale system. Or if you simply don't invoice customers. This saves you time, while still keeping your income reports accurate.
Here's a step-by-step guide to help you get you started.
Step 1: Create a customer for daily sales
You'll only use this customer account on your "end of day" sales receipt.
- Go to Get paid & pay and select Customers (Take me there).
- Select New customer.
- In the Display name as field enter "Daily Sales".
- Select Save.
Step 2: Set up accounts for daily sales
Make sure your Daily Sales accounts are set upright. Doing so can help you a lot with accurate income reporting.
To set up daily sales accounts:
- Go to Settings ⚙ and select Chart of Accounts.
- Select New at the top right.
- Set up these accounts:
| Name | Category Type / Account Type | Detail Type | Description |
|---|---|---|---|
| Daily Sales Income | Income | Other Primary Income / Sales of Product Income | For tracking daily sales |
| Clearing account | Cash and cash equivalents | Bank / Cash on hand | Zero balance account for daily sales |
| Overage and Underage Expense | Other expense | Other expense | For drawer shortages |
- Select Save and close or Save and new.
Step 3: Set up items for daily sales
Set up a "Daily Sales" category to keep your items organised:
- Go to Settings ⚙ and select All Lists.
- Select Product Categories.
- Select New Category at the top right.
- Name the new category "Daily Sales".
- Select Save.
After setting up the Category, next are the items:
- Go to Settings ⚙ and select Products and Services.
- Select New at the top right.
- Set up these items. Note: Make sure to select Daily Sales as Category for each item.
| Name | Income Account | Description (will appear on forms) |
| Daily Sales Income | Daily Sales Income | Daily Sales Income |
| Overage/underage | Overage/Underage Expense | Overage/Underage |
| Cheque | Cheque | Cheque |
| Visa/MasterCard | Undeposited Funds | Visa/MasterCard |
| American Express | Undeposited Funds | American Express |
| Cash | Undeposited Funds | Cash |
| Discover | Undeposited Funds | Discover |
- Select Save and close or Save and new.
Step 4: Create a daily sales template
You'll use this template every time you need to record total daily sales.
- Go to Settings ⚙ and select Recurring Transactions.
- Select New at the top right.
- From the Transaction Type dropdown, choose Sales Receipt.
- Name your template "Daily Sales" and make sure the Type is Unscheduled.
- Select Daily Sales as the Customer.
- Select these items in the Product/Service column:
- Daily Sales: Daily Sales Income
- Daily Sales: Cash
- Daily Sales: Cheque
- Daily Sales: Visa/Mastercard
- Daily Sales: American Express
- Daily Sales: Overage/Underage
- Daily Sales: Discover
- Select Save template.
Remember
- Mark the "Daily Sales Income" item taxable if you collect sales tax.
- Make sure your sales tax rate is correct.
Step 5: Record your total daily sales
Done setting up your sales receipt template? You're now ready to record your "end of day" sales.
- Go to Settings ⚙ and select Recurring Transactions.
- Find your template, then select Use from the Action dropdown.
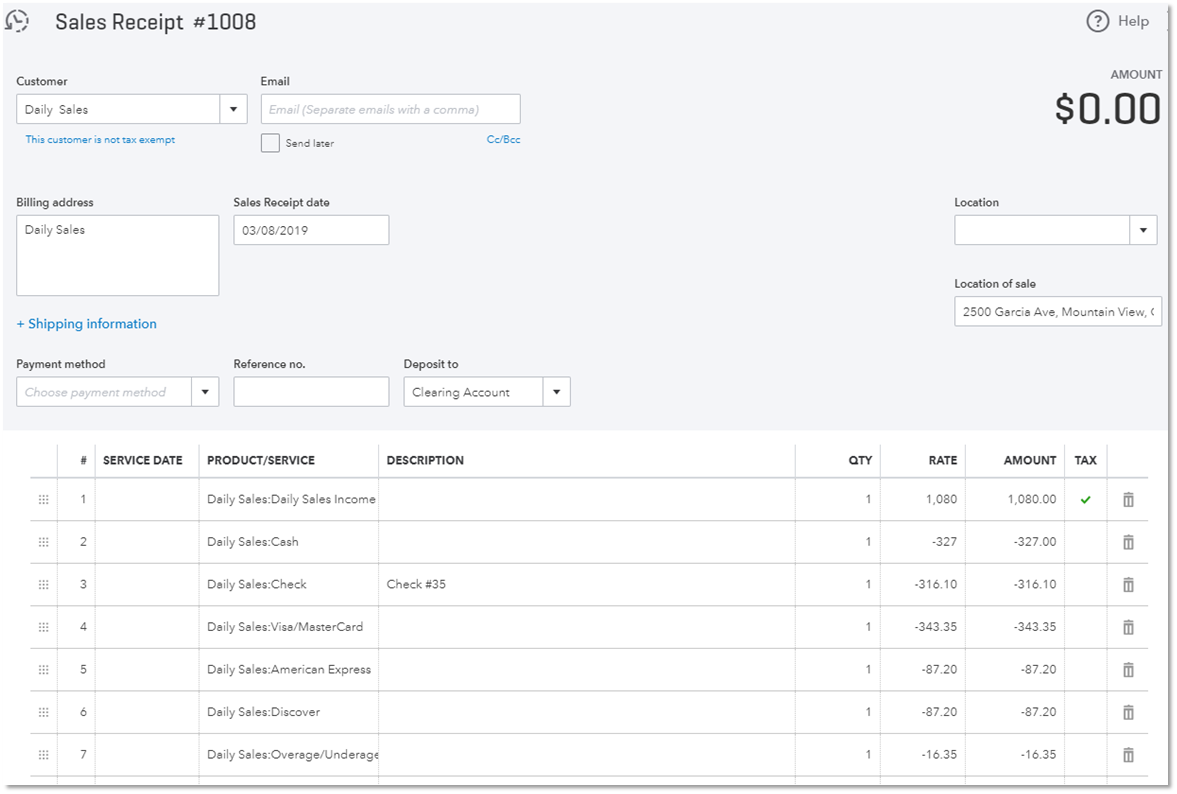
- To better illustrate how your sales receipt should look like, check out a sample breakdown of total daily sales below.
Total end of day sales example:
- You have $1177.20 in total reported sales ($1080 sales income, plus $97.20 sales tax/GST).
- Your cash register count is $327.
- The total of cheque payments is $316.10.
- Sales through Visa/Mastercard is $343.35.
- Sales through Amex is $87.20.
- You have a cash shortage of $16.35.
- Sales through Discover is $87.20.
How your "end of day" sales receipt should look like
Step 6: Deposit your total daily sales
Record the actual amount of funds deposited to the bank. This step is important for making sure your deposits match what's shown on your bank statement.
Keep in mind
- Record the deposit for Visa, AMEX, or Mastercard as soon as you receive the funds from your merchant service provider.
- Also, record a bank deposit as soon as you deposit cheque payments.
To record the deposit:
- Go to New and select Bank Deposit.
- Select the bank account from the Account dropdown.
- In the Date field, enter the deposit date.
- Select the group of payments included in the deposit.
- Select Save.
See this sample deposit.

