- Mark as New
- Bookmark
- Subscribe
- Permalink
- Report Inappropriate Content
Move from QuickBooks Desktop for Mac to QuickBooks Online
Learn how to move your QuickBooks Desktop for Mac file to QuickBooks Online.
No need to start over again. Just move your QuickBooks Desktop for Mac file to a QuickBooks Online company. We'll show you how.
Note: You can only move QuickBooks Desktop for Mac files to the US version of QuickBooks Online.
Step 1: Get your file ready to move
Here are steps to make sure your data is ready to move to QuickBooks Online.
- Sign in to your QuickBooks Desktop file as the admin.
- Select QuickBooks then choose Check for QuickBooks Updates.
- If your version is older than 2016, you can download and install a free trial to upgrade your data.
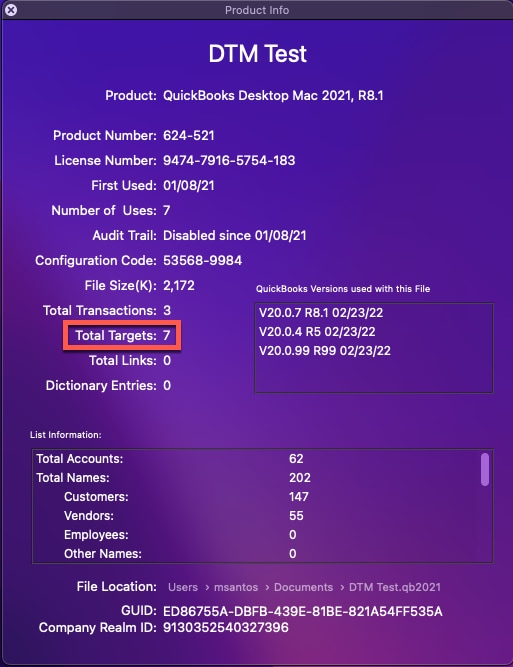
- Use Command + 1 on your keyboard to see the number of targets in your file.

- If your company data more than 350,000 targets, you will need to condense your file.
- Accept any downloaded transactions and complete any bank reconciliations.
Step 2: Move your data to QuickBooks Online
Note: Make sure payroll isn't turned on in QuickBooks Online. If it's turned on, you'll need to create a new QuickBooks Online company to move your data.
- Sign in to your QuickBooks Desktop file as the admin.
- Select File, Export and then choose To QuickBooks Online.
- Select Get Started.
- Select Select Destination.
- Sign in to your QuickBooks Online account as the admin.
- If you don't have a QuickBooks Online account, no problem. You can open your browser and create a new account. Then return to QuickBooks and continue with Step 3 to move your data.
- Select the QuickBooks Online company to move your data to, then select Continue.
- Your QuickBooks Desktop data will replace any data already entered in QuickBooks Online.
- Select OK, got it. QuickBooks moves your data.
After you move your data to QuickBooks Online
- You’ll receive an email confirmation once the move is done.
- Confirmation can take up to 24 hours.
- Check out the Learn how features and data move from QuickBooks Desktop to QuickBooks Online to learn how to make sure your data moves successfully.
