- Mark as New
- Bookmark
- Subscribe
- Permalink
- Report Inappropriate Content
Reports and accounting
Thank you for the information, @pradervr, and congratulations on making the move from paper only to QuickBooks. I'll be sure to keep that in mind going forward. What I recommend doing from here is entering your customers, so when you select them on the invoice, it will automatically populate the "bill to" field with their information from the Customer Center. Here's how:
Entering Customers:
- Go to Customers across the top.
- Click Customer Center.
- From there, select the New Customer & Job drop-down in the upper left-hand corner, and click New Customer.
- Enter in all of the information you'd like to see for this customer in QuickBooks.
- Click OK once you're finished.
Note: you will see this customer's name appear on the list to the left of the Customer Center.
Because you're new to QuickBooks, I imagine you will need to enter vendors at some point. You can follow these same steps for entering vendors under the Vendor tab across the top. Also, since you mentioned adding the field to the custom invoice by going into the template, I want to give you some information on custom fields and customizing forms.
There are many ways that you can benefit from custom fields in QuickBooks, such as:
- Custom fields give you the flexibility to add specific information to your customer, vendor, and employee list.
- It helps you add and track additional data about Items.
- The customized information can be included in your forms and reports.
For more information on custom fields, see: Use QuickBooks Desktop custom fields. As for customizing the forms themselves, as I'm sure you noticed, there are a multitude of customization options for you to choose which will help your forms to really stand out. Here are some basics about customizing form templates:
Basic customization:
The basic customization window serves as a good starting point for customizing your templates. There are two ways to access it:
- From QuickBooks Lists menu, select Templates and double-click the template you want to customize.
- In the transaction form, go to the Formatting tab and select Manage Templates.
Bellow is a breakdown of the basic customization screen:
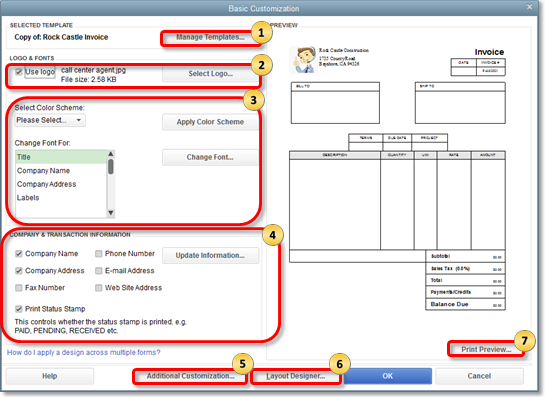
1.) Manage Templates: When you select this button, you’ll get to the screen where you can view the list of templates for a specific form. Here you can Copy, Delete or Download Templates. If you need to rename your template so you can easily distinguish and use it, you can also do that task on this window.
2.) Add your logo: Select the box Use logo if you want your company logo to appear on your invoices and other forms. If you have not previously used a logo, a window opens where you can select a logo. If you have been using a logo and want to change it, choose the Select Logo button to select the image you want to use.
3.) Change fonts and colors: This section allows you to personalize fonts and colors for certain details (Company Name, Labels, Data, etc.) used in the form.
4.) In the Company & Transaction Information area, you can select the contact information you want to appear on the invoice. You can also change any of this information by clicking Update Information. When you add information, you need to select Layout Designer to move the information where you want is displayed.
5.) Additional Customization: Select this button to get to the screen where you can remove/add information on the header, columns, and footer of the form as they appear on your screen and the printed copy. Select the Screen checkbox if you want to see the field on your computer screen while filling out the form in QuickBooks and select the Print checkbox if you want the field to appear on the printed form. Note that you can assign a unique title for each header, column or footer. You can also set printing options (Print orientation, etc…) by going to the Print tab.
6.) Layout Designer: You need to go to the Layout designer especially if you opt to add or remove header/columns from the template. The layout designer allows you to move and resize items and information on your template.
7.)Print Preview: The right side of the screen gives you a quick preview of the template and the changes you have made thus far. When you choose the Print Preview button, you’ll see how your form will look like once printed.
For more information and tips on how to customize templates, see: Use and customize form templates. And, to ensure you have everything you need for getting familiar with the Desktop version, take a look at this link here. This will take you to a resource center which outlines important topics form installing, to after you install, and if you run into issues early on.
By entering your customers into QuickBooks this way, you are ensuring that the "bill to" field will populate and print properly. Should you have additional questions about this, or anything else QuickBooks, feel free to reach back out to me. I'm always here to help.
