Learn how to use QuickBooks Online Advanced Payroll rostering system to manage employee shifts.
How to create a shift
- Navigate to the Rostering screen by selecting Employees, then the Manage Employees dropdown and selecting Rostering.
- Find the employee you want to create the shift for and select the blank panel for the day you want to create the shift for. A panel will open up on the right side of the screen to edit the shift details.
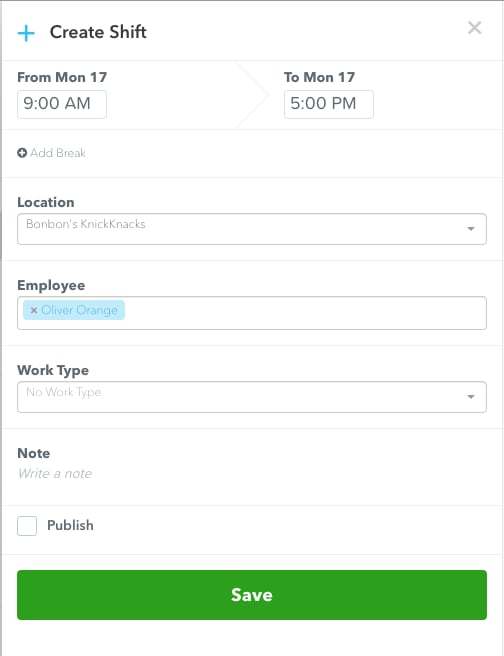
- From the shift editor you can select the following details for the shift:
- Start time
- End time
- Shift breaks (optional)
- Location
- Employee (optional)
- Qualifications (optional. Will only show if qualifications have been setup for the business)
- Work Type (optional. Will only show if work types have been setup for the business)
- Classification (optional. Will only show if the employee is attached to an employee agreement which allows selection of higher classification)
- Notes (optional)
- Publish - if you tick the "publish" option, a notification will be sent to the employee(s) associated with the shift once the shift is saved.
- Select Save once done.
Note: You can create a shift for multiple employees by selecting more than one employee in the "employee" field from the shift edit panel. When you save the shift, a new shift will be created for each of the selected employees.
How to edit a shift
- From the Rostering screen, select the shift you want to edit from the roster grid.
- A panel will open on the right side of the screen to allow you to make any changes.
- If you want to move a shift to another employee or another time, you can alternatively drag the shift to the employee or time you prefer. The shift will be updated with this new information.
Note: You can only edit shifts that are "unpublished". You cannot edit published shifts.
How to copy a shift
- From the Rostering screen, hold down the Shift button on your keyboard.
- Drag the employee shift tile from the original day to the day you would like it to be copied to.
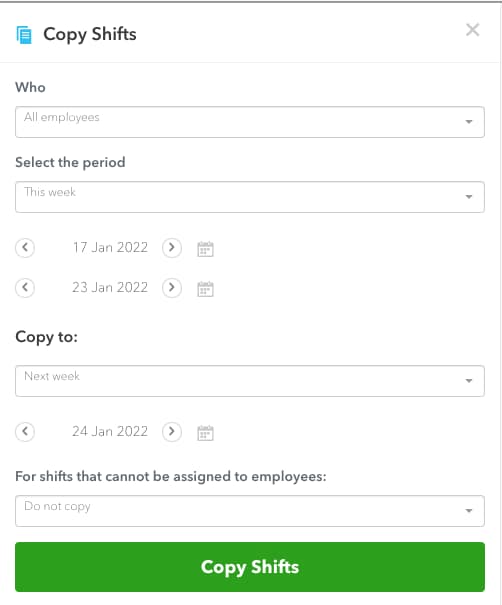
- To copy multiple shifts at the same time, select Roster actions on the top left of the Rostering screen, then select Copy shifts.This will open up a panel on the right to select the shift period you want to copy and for which employees.
How to publish a shift
- From the Rostering screen, select the shift you would like to publish.
- The panel on the right side of the screen will open. Tick the Publish box at the bottom of the panel.
- Select Save.
- To publish shifts in bulk, select the Publish XX shifts button on the top left corner of the Rostering screen. Then, select Publish.
Once you have done this:
- The shift/s will be published and the orange circle will change to blue on the employee roster.
- An email is sent to the employee letting them know that they have been assigned a new shift.
- The shift becomes visible in the employee roster.
- The shift is made read-only in the shift dialog.
How to unpublish a shift
- From the Rostering screen, select the shift you would like to unpublish.
- The panel on the right side of the screen will open. Select the Save button as this will update it and make the shift status “unpublished”.
- To unpublish shifts in bulk, select the Unpublish XX shifts button on the top left corner of the Rostering screen. Then, select Unpublish.
Once you have done this:
- The shifts will no longer be visible to employees in the employee portal.
- The blue circle will change to orange in the employee roster.
- A notification is sent to employees letting them know that they are no longer required to work the previously scheduled shifts.
- The shift is no longer visible in the employee roster.
- The shift can be edited in the shift dialog.
How to delete a shift
- Select the shift you want to delete and unpublish it if it hasn’t been already.
- Select the Delete this shift link next to the Publish box.
- Select Delete.
- To delete shifts in bulk, select the Delete XX shifts button on the top left corner of the Rostering screen. Then, select Delete.
Note: If you want to delete certain shifts and not others, select the Filter icon to filter unpublished shifts by employee or location, then delete in bulk. The Delete XX shifts button will delete any unpublished shifts that show up in the filtered roster view.