ProFile automatically selects the forms that will print. Users can define a different selection of forms for each print job.
Note: Ensure the file is unlocked prior to printing.
1. Select Form Selection from the Options drop-down menu.
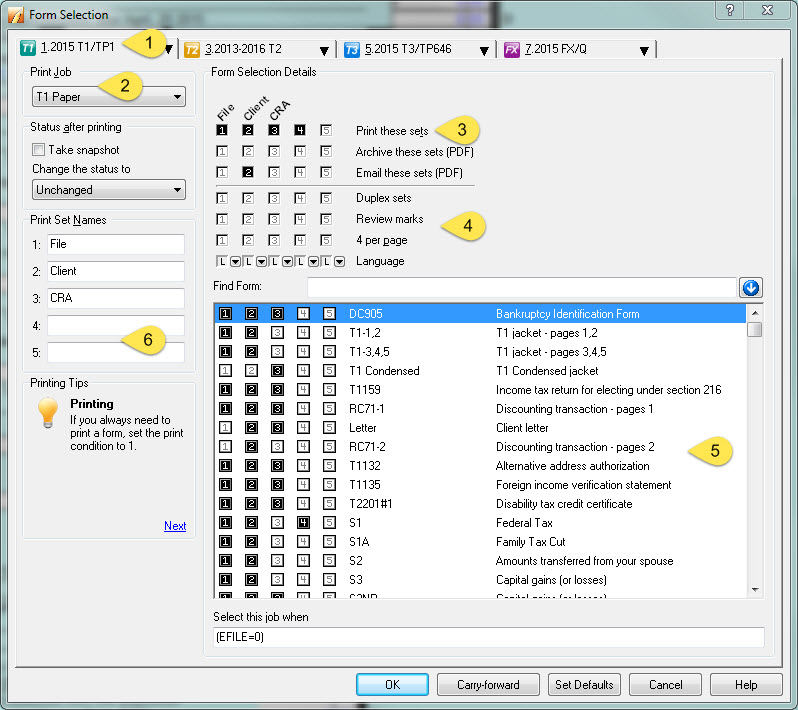
2. Select a module tab.
3. Select one of the pre-defined print jobs from the Print Job drop-down list.
4. Under Form Selection Details, select how many copies (sets) of files to print, archive, or email.
A print job can include up to 5 sets of forms. The first 3 boxes apply to:
- Your files (box 1),
- The client (box 2), and
- The CRA (box 3).
5. Use boxes 4 and 5 for any extra sets to print. To select a print set, select the box. To clear a set, deselect the box.
6. The rows at the top determine the formatting of the forms included in the box below. For ProFile T2, you can create an RSI/Barcode form set. All modules include an alternate language option.
7. After choosing the number of copies to print, select other formatting options, including:
- Duplex sets
- Review marks
- 4 per page
- Alternate language printing
8. In the box at the bottom of the window, select the forms to print and the number of copies of each.
9. Name the print sets in the Print Set Names area. You can create different names for each of the five sets.
10. Select which forms to print based on their set. For example, for ProFile T1, you may want to include the Keying Summary in the CRA set, but not in the set for your client or your office.
11. Change the list as required. You can change the list in two ways:
- With the mouse, manually change the list by clicking on numbered form boxes.
- With the keyboard, use the arrow keys to highlight a form name and press numbers 1 through 5 to select or clear the form selection checkbox.
Note: ProFile does not automatically select forms to print. Always ensure that each print job reflects all the forms to print in a client file. If a particular form has no checkmark in any of the active set columns, it will not print.
The print sequence can be re-organized for the listed forms. Depending on preference, the form sequence may differ for each of the print jobs you use, simply click and drag the forms into the desired order.
12. ProFile selects a print job when a client data file meets the job condition. A condition is generally a comparison that uses a field code or alias to represent data from the client files.
13. The form list includes all the forms available in the selected print job. In each of the active Print set columns, select or remove the forms to customize each set.
14. Modify the print condition if you want ProFile to select the print job based on different client data.
15. To print jobs for all clients, enter 1 in the Select this job when field. For print jobs that you never use, enter a 0. You can also use 1 and 0 to arrange print jobs in the Print condition field in the Template Editor window.
Note: Ensure that you understand how conditions work before you alter a default print job condition. Your change could cause ProFile to miss selecting a print job that is required for filing.
If a particular client file requires a different combination of forms, you can override your usual form selection. Select the Print option under the File drop-down menu in the top toolbar. If you want to keep these selections, ProFile remembers them if you select the Keep selections checkbox.
Note: Remember to save the Options Package if applicable.