Verify that an invoice was emailed and read by recipient
by Intuit•2• Updated 1 year ago
Wondering if your invoice was sent and if your customer already received and read it? QuickBooks Desktop lets you quickly track invoice status so you stay on top of your receivables. Here’s how!
Track Invoice status in QuickBooks 2019
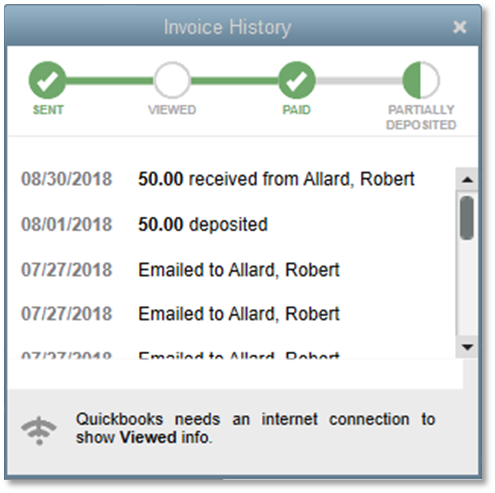
QuickBooks 2019 allows easier tracking of the Invoice status/history. Simply open the appropriate invoice and select See History link. The Invoice History window will pop up and show a status flow:

- Sent: Your invoice was sent using one of the email options in QuickBooks.
- Viewed: Your customer already received and opened the email. Note that you would only see this status if you are connected to the internet. Also, this may not appear if the customer’s email doesn't auto-allow image downloads.
- Paid: You entered a payment for Invoice in QuickBooks. The history displays partial and full payments.
- Deposited: You record a payment deposit in QuickBooks.
Manually track invoice status
All versions of QuickBooks allow you to check if your invoice(s) was sent and depending on your email program, you can also enable deliver/read receipts to see if your customer already received it.
Verify if the invoice was sent
Start by ensuring you have the correct email address for your customer:
- From the Customers menu, select Customer Centre.
- In the Customer Centre, double-click the customer name to open the Edit Customer window.
- Go to the Address Info tab then verify if the email address for the customer is accurate and formatted correctly.
If you’re sure the email address is correct, check to see if the invoice(s) is sent by following these steps:
For a specific invoice
- Open the invoice.
- From the invoice toolbar, go to the Reports tab, then select Transaction History.
- Under Invoice Information, check Sent Date and Send Method.
- If there's no status, the invoice may have been tagged for Email Later. Go to the QuickBooks File menu, then select Send Forms to see if there are invoices in the email queue.
- Select any or all that you need to send, then select Send Now.
For multiple invoices
To view the history for multiple invoices, enable the necessary preferences.
- From the Edit menu, select Preferences.
- On the left pane, choose Send Forms, then go to the My Preferences tab.
- On the Send e-mail using section, check to see if you are sending forms via Web Mail, Outlook, or QuickBooks email (a subscription-based service).If you are sending emails through the QuickBooks email:
- Go to the Company Preferences tab.
- Type your own email address in the BCC: (Blind Carbon Copy) field to send a copy of any form you email to you as well as the other recipient(s).
- If you get the copy and the recipient's email address of record is correct, this indicates that the email has been sent from QuickBooks.
If you are using Outlook or Webmail:
- A copy of any sent mail should be in your Sent folder.
- Except for verifying that you have the correct email address for your customer to ensure that they can receive the email, there is no need to perform any other steps.
Important: The Sent Email tab added in the Customer Information lets you see a history of the transactions you have successfully emailed to a customer from within QuickBooks using QuickBooks email or Web Mail. Always check with your customers and ensure that emailed invoices are not being routed to their Spam or Junk Mail folder inadvertently.
Check if the emailed invoice was viewed/read by the customer
Some email programs have an option for read receipts. If you use Microsoft Outlook, Outlook Express, or another email program supported by QuickBooks Desktop, you can enable your email program's read receipt option.
- Select the Email button at the top of the invoice.
- In your program's email window, you can use the Options to create a Delivery and Read Receipt option.
If you use webmail or another email program, verify if it supports read receipts and enable that option.
More like this
- Email a sales form or report to multiple email addressesby QuickBooks
- Fix undelivered invoicesby QuickBooks
- Email sales forms, invoices, and statements in QuickBooks Desktopby QuickBooks
- What’s new in QuickBooks Desktop 2024by QuickBooks