 QuickBooksHelpIntuit
Use Workpapers to map and export your clients’ tax info
by Intuit•6• Updated 3 weeks ago
Learn how to use Workpapers to review, adjust, map, and export your client’s QuickBooks Online accounts to get ready for tax season.
Workpapers is a tool in QuickBooks Online Accountant lets you review a client’s accounts from a single dashboard. It's very similar to a trial balance. You can use it for any clients who use QuickBooks Online. After you review your client's accounts, Workpapers automatically export accounts to the proper lines on tax forms. You can export the mapped GIFI forms to Pro Tax (or as a .GFI file for other tax products) to get a headstart on your clients' tax returns.
In this article, you'll learn how to:
- Open Workpapers
- Review your client’s accounts
- Make adjusting journal entries
- Map accounts to tax forms
- Export the mapped tax forms
Step 1: Open Workpapers
Each client has their own dedicated Workpapers page.
If you're using Intuit Accountant Suite:
- Go to Firm Books
 , select Business Tax, then select Workpapers (Take me there).
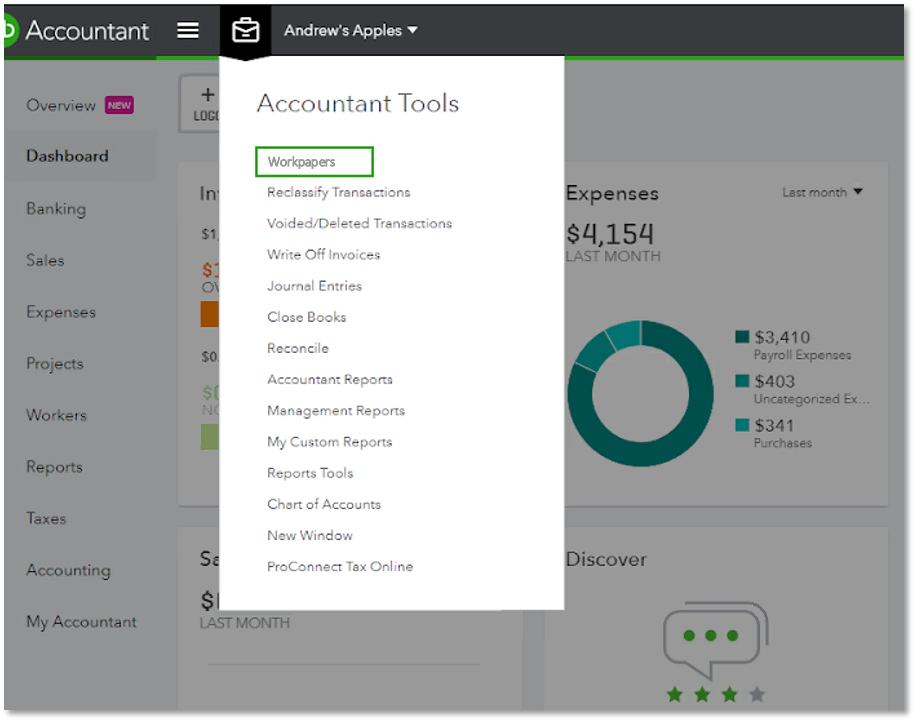
If you're using QuickBooks Online Accountant:
- Select
 Accountant tools and select Workpapers.
Step 2: Review your client’s accounts
Start your work in the Review & adjust tab. Your client’s annual Balance sheet and Profit and loss reports are in separate sections so you can make quick comparisons. You’ll also see last year’s totals, account differences, and any adjusting entries you’ve made.
To dive into a specific account:
- Expand the list of accounts.
- Select the account total from the column for the current year.
- Review the transactions in the account.
Step 3: Make adjusting journal entries
Workpapers makes it easy to record adjusting journal entries if needed. These lets you adjust transaction totals without changing the original record. To make an adjusting journal entry while you're on the Review & adjust tab:
- Expand the list of accounts.
- Find the account you want to adjust.
- Select Make adjustment from the Actions column. It will open the Journal Entry page.
- On the first row, select an account from the Account ▼ dropdown if the account does not appear automatically.
- Enter the amount in either the Debits or Credits column.
- In the next row, select the other account you're moving money between.
- Enter the same amount in the opposite column to balance the debits and credits.
Note: The system may enter the same amount in the opposite column on the other row. - Select Save and close.
You can attach notes and documents to keep track of work on individual accounts as needed:
- Select the ▼ dropdown from the Actions column.
- Select Add attachment or Add note.
- If you select Add attachment, then select Upload. Upload the document you want.
- If you select Add note, enter the appropriate note, then select Save.
Enhance your review
Change the accounting method view
You can switch between accounting method views to make your review easier. This won’t affect your client’s settings or view in QuickBooks Online.
- Select the edit icon
 next to the date.
 - Select Cash basis or Accrual basis.
- Select Save.
Review the Change List
The change list in the Review & adjust tab acts as an audit log. Every time someone makes a change in Workpapers, it appears on this list.
To approve these changes so QuickBooks applies them, select Accept all transactions.
Step 4: Map accounts to tax forms
After reviewing your client’s accounts, you’ll assign them to specific lines on tax forms.
- Go to the Tax mapping tab.
- From the Select a tax form ▼ dropdown, select the appropriate tax form for your client.
| Important: Edits don’t carry over to different forms. If you change forms in the middle of mapping accounts, you’ll need to make edits again on the new form. |
Workpapers automatically assigns most accounts to tax lines. Any unassigned accounts appear in the We found unmapped accounts section. Select Assign tax line from the Action column and select the correct tax line from the To ▼ dropdown. Then select Save.
Review each tax line. If you need to reassign an account to a different tax line:
- Find the account on the tax form.
- Select the edit icon to make changes.
Note: If the edit icon does not appear, then select the account on the tax form. - Select the correct tax line from the To ▼ dropdown.
- Select Save.
Step 5: Export the mapped tax forms
When you’re ready, you can import this data directly into Pro Tax.
- Go to Work , select Pro Tax, then select T2 - Corporate.
Note: If you are using QuickBooks Online Accountant, go to Pro Tax and select T2 - Corporate. - Select Trial a return.
Note: If you are creating T2 - Corporate Pro Tax for the first time, select Get started with Pro Tax. - Select client form the Client ▼ dropdown.
- Check and update the dates in the Year start and Year end fields.
- Check and update the return name in the Return name.
- QuickBooks will pull in your mapped GIFI data from Workpapers.
- Select Continue.
Pro Tax fills in form fields using your work. Check that everything exported correctly and complete your client’s return in Pro Tax.
Download a GFI for other tax preparation software
- Go to Clients
 and select Client list (Take me there).
Note: If you are using QuickBooks Online Accountant, select Clients. - Select the QuickBooks icon
 next to the client name to open the client company.
 - Go to All apps , select Accounting, then select Income tax.
- Select the Books to tax actions ▼ dropdown, then select Export GIFI file.
- Select the folder where you want to save your file, then select Save.
Download a CSV for other tax preparation software
When you're ready to export, download a CSV.
- Select the export icon
 from the Tax mapping list.
Tip: Export CSV is available when you change the form name to T2125. - Select the folder where you want to save your file, then select Save.
More like this
- Workpapers GIFI mappingby QuickBooks
- Accountant T2 Pro Tax corporate returns in QuickBooks Online Accountantby QuickBooks
- How to file a return in Pro Taxby QuickBooks
- Sales Tax overviewby QuickBooks