Before printing mailing labels, the labels have to be set up, as well as the contents of each label. ProFile includes a default mailing label template. Depending on the size of the labels, the layout of this template may need to be changed.
Change the template layout
- Go to the File menu and select Setup Mailing Labels.
- Select a module tab.
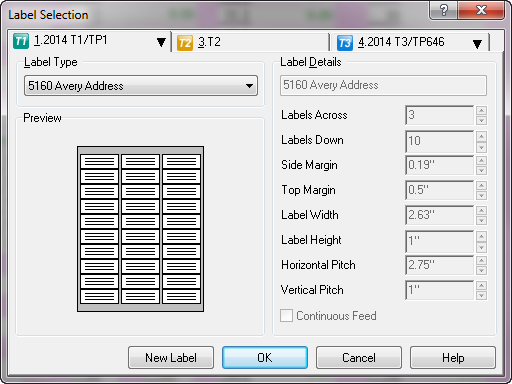
- Choose from the drop-down list of more than 200 types of Avery mailing label formats.
The Label Type name corresponds to the names printed on the Avery boxes. ProFile displays a preview of the label sheet. By default, ProFile uses the template embedded in the module.
- To customize the label setup, go to the Label Type list and select User Label 1. The label can be modified, including its name, in the Label Details fields. New labels can also be customized at the bottom of the dialogue box by clicking on the New Label button.
The Preview area shows a preview of the label layout.
The Mailing Label template defines the contents of each label. The template is a word processor document that allows Merge Field codes to be entered. These codes match field codes in the client file, enabling the mailing label content to flow directly from the ProFile forms.
A label template is like any other ProFile template. The file can be edited in the word processor. Add or remove field codes, or reduce the size by combining field codes on a single line. The font formatting on the template can also be changed. For example, the client name can be made to appear in bold and offset from the other lines.
- If none of the mailing label formats is a close match to the labels being used, new mailing label sets may have to be defined. Click New Label and then modify the label specifications on the right.
- Try printing a few mailing labels to make sure the setup is correct. If the text does not fit on the label or one line prints over another, the contents of the label template will have to be edited.
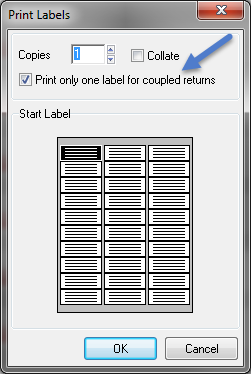
Print only one spouse's name on a mailing label
Before ProFile prints the mailing label, the software will give a prompt to select the start of the printing form. On this window, the option to print the spouses' labels can be selected.
Print mailing labels from Client Explorer
- Set up the mailing labels.
- Load a sheet of labels into the printer.
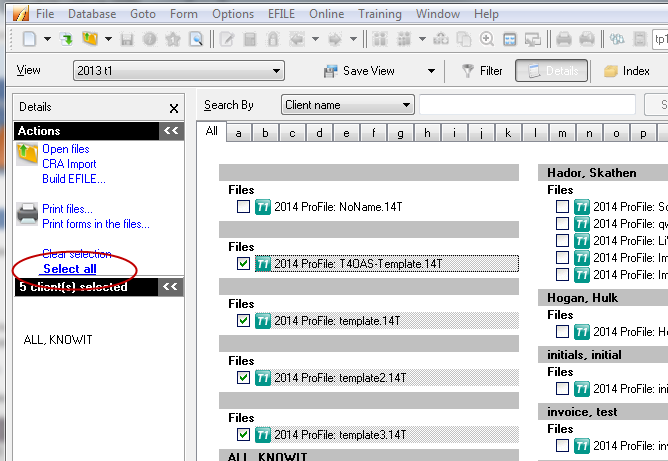
- Open the Client Explorer.
- Use filters to narrow down the list of client files to be printed to the mailing labels.
When printing a set of multiple labels at once, the files must be of the same module and come from the same taxation year. For example, only group of 2013 T1/TP1 files, or a group of 2014 T1/TP1 files can be selected, but not both.
Tip: When printing labels for ProFile T1/TP1 returns, consider hiding spousal returns. To do so, display the filters by clicking the Filter button, select the T1 tab at the bottom, then clear the Show Spouse In List checkbox. Since a joint mailing label is addressed to both spouses, there is no need to print two copies.
- Select the clients to be printed on the mailing labels.
To select multiple clients, hold CTRL as each client is clicked. To select all of the displayed clients, go to the Database menu and click Select All.
- Go to the Database menu and click Print Mailing Labels.
- Choose the position of the starting label by selecting it with the mouse. A starting position is not needed to be selected if a full sheet of labels is being printed.
- Click OK.
Print mailing labels from Classic Database
- Set up the mailing labels.
- Go to the File menu and select Print Mailing Labels. A standard Classic Database window appears.
Tip: When printing labels for ProFile T1/TP1 returns, consider hiding spousal returns. To do so, click the Other tab, then clear the Show spouse in list checkbox. Since a joint mailing label is addressed to both spouses, there is no need to print two copies.
- Select the clients to be printed on the mailing labels. The list can be navigated through with the keyboard with the Up Arrow and Down Arrow keys.
- Press Space to toggle the highlighted client.
- To select all clients, click Show All, then click Select All.
- Click Print Labels.
- Choose the position of the starting label by selecting it with the mouse. A starting position is not needed to be selected if a full sheet of labels is being printed.
- Click OK.