A file (or files) properties is set to read-only format. This prevents changes from being saved and taking effect.
This issue can be caused by several factors, including, but not limited to:
- When transferred from a CD-ROM, file properties may default to read-only status
- A previous user may have applied the read-only status to the file(s) and saved them
Resolution
- Select Open... from the File drop-down menu in the top toolbar.
- Select the file(s) that are in read-only format.
- Right-click on the selected files and select the Properties option from the menu. The Properties window displays.
- Deselect the checkmark in the Read-only box under the Attributes section of the window.
- Click the Apply button.
- Click the OK button.
If the Read-only checkbox is not checked, or if the steps above do not resolve the situation:
- Select Open... from the File drop-down menu in the top toolbar.
- Select the module and year tab of the file that is in Read-only format (for example 2018 T1).
- Ensure the Open as read-only button is not selected in the window.
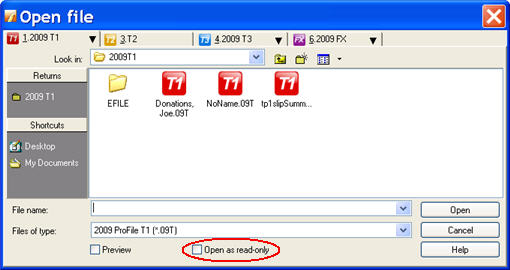
If the Open as read-only checkbox is selected, there are two options:
- Option 1: Remove the checkmark that appears in the Open as read-only checkbox and close the file. However, all changes made to the file since it was opened in read-only format will be lost.
- Option 2: Copy the data from the Read-only file to a new file. This option is best if significant changes were made to the file that need to be retained.
Follow these steps for Option 2:
- Remove the checkmark from the Open as read-only checkbox.
- Select New fromthe File drop-down menu in the top toolbar. This creates a new file. Keep the read-only file open.
- Select Tile Horizontally under Window. You will be able to see both files on screen.
- Click on the Info form of the read-only file and select Edit > Copy form.
- Click on the Info form of the new file and select Paste form under the Edit menu.
- Repeat the last two steps for every form used in your file.
Note: Do not copy the T1and TP1 jackets, but rather the forms that feed into them.
For a complete list of forms that are used in the file, open the Form Explorer by pressing F4 and clicking Used in the forms list.
The message you were getting will no longer appear for files that you create or open from this point on.