Accessing the New T2 Print Interface
1. Ensure you are using release 2017.4.7 or later (read our support article on how to update ProFile).
2. Open the existing T2 return.
3. Select the “Print Setup” option from the “File” dropdown menu in the top toolbar.
The “Print Setup” menu displays:
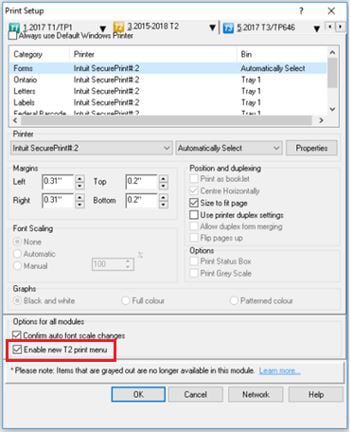
4. Select the “Enable new T2 print menu” option box and then select OK; the new print interface menu displays:
Using the Job Selection Section
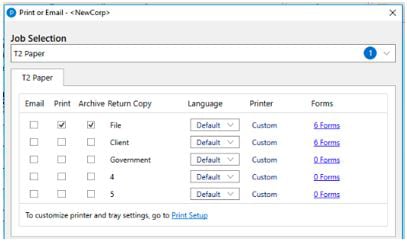
The “Job Selection” section allows preparers to navigate between types of returns and assign parameters for print, email, archiving, and language. The “Job Selection” dropdown menu populates automatically with print details based on the open T2 return.
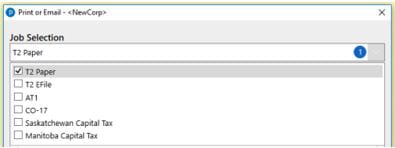
Preparers can select a single return type to print, archive, or email from the dropdown list (e.g. “T2 Paper”):
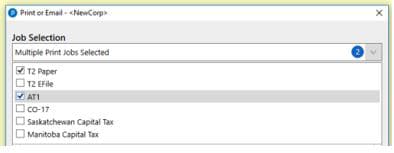
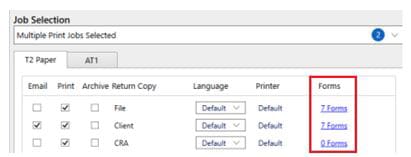
Alternatively, preparers can select multiple types of returns to print or email from the dropdown list (e.g. “T2 Paper” and “ATI1”):
The details of the selected items displays:
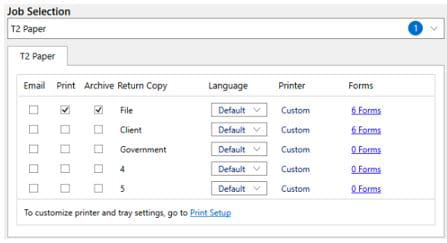
The details presented include email, archive, and print options for each item in the return, as well as language preferences and assigned printers.
Setting Language under the Job Selection section
Preparers can assign a language to each item in a T2 return.
Select the Language dropdown menu and make a selection from the options presented:
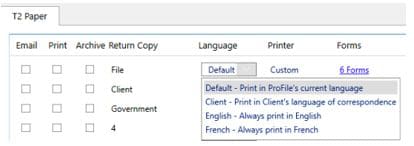
The item is assigned the selected language.
Setting Print Setup under the Job Selection section
1. Select the Print Setup link in the “Job Selection” section:

The “Print Setup” window displays:
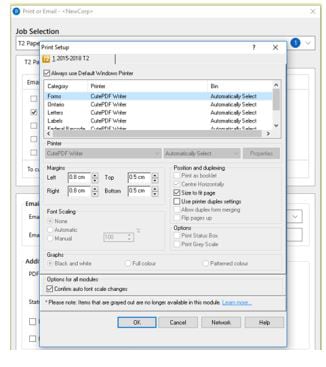
2. Set the printer and tray settings as required.
3. Select OK; the printer and tray settings save.
Reviewing Forms under the Job Selection menu
Under the “Forms” column is a link that displays selected forms for each item:
1. Select the “Forms” link; the “Form Selection” window displays:
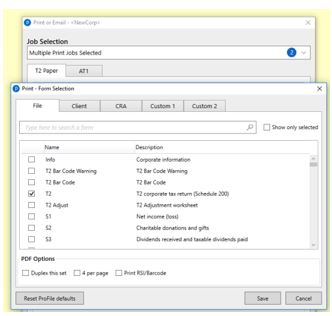
The list of selected forms displays, including the description of each. The available forms are sourced from the global settings in ProFile.
Note: Saving form selections in the new print interface does not alter the global settings but applies only to the specific T2 return.
2. Select Save to retain the selections.
Options under the Job Selection menu
Three PDF options are available in the “Form Selection” section:
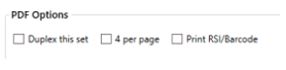
1. Select a checkbox to activate the “Duplex this set”, “4 per page”, and/or “Print RST/Barcode” options.
2. Select Save to retain the selections.
Using the Archive PDF Section
Preparers can set the file location and file name for archived forms in the new printer interface:
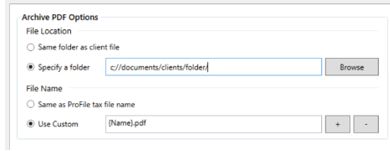
Setting the File Name
1. Preparers can select two options for archived PDF file names:
- Select the “Same as ProFile tax file name” option; this names the archived PDF with the same file name as the tax file, or:
- Select the “Use Custom” option; use the “+” and “-“ buttons to assign file name parameters such as name, month, day, time, yearend, and more:
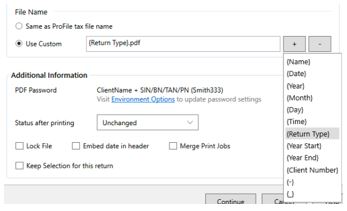
2. Select Continue to save the selections.
Using the Email Options Section
Preparers can set parameters in the “Email Options” section for email templates and email addresses:

1. Select the “Email” option under the job selection to access the “Email Options” menu in the new print interface.
2. Select the available email template from the drop-down menu.
Note: Email templates source from the designated ProFile “Templates” folder.
The client email address – as set on the return – automatically populates in the “Email Address” field. If no client email address is set on the form, enter the address manually.
3. Select the Continue to retain email settings.
The preparer’s email program opens a new draft email with the template and client email already entered.
Additional Information Section
The “Additional Information” section of the new print interface allows preparers to manage PDF passwords, set the status of the return after printing, and set several other features:

Setting PDF Password
1. Select the Environment Options link in the section; the ProFile “Environment Options” window displays:
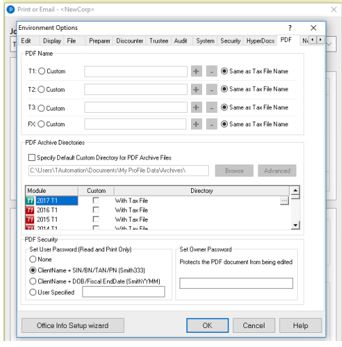
2. Navigate to the “PDF” tab to update password settings.
3. Select OK; the settings save.
Setting Client Status after Printing
Preparers can select the client status of the T2 return after printing has occurred.
1. Select the dropdown menu for “Status after printing”; the options display:
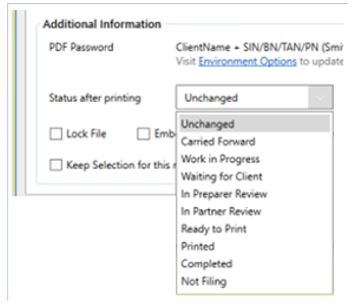
Select the designation; the designated status displays in the “File” properties of the T2 return.
2. Select OK; the settings save.
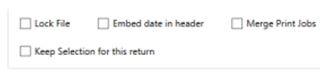
Additional Options
Four options are available in the “Additional Information” section:
You can review our tutorial video regarding these four options below:
1. Select the checkbox to activate the “Lock File”, “Embed date in header”, “Merge Print Jobs”, and/or “Keep Selection for this return” options.
2. Select OK; the settings save.
Note: Any activated options save and take effect in both the previous and new print interface for T2.