QuickBooks HelpQuickBooksHelpIntuit

What transactions are not supported by Balance Sheet by Class in QuickBooks Desktop?

SOLVEDby QuickBooksUpdated over 1 year ago

Learn what transactions create unclassified, unbalanced, or other incorrect amounts on Balance Sheet by Class report in QuickBooks Desktop.

Balance Sheet by Class lets you see your balance sheet by fund, location, or other classes that you set up. If you see wrong amounts on the report, don’t worry. Here are common transactions that cause those amounts and what you can do to tidy up your report.

When you assign classes in journal entries, debits must equal credits for each class. Otherwise, the entry becomes “unbalanced” from the classes’ perspective and shows as unclassified on both accrual and cash basis of Balance Sheet by Class.

Here’s an example of a journal entry with “unbalanced” classes.

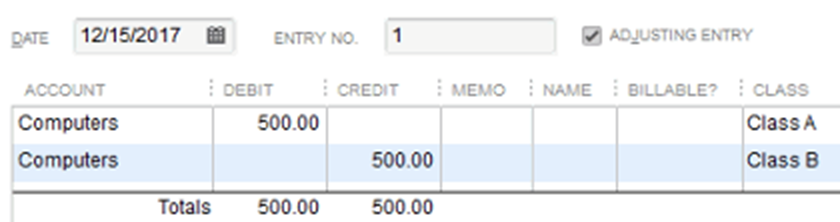
While this journal entry overall has equal debits and credits, there’s no equal credit for Class A, and no equal debit amount for Class B. QuickBooks can’t classify this kind of transaction.

What you should do

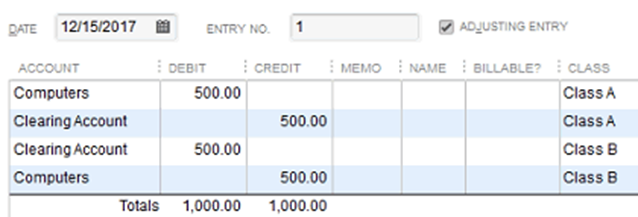
Use a journal entry to make sure debits equal credits for each class. To do this, you also need to create a “clearing” account.

  1. Set up a clearing account.
  2. Use the clearing account to balance the classes in the journal entry, like this:

The Balance Sheet by Class report only supports one class per paycheque. Paycheques with multiple classes create unclassified amounts on both accrual and cash basis of Balance Sheet by Class.

Learn more about assigning classes to employees.

What you should do

Change your Payroll settings to make sure only one class gets assigned to each paycheque. Then, assign a class for each employee.

  1. From the Edit menu, select Preferences.
  2. Select Payroll & Employees from the menu on the left.
  3. Select Company Preferences.
  4. Next to Assign one class per, select Entire paycheque.
  5. Select OK.
  6. Select the Employees menu, then choose Employee Centre.
  7. Double-click your employee’s name.
  8. Select the Payroll Info tab, then select a class from the CLASS drop-down.
  9. Select OK once done.

Note: As a rule of thumb, assign a single class per employee paycheque.

QuickBooks doesn’t automatically assign classes to payroll liability checks. The check amount shows as unclassified on both accrual and cash basis of the report.

What you should do

Always review the check details and assign classes for each line item when you make a liability payment.

If you assign a single class for all paycheques, here’s how to enter the class.

  1. Select Employees, and then Payroll Centre.
  2. Select the Payroll Liabilities tab.
  3. Under Pay Taxes & Other Liabilities, double-click the scheduled payment you want to make.
  4. Enter the appropriate class for each amount.
  5. Select Save & Close.
  6. Review the payment summary, then Close.

If you assign different classes to paycheques, here’s how to classify the amounts.

  1. On the last day of the period you’re paying liabilities for, run the Balance Sheet by Class report.
  2. Take note of the amount you owe for each class. Or, print the report.
  3. Select Employees, and then Payroll Centre.
  4. Select the Payroll Liabilities tab.
  5. Under Pay Taxes & Other Liabilities, double-click the scheduled payment you want to make.
  6. Add line items so you have one per class.
  7. Enter the amount and class for each line, then Save & Close.
  8. Review the payment summary, then Close.

You can’t assign a class to a sales tax payment. The payment shows as unclassified on both accrual and cash basis of Balance Sheet by Class. But don’t worry, a simple journal entry can fix this.

What you should do

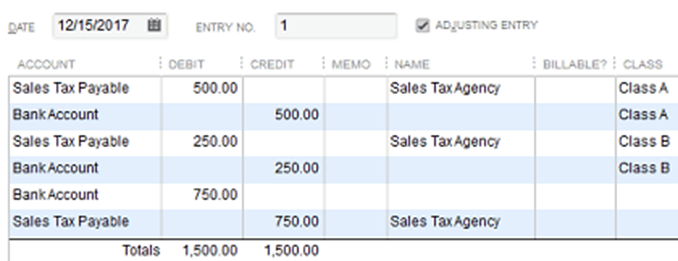
Find out how much of the sales tax payment goes to each class. And then, create a journal entry to classify the amounts in your sales tax payment.

  1. Run the Balance Sheet by Class report as of the date you paid sales tax through.
  2. Take note of the sales tax liability you owe for each class.
  3. Make a journal entry to move the payment from the “Unclassified” column to the appropriate class.

    Here's an example.

    • Sales tax for Class A: 500
    • Sales tax for Class B: 250
    • Total: 750

    In this example, you should enter the journal entry like this:

QuickBooks uses the invoice to find the correct class for customer payment. This is why you can’t add a class in the Receive Payments window. So when you record a pre-payment, it shows as unclassified on both accrual and cash basis Balance Sheet by Class.

What you should do

Don’t worry, this problem is self-correcting. Later, once you apply the pre-payment to an invoice, QuickBooks classifies the payment amount correctly.

An early payment discount can cause a net income difference between the Balance Sheet by Class and Profit & Loss by Class reports. This happens if you enter the discount in the “Receive Payments” window, then use it for an invoice with multiple classes.

Profit and Loss by Class shows the full discount in a single class. But Balance Sheet by Class classifies the discount based on the classes from the invoice.

What you should do

  • Use a single class for the invoice. And then, enter the same class for the discount when you receive the payment.
  • If your customer’s invoice has multiple classes, enter a separate invoice for each class.

An early payment discount in a bill payment can cause a net income difference between the Balance Sheet by Class and Profit & Loss by Class reports. This happens if you enter the discount in the “Pay Bills” window, then use it for a bill with multiple classes.

What you should do

  • Use a single class for the bill. And then, enter the same class for the discount when you pay the bill.
  • If your bill has multiple classes, enter a separate bill for each class.

Multi-currency transactions create unclassified amounts and unbalanced classes, both on cash and accrual basis of Balance Sheet by Class.

What you should do

The Balance Sheet by Class doesn’t support multi-currency transactions. We recommend not using it if you use the multi-currency feature in QuickBooks.

Be careful when you pay a bill with bill credit and use multiple classes. It can cause incorrect amounts on both accrual and cash basis of Balance Sheet by Class.

To understand how that happens, here’s a sample transaction:

You add a bill and classify the amounts this way.

  • 50% to Class A
  • 50% to Class B

Then, you pay the bill and apply a bill credit that has a different proportion of classes.

  • 90% to Class A
  • 10% to Class B

This creates “Unbalanced Classes” at the bottom of your cash basis report. On an accrual basis, the report shows the wrong balance by class for Accounts Payable.

What you should do

  1. Make sure to only use a single class for a bill and bill credit.
  2. Only apply credit memos against bills if the two have the same class.

You can't use the Funds Transfer window to transfer funds between classes. We recommend using a journal entry instead.

What you should do

Use a journal entry to make sure debits equal credits for each class. To do this, you need to create a “clearing” account first.

  1. Set up a clearing account.
  2. Create your journal entry like this.

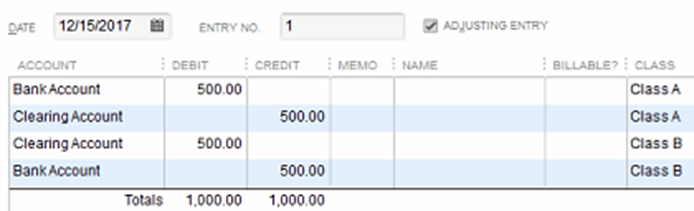
    In this example, a fund is moved from the checking account for Class B to the checking for Class A. Notice that for each class, there are equal debits and credits.

You can’t assign classes to inventory build assemblies. QuickBooks can’t classify these items on the Balance Sheet by Class report.

What you should do

Because QuickBooks doesn’t support classes for inventory assemblies, you shouldn’t run or use the report if you have assembly items.

Was this helpful?

You must sign in to vote, reply, or post

Sign in for the best experience

Ask questions, get answers, and join our large community of QuickBooks users.

More like this