Learn how you can create and manage users and roles in QuickBooks Desktop Enterprise.
In QuickBooks Desktop Enterprise, you can customize the access for different user roles. This way, users will only be able to access what they need to do their job in QuickBooks. You can also invite users that don’t regularly work in QuickBooks, like a Payroll Manager or Payroll Processor, to create an Intuit account so they can use services like Payroll or QuickBooks Time.
Add and invite QuickBooks users to a role
If you have users that regularly work in QuickBooks, you can add or invite them to a specific role. For example, an inventory role will have access to adjust quantities on hand, view item receipt, and inventory reports. Here’s how.
- Go to the Company menu, then Users.
- Select Set Up Users and Roles.
- Enter the admin Password, then select OK.
- From the User List tab, select New.
- Enter a User Name and an optional Password.
- From Available Roles, select the users role, then select Add.
- Enter the User’s email address, then select OK.
- From the confirmation window, select OK.
Certain roles will need a user's Intuit account linked. These include Accountant, External Accountant, Finance, Full Access, Payroll Manager, Payroll Processor, and View Only roles.
These roles will show ^ next to the role name.
Have the user check their email and look for the invite. They’ll need to select Accept Invite, then sign in using their Intuit ID.
Manage Intuit account users and their roles
If you have users that don’t regularly work in QuickBooks and only need access to connected services like Payroll, Workforce, or QuickBooks Time, you can invite them to create an Intuit account. Then, they’ll be assigned a Basic User role. This is a required default role that’s automatically assigned to the user, and by itself doesn’t grant any permission.
- Go to the Company menu, then Users and select Intuit Account User Management.
- From the Users tab, select Add user.
- Enter the User’s name and User’s email, select the role from Available roles, then select Add.
- Select Add user.
- Select OK.
Have the user check their email and look for the invite. They’ll need to select Accept Invite, then sign in using their Email or user ID.
Use predefined roles
You can select from 14 predefined roles. These cover common roles for most businesses. Roles marked with an asterisk (*) have unrestricted access to view all transactions in your account. You can also customize predefined roles so you start with some existing permissions. Keep in mind, any adjustments you make apply to all users who have that role.
- Go to the Company menu and select Users.
- Select Set Up Users and Roles.
- Select the Role List tab.
- Select a role and then select Edit to review its permissions.
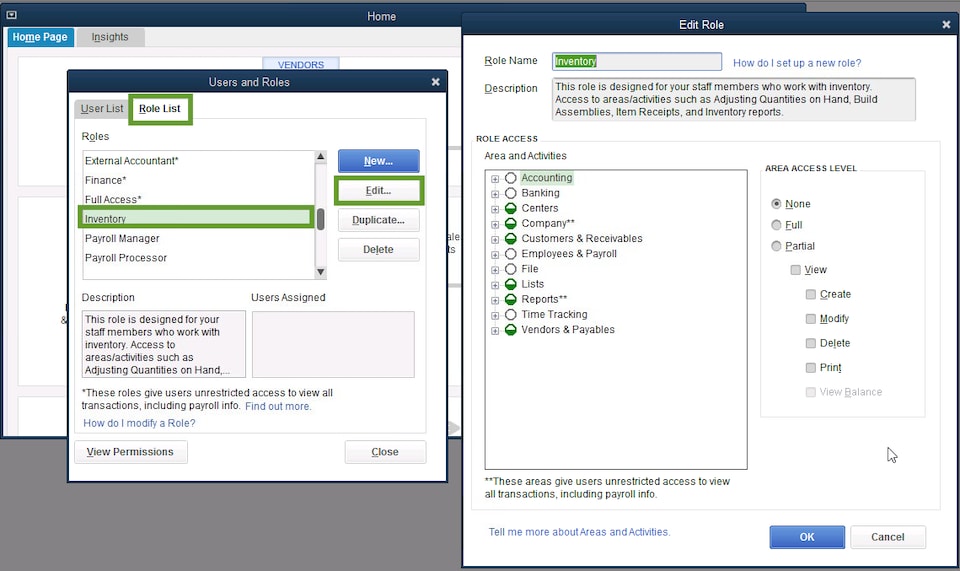
- In the Area and Activities section, select an area of your accounts. You can select None, Full, or Partial to set the access level.
- Once you set the permissions, select OK to save.
Create a new custom role
You can create brand new roles from scratch. This gives you the flexibility to determine which specific area of your accounts can be accessed.
- Go to the Company menu and select Users.
- Select Set Up Users and Roles.
- Select the Role List tab and select New.
- Give the role a name and description. Tip: Name it something that indicates its permission level.
- In the Area and Activities section, select an area of your accounts. Review each area and select None, Full, or Partial to set the role's permissions.
- Once you set permissions for each area, select OK to save.
Review roles and permissions
To review your roles and permissions, run a Permission Access by Roles report:
- Go to the Company menu and select Users.
- Select Set Up Users and Roles.
- Select the Role List tab. Then select View Permissions.
- Select the roles you want to review and then select Display.
You'll get a report that shows all roles and their permissions.