QuickBooks HelpQuickBooksHelpIntuit

Integrate BigCommerce and QuickBooks Online using OneSaas

SOLVEDby QuickBooks2Updated November 20, 2023

Learn how to integrate BigCommerce to QuickBooks Online.

With QuickBooks Connector (One Saas), you're able to set up your complete integration within minutes using our simple setup process. Below is a step by step walkthrough, highlighting some useful key points throughout the process.

Connect

Begin here by connecting the systems you're looking to integrate. You'll find guides on how to connect every system. For this example, we'll be connecting Bigcommerce and QuickBooks Online. Select Configure to move forward.

Configure

The configuration process below will present you with various options detailing exactly how you want your BigCommerce-QuickBooks Online integration to work. You'll need to have some basic accounting knowledge to make sure that the integration settings are tailored to your business and accounting practices.

If you have any questions, you can reach out to our Support team at any time.

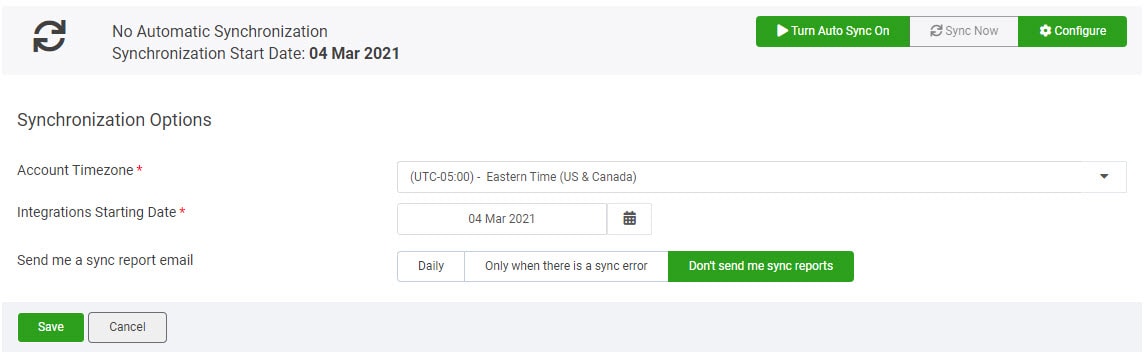
  1.  You will be required to set up your synchronisation options before you can start configuring your workflows. You'll need to set up the following:
    • Account timezone
    • Integrations starting date
    • Email sync report options

      SynchronizationOptions_QBConnector_US_ExtInt_102721.png
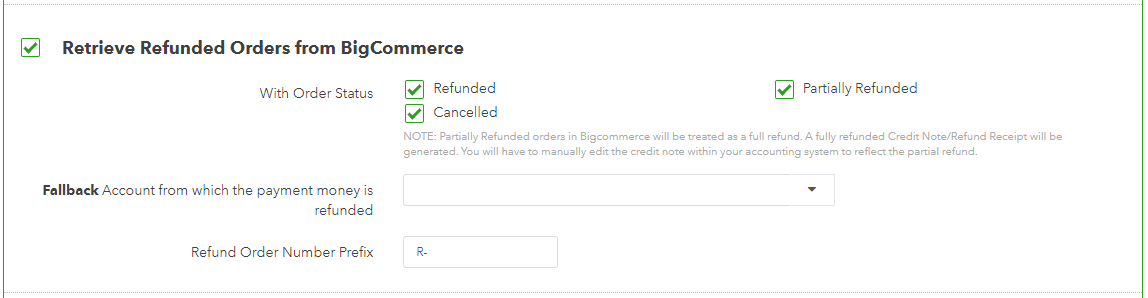
  2. You'll be presented with a list of main workflows. These are optional, so make sure to read each option carefully. Generally, our sync will allow the following:
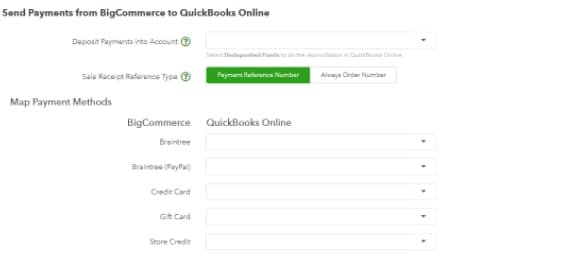
    • Sales from BigCommerce to be sent into QuickBooks Online.
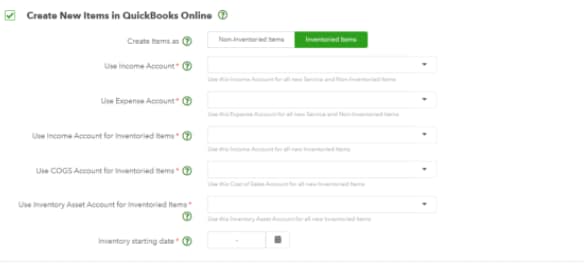
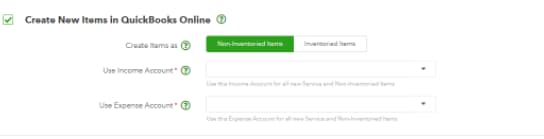
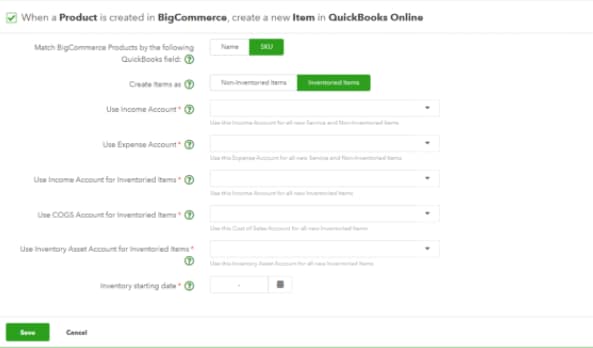
    • Products from BigCommerce to be sent into QuickBooks Online.
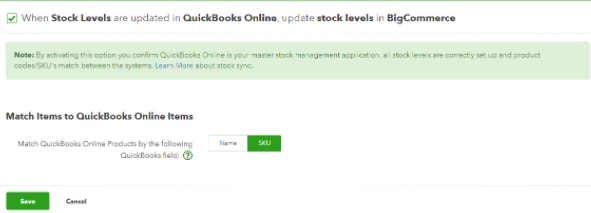
    • If you have inventory turned on in QuickBooks Online, QuickBooks Connector can read this information and update BigCommerce.
  1. Start the configuration process by selecting the first workflow to sync BigCommerce orders into QuickBooks Online, as shown below. This set of configuration settings will help determine some basic integration behaviour:
    • Select the BigCommerce order statuses from which the app will retrieve sales to sync into QuickBooks Online. Depending on the nature of your business, you may want to also sync sales in the Pending or Awaiting payment statuses.
    • Select how BigCommerce orders will appear in QuickBooks Online. In the case of QuickBooks Online, choose if you want your BigCommerce orders to be sent to QuickBooks Online as Sale invoices or Sales receipts. Select the appropriate option for your business.
  2. Select Default Product and Advanced Options to see the advanced settings.
    • Order number prefix - The prefix you input here is added to all orders retrieved from your BigCommerce account. For example, if you have order 1234 in BigCommerce and you add the prefix BC- in the configuration, your order will be retrieved into QuickBooks Connector with the order number BC-1234 and sent to QuickBooks accordingly.
    • Gift card product - Similar to the shipping and discount item options above, you can specify a dedicated gift card item so you can track your gift card on sales.
    • Assign sales to class/Assign sales to location - These two options allow you to choose a default class or location within your QuickBooks Online system. This is an option unique to QuickBooks Online, and only if you have set up classes or locations within your QuickBooks company file.
    • Original customer/Customer's organisation/Generic online sale customer - Most Accounting systems require a customer record to be specified when a sales invoice is created. This particular option allows you to choose the nature of the customer record that is being created. The default option is original customer; however, if your BigCommerce customers specify a company name and you prefer to have that appear within your accounting system instead, then you can opt for the customer's organisation option.
    • Automatic invoice numbers - This option allows you to disregard the BigCommerce order number completely, and use the sequential numbering convention within your accounting system. Alternatively, if you don’t want any customer records to be created within your accounting system at all, you can select the Generic online sale customer option. This means all sales will be synced to your accounting system against a generic BigCommerce customer record. You can read more about how this works here.
    • Discount product - You can specify a dedicated discount item so you can track your discounts on sales.
    • Rounding off product - This product will be used to allocate if in case there is a rounding discrepancy in the grand total of an order in a QuickBooks Online invoice or sales receipt.
    • Use shipping item - You may be charging your customers extra shipping charges on your sales. If this occurs, the integration can allow you to specify a dedicated item to assign these shipping charges. This will allow you to easily track any revenue generated from shipping charges.
    • Use default customer message - This option will allow you to use the message that exists on the template in QuickBooks instead of having any notes populated from BigCommerce.
    • Allow credit card payments - Select this option if you want to allow credit card payments for the transactions.
    • Due date offset - A due date will be assigned if transactions do not have a due date. This is calculated using the transaction date and the due date offset. If not set, the transaction date is used as the due date. 
    • Allow credit card payments - Select this option if you want to allow credit card payments for the transactions.
  3. There is an option to sync refunded orders from BigCommerce. In this workflow, you will be asked to map a fallback account from which the payment money is refunded. You will also be asked to input your preferred refund number prefix which will be appended before the refund receipt number.

    With order status - Select the BigCommerce order statuses from which the app will retrieve refunded/cancelled orders to sync into your accounting system.

    Retrieve_Refund_QBCOneSaas_EXT_US10262021.png
  4. Matching BigCommerce products with QuickBooks Online. In order for sales to properly integrate with your accounting system, you'll need to have all of your BigCommerce items set up with unique SKUs.

    Note: With QuickBooks Online integrations, we have two product matching options:
    • Name: We match the product's SKU field from BigCommerce to the product's Name field in QuickBooks Online.
    • SKU: We match the product's SKU field from BigCommerce to the product's SKU field in QuickBooks Online.
  5. You'll be taken to the tax configuration page. Here, for each tax created/defined in your BigCommerce, you must select its corresponding sales tax in your accounting system. Learn about tax configuration.

    Map_Big_Commerce_QBCOneSaas_EXT_US_10262021.png
  6. If you'd like QuickBooks Connector to create new items in QuickBooks Online, you can enable this option. For inventory, QuickBooks Connector can only assign the COGS account for the products upon creation, but we won't sync the COGS price of products.

    Createnew_Big_QBCOneSaas_EXT_US_10262021.PNG

    For non-inventoried, You'll need to select the Income and Expense Accounts.

    Createnew_Big2_QBCOneSaas_EXT_US_10262021.PNG
  1. The Send payments from BigCommerce to QuickBooks Online settings will allow you to select whether you want payment data from BigCommerce to be registered against your sales within QuickBooks Online. If you want to map different payment methods to different clearing accounts, this can be done via the Map individual payment methods. If you are unsure of which clearing accounts to use, ask your accountant.

    SendPayments_1QBCOneSaas_EXT_US_10262021.PNG

    Select Save.

This will allow QuickBooks Connector to read all of your BigCommerce items and create them in QuickBooks Online. Some users prefer to only have items that are used in actual sales to be created (which is covered above), while other users prefer to take all BigCommerce items and send them through instead.

Product_Big_QBCOneSaas_EXT_US_10262021.PNG

Note: If you want different products to have different income/expense accounts, then this will all have to be set up within QuickBooks Online after the items are created by the app.

Select Save. Learn about products integration.

If you would like to send stock level data from your QuickBooks Online to your BigCommerce products, you can simply select the final workflow.

Stock levels aren't available to configure with QuickBooks Online France.

Note: This option should only be enabled if you have stock levels set up in QuickBooks Online prior to the integration. Otherwise, you'll risk wiping out your BigCommerce stock levels. Learn more about our stock control process.

Select Save.

Stocklevels_BIG_QBCOneSaas_EXT_US_10262021.PNG

Sync

Your account is now ready to sync your data across your apps. When auto-sync is on, your account should sync every hour, but you can trigger a manual sync at any time. Just select Sync Now on the Synchronisation Options on top of your Manage tab.

Once you have agreed to the QuickBooks Connector user terms and conditions, you can turn on the automated hourly sync.

Was this helpful?

You must sign in to vote, reply, or post

Sign in for the best experience

Ask questions, get answers, and join our large community of QuickBooks users.