Integrate Etsy and QuickBooks Online with OneSaas
by Intuit• Updated about 9 hours ago
Learn how to integrate Etsy with QuickBooks Online.
Set up your QuickBooks Connector integration between Etsy and QuickBooks Online within minutes using our simple setup process. Below is a step by step walkthrough, highlighting some useful key points throughout the process.
Connect
Begin here by connecting your apps to QuickBooks Connector. If you haven't already connected your apps, you can follow our guides to connect Etsy and QuickBooks Online. Select Manage to move forward.
Configure
The configuration process below will present you with various options detailing exactly how you want your Etsy and QuickBooks Online integration to work.
Note: You'll need to have some basic accounting knowledge to make sure that the integration settings are tailored to your business and accounting practices.
Our Etsy and QuickBooks Online integration has a single workflow which is to send all new orders from Etsy to QuickBooks Online. Every part of the configuration setup will be explained below.
- You will be required to set up your synchronisation options before you can start configuring your workflows. You'll need to set up the following:
- Account Timezone
- Integrations Starting Date
- Email Sync Report Options
.png)
- Configure the order workflow settings.
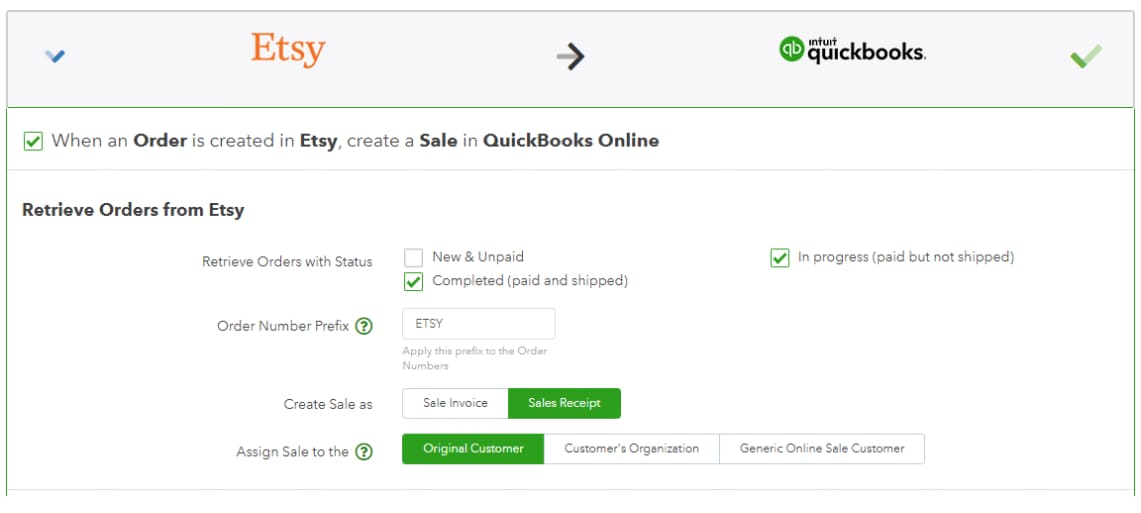
Retrieve orders from Etsy
- Set up the filters to determine which orders will be retrieved from Etsy. You will need to set up the filters based on the order status.
- Select how Etsy orders will appear in your QuickBooks Online. In the case of QuickBooks Online, choose if you want Etsy orders to be sent to QuickBooks Online as Sale invoices or Sales Receipts. Select the appropriate option for your business.
- Most accounting systems require a customer record to be specified when a sales invoice is created. The Original customer/Customer's organisation/Generic online sale customer option allows you to choose the nature of the customer record that is being created. The default option is Original Customer; however, if your Etsy customers specify a company name and you prefer to have that appear within your QuickBooks Online instead, then you can opt for the Customer's Organisation option.
- The prefix you input in the Order Number Prefix field is added to all orders retrieved from your Etsy account. For example, if you have order '1234' in Etsy and you add the prefix 'ETSY-' in the configuration, your order will be retrieved into QuickBooks Connector with the order number 'ETSY-1234' and sent to QuickBooks accordingly.
Map tax code
Here, for each tax created/defined in your Etsy, you must select its corresponding sales tax in your accounting system. There are times tax rates aren't available during the setup process, if that happens, wait for an order to sync from Etsy so your tax rates will sync over and should be available in the tax mapping setting.
Learn about tax configuration.
The sold item should
The income account added here will be used by QuickBooks Connector for creating new service line items and to ensure all sales data from each order will be sent over to the correct income account in QuickBooks Online.
Send payments from WIX to QuickBooks Online
This will allow you to select whether you want payment data from Etsy to be registered against your sales within your accounting system.
If you are unsure of which clearing accounts to use, ask your accountant. If you are happy with the workflow you created, select Save.
Sync
Your account is now ready to sync your data across your apps. When auto-sync is on, your account should sync every hour, but you can trigger a manual sync at any time. Just select Sync Now on the Synchronisation Options on top of your Manage tab. You can reach out to our support team for help at any point in time.


