Troubleshoot common errors and issues you may encounter when using Accountant File Transfer Service (or ACFT), a feature that allows accountants to send and receive QuickBooks Desktop Accountant's Copy files through the Intuit's secure servers.
This article covers the errors and scenarios that you may encounter while using the service:
- Accountant's Copy error: Subscription is not recognised/ You must subscribe to accountant's copy file transfer service...
- Accountant's Copy file uploaded successfully, but the accountant did not receive the email confirmation
- Application Not Found, QuickBase Error, or expired download link
- "Page cannot be displayed" when downloading Accountant's Copy
- Portfile: DBUnload has failed
- You are asked to enter a file transfer password when downloading from ACFT
- "The accountant's first email address is not in the proper format for an email address."
- Send an Accountant's Copy without using ACFT
Reminder: Some troubleshooting steps described in this article require you to remove the Accountant's Copy Restriction. Removing this restriction is irreversible, and will make the current Accountant's Copy impossible to import into the client's file. Make sure to consult your accountant and create a backup copy of your file before following the steps below.
It's recommended to install the latest update of QuickBooks Desktop to ensure you have all the critical updates needed by the program. For scenarios and errors with multiple solutions, perform the recommendations in the order shown.
Accountant's Copy error: Subscription is not recognised/ You must subscribe to accountant's copy file transfer service...

This error happens if you attempt to use ACFT without a valid subscription, or, you are subscribed to the Accountant's Copy File Transfer service, but your QuickBooks Desktop is not in sync with the Intuit servers.
If you don't have this subscription, you can get it for free by becoming a ProAdvisor (US or Canada).
Important:
- Make sure that you have the latest updates.
- Always run QuickBooks as the Administrator when following the steps outlined in this section. To do this, right-click the QuickBooks icon on your desktop and select Run as Administrator.
Solution 1: Sync license data online
- Make sure you're connected to the internet.
- Sync your license data online:
- From the Help menu, go to Manage My License.
- Select Sync License Data Online.
Solution 2: Send an Accountant's Copy using a different file
Identify if the issue is only happening in one company file. If the error is isolated with one file, the issue may be related to data damage.
Solution 3: Rename the Entitlementdatastore.ecml file
Note: This solution will require you to re-register all versions of QuickBooks Desktop on your computer.
- Close QuickBooks Desktop.
- Re-create the damaged EntitlementDataStore.ecml.
- Open QuickBooks Desktop. You should be prompted to re-register the program.
- Sync your license data online:
- From the Help menu, go to Manage My License.
- Select Sync License Data Online.
Solution 4: Boot in safe mode
Try booting your computer in safe mode to verify if a third-party application prevents your QuickBooks Desktop from syncing its license data to the Intuit servers. If you can sync the license data online, open and convert an Accountant's Copy in Safe Mode. That indicates that a third-party program is causing the issue.
You can also create a new Windows Administrator user to identify if your current user lacks permission, or is already damaged.
Create a new Windows Administrator user
Windows 10
- Go to Start and choose Settings.
- Select Accounts, then Family & other users.
- Under Other Users, select Add someone else to this PC.
- Select I don't have this person's sign-in information and Add a user without a Microsoft account.
- Enter the name of the new account and select Finish.
Recommended: Assign a password to the new account to ensure security. - Select the newly created account and select Account Type.
- Choose Administrator and then OK.
Windows Servers
Windows Server 2012
Note: Servers are usually maintained by a licensed computer technician. Consult your IT professional before following the steps in this section.
- Open Server Manager.
- Open Tools and select Computer Management.
- Expand Local Users and groups and select Groups.
- Double-click the Administrator groups to open the Administrators Properties window.
- Select Add.
- In the Select Users, Computers, Service Accounts or Groups window, enter the account you want to add to the local admin groups, and select OK.
Windows Small Business Server 2011 and 2008/R2
- Run the Windows SBS (2011/2008) Console.
- Select Users and Groups and go to the Users tab.
- From the Tasks pane, select Add a new user account to run the Add a New User Account wizard.
- Enter the details and select the role for the new user.
- Enter a password for the new user.
Note: You will not be able to continue without adding a password. The password must meet the complexity requirements. - Select Add user.
- Follow the rest of the instructions and select Finish.
Accountant's Copy file uploaded successfully but the accountant did not receive the email confirmation
After sending your Accountant's copy file using Intuit's Accountant Copy File Transfer Service, the successful upload confirmation e-mail is never received by the accountant. This issue usually happens because of one or more of the following:
- The file is too large
- Slow internet connection
Note: Intuit's Accountant Copy File Transfer server stops responding after 15 minutes. Uploading a 100 MB file using a high-speed internet connection should complete successfully however, uploading a file using a slow internet connection can fail even if it is a small file. - Internet explorer is not set as the default browser
- Security settings was set too high
- The email went to the spam/junk email folder
- The accountant's email security settings is blocking the confirmation email
Important:
- Try using a different email address for the accountant. If the accountant received the email using a different email address, this confirms that the email server of the previous email is blocking the confirmation email from ACFT.
- Check the spam folder. Some email programs and services filter emails from Intuit. Check with your provider on how you can add AccountantsCopy_notify@intuit.com as a trusted sender.
- If the client received the email, forward the email to the accountant.
- Don't forget to provide your accountant with the file transfer password.
- Consider sending your Accountant's Copy using a different media like CD, thumb drive, or email attachment.
Solution 1: Resend the file
- Remove the Accountant's Copy Restriction.
- From the File menu, select Send Company File, Accountant's Copy, Client Activities, then Remove Restrictions.
- Select Yes, I want to remove the Accountant's Copy restrictions and then OK.
- Re-send the Accountant's Copy using ACFT:
- From the File menu, select Send Company File, Accountant's Copy, then Client Activities.
- Select Send to Accountant.
Solution 2: Set Internet Explorer as your default browser
- Open Internet Explorer.
- From the Tool menu, choose Internet Options.
Note: If you can't see the Tools menu, press the Alt key once. - On the Program tab, select Make Default.
- Select Apply and OK.
Solution 3: Check the security settings for Outlook Express
- Open Outlook Express.
- From the Tools menu, choose Options and go to the Security tab.
- Uncheck Do not allow attachments to be saved or opened that could potentially be a virus?.
- Select Apply and OK.
Application Not Found, QuickBase Error or expired download link
Files uploaded through the Intuit Servers are only available for two weeks. If the ACFT e-mail is already expired, your client needs to remove the Accountant’s Copy Restriction and recreate the Accountant’s Copy again.
You may also encounter messages like The application does not exist or was deleted. If you followed a link to get here, you may want to inform the author of that link that the application no longer exists or Cannot download file v0 from www.quickbase.com. Please try again later when experiencing this kind of issue.
The expiration of the download link fom ACFT does not mean that you have to work on the Accountant's Copy file within the 2 week time frame. You can download the Accountant's Copy file, save it on your computer, and work on it when it's convenient.
Important: Removing the Accountant’s Copy restriction is IRREVERSIBLE. Create a backup copy of your file, and consult your accountant before removing the Accountant’s Copy Restriction.
Before re-sending the Accountant's Copy file, test the link to make sure it's really expired
- Right-click the file name and select Copy Hyperlink.
- Paste to your browser's address bar and press Enter.
- If the file downloaded successfully, open the Accountant's Copy from the saved location. If you are getting the same error, you have to re-send the Accountant's Copy file.
Re-send the Accountant's Copy file
- Remove the Accountant's Copy restriction:
- From the File menu, go to Send Company File, Accountant's Copy, then Client Activities.
- Select Remove Restriction.
- Re-create the Accountant's Copy file and re-send it through ACFT:
- From the File menu, select Send Company, Accountant's Copy, then Client Activities.
- Select Send to Accountant.
If Internet Explorer is not configured to access the QuickBase servers, you'll get one or more of the following errors or unexpected results when downloading Accountants Copy from the Accountant File Transfer service:
- Blank Page
- Page Can Not Be Displayed
- Page Error
- "To help protect your security, Internet Explorer blocked this site from downloading files to your computer. Click here for options..."
Important: Selecting the download link from accountantscopy@intuit.com should prompt you to Open or Save the Accountant's Copy file. It's highly recommended that you save the file into your hard drive before opening the Accountant's Copy file in QuickBooks Desktop.
Solution 1: Add Intuit's URL as a trusted site
- Open Internet Explorer.
- From the Tools menu, choose Internet Options
Note: Press the Alt key once if you can't see the Tools menu. - Go to the Security tab and select Trusted Sites, then Sites.
- Type in "https://www.intuitcorp.quickbase.com" and select Add.
Quick tip: Add "https://mail.google.com" as a trusted site if your email provider is Google. - Select Close.
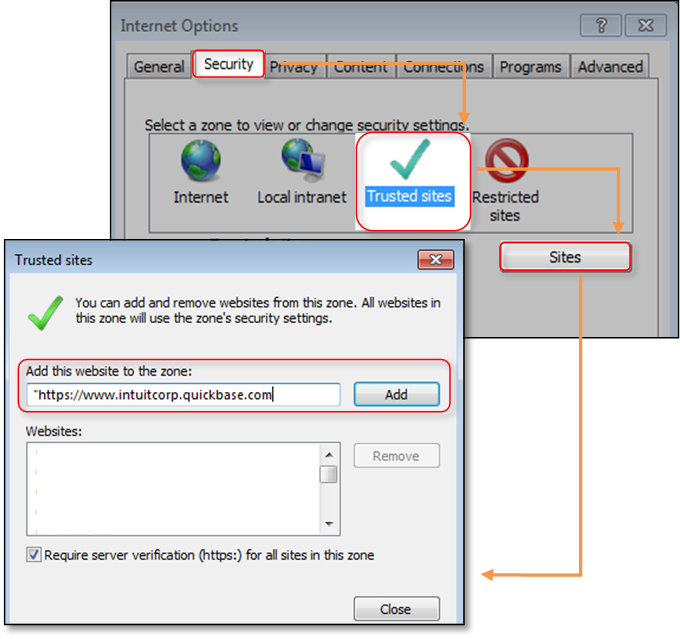
- Select Apply and then OK.
Solution 2: Reset Internet Explorer
- Open Internet Explorer.
- From the Tools menu, choose Internet Options
Note: Press the Alt key once if you can't see the Tools menu. - Go to the Advanced tab.
- Under the Reset Internet Explorer Settings section, select Reset.
- Close and re-open Internet Explorer.
Solution 3: Disable saving encrypted pages to disk
- Open Internet Explorer.
- From the Tools menu, choose Internet Options.
Note: Press the Alt key once if you can't see the Tools menu. - Go to the Advanced tab.
- Find and uncheck Do not save encrypted pages to disk.
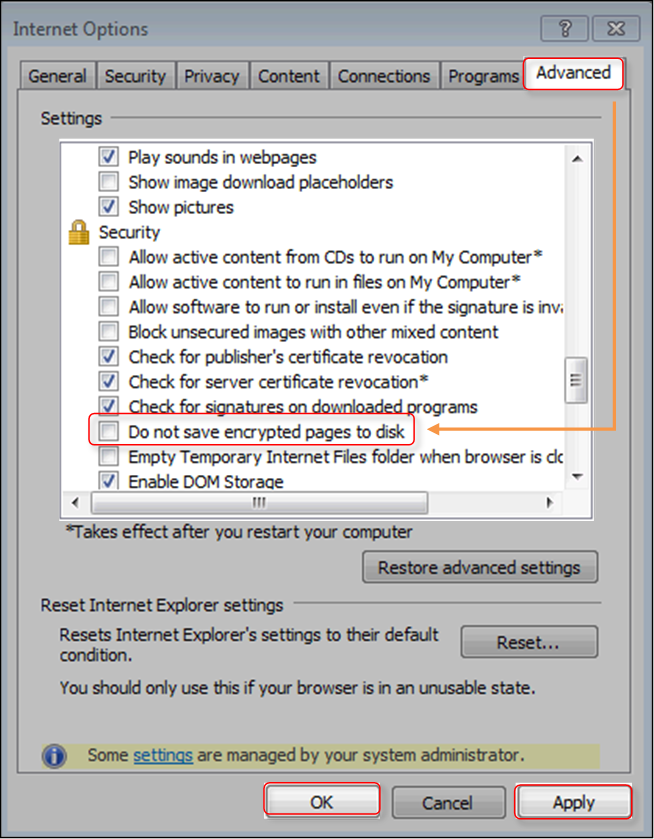
- Select Apply and then OK.
Portfile: DBUnload has failed
Portfile: DBUnload has failed is usually caused by user permissions not being applied correctly to the temporary folder created by the Accountant's Copy. To resolve this issue, manually change the user permission of the folder where the company file is saved.
Important:
- The steps described in this section require you to be logged in as a Windows Administrator.
- If the company file is saved in a subfolder of a shared mapped folder, assign the permissions on the main/parent folder.
- When adding permissions, replace XX with the version of QuickBooks you are having issues with (Example: QuickBooks 2017 - QBDataServiceUser27, QuickBooks 2018 - QBDataServiceUser28, QuickBooks 2019 - QBDataServiceUser29).
Fix this error
- Right-click the folder where the company file is saved and select Properties.
- Go to the Sharing tab and select Share:
- Choose everyone from the dropdown menu and select Add.
- Click to highlight Everyone and toggle the Permission Level to Read/Write.
- Select Share and Done.
- Select Advanced Sharing:
- Go to Share and select Permissions.
- Highlight Everyone and select Full Control.
- Select Add, type in QBDataServiceUSerXX, and select OK.
- Highlight QBDataServiceUSerXX and select Full Control.
- Select Apply and then OK.
- Go to the Security tab:
- Select Edit and Add.
- Type in Everyone and select OK.
- Highlight Everyone and select Full Control.
- Select Add, type in QBDataServiceUSerXX and select OK.
- Highlight QBDataServiceUSerXX and select Full Control.
- Select Apply and OK until the Properties window is closed.
You are asked to enter a file transfer password when downloading from ACFT
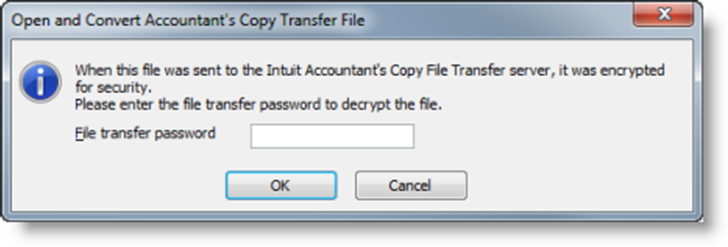
A file transfer password is created for added security when using ACFT. It's a password created by the client upon creating an Accountant's Copy for their accountant.
Important:
- There is NO password reset tool for the encrypted password on Accountant's Transfer files.
- If the accountant can't get the password from the client, they will have to remove the Accountant's Copy Restriction and re-send the Accountant's Copy again.
- If you received this password prompt from a file that you already converted to accountant’s working file (.qba), the file is probably damaged.
- The troubleshooting steps described in this article requires you to remove the Accountant’s Copy restriction and resend the Accountant’s Copy again. This is IRREVERSIBLE. Make sure to that you have an agreement with your accountant and you have a backup of your company file before you do this.
- Ensure that QuickBooks Desktop is updated to the latest release.
Solution 1: Remove special characters from the file name and file path
- Open Windows Explorer and browse to the location where the company file is saved.
- Check if the file name and file path contain any special characters.
- Remove any special characters from the folder name and file name as necessary.
- Re-open the Accountant's Copy.
Solution 2: Check for possible data damage
- Perform basic data damage troubleshooting on the client's company file (.QBW).
Note: There are data damage troubleshooting steps that will require you to remove the restriction in order to fix the data damaged. If that is the case, follow steps 2 and 3. - Remove the Accountant's Copy Restriction.
- From the File menu, select Send Company File, Accountant's Copy, Client Activities, then Remove Restrictions.
- Select Yes, I want to remove the Accountant's Copy restrictions and then OK.
- Re-send the Accountant's Copy using ACFT:
- From the File menu, select Send Company File, Accountant's Copy, then Client Activities.
- Select Send to Accountant.
"The accountant's first email address is not in the proper format for an email address."
The accountant sets up the Accountant's Copy to send back to their client via email. Make sure the email address is valid without any additional or missing characters. The error can also occur when the field is blank.
Send an Accountant's Copy without using ACFT
Accountant File Transfer Service is not the only way to send an Accountant's Copy file. You can use other media like a CD, thumb drive, email attachment, or third-party file sharing app like Dropbox. However, file sharing applications condense files to improve upload and download speed, which may sometimes damage the file.
To prevent this from happening, use a compression program such as WinZip to protect your file before sending it through a file sharing app. If you keep getting an error even after using a compression program before uploading your file to a file sharing application, your data file may be damaged. If so, follow basic data damage troubleshooting.