Statutory Maternity Pay (SMP) in QuickBooks Online Advanced Payroll
by Intuit•6• Updated 11 months ago
An employee should inform you that they are pregnant at least 15 weeks before the baby is due. At the same time, they must inform you of when they want to start their maternity leave.
Statutory Maternity Leave divided into two parts. The first 26 weeks are called Ordinary Maternity Pay, while the remaining 26 weeks are known as Additional Maternity Pay.
Employees aren't required to take the full 52 weeks of Maternity Leave. Additionally, Statutory Maternity Pay (SMP) is provided for a maximum of 39 weeks.
This article will cover:
- Add maternity pay
- Download and send the payment record
- Change or delete maternity record
- Record an employee returning from maternity leave
- Reports
- Keeping in touch (KIT) days
Add statutory maternity pay
Watch a video or follow step-by-step instructions.
- Select Payroll, then select Employees.
- Choose the name of the employee.
- Select Statutory Payments, then select Add.
- Choose Statutory Maternity Leave from the dropdown options.
- Select Start date and Baby due date.
- The Average weekly earnings is automatically calculated. You can Override this if needed.
- A message will indicate whether the employee is eligible for SMP. View the log for more details.
- The Weeks payable is calculated automatically, but you edit it if necessary.
- Enter Weeks already paid, if applicable.
- Select Calculation type.
- Choose Weekly payments if you want to pay SMP in full weeks. If leave starts on a Tuesday, SMP will be applied the following Wednesday.
- Select Align with pay period if you want to pay SMP according to your pay period dates.
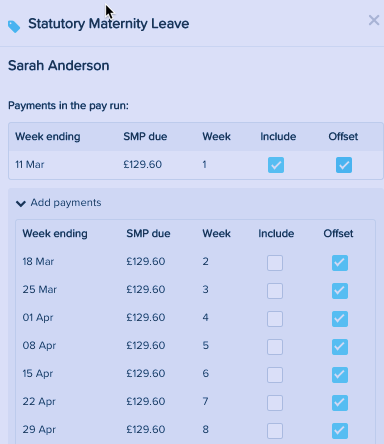
- Choose Offset SMP if you want the payment to be offset against basic pay. If not selected, only the statutory payment will be made.
- The table shows the SMP due and the Status.
- Under Advanced settings, select the applicable options:
- Set employer pension protection: Set up the desired employer pension amount, overriding the calculated amount.
- Do not pay: Select a reason from the dropdown option to apply the SMP 1 form to the employee.
- Pay lump sum: Choose this option to pay a lump sum to the employee.
- SMP adjust: Enter an adjustment amount if needed, such as for a pay rise affecting the calculation.
- To upload any relevant documents, select Add in the Attachments section and follow the steps to upload them.
- Enter Notes, if necessary.
- Once you're done, select Save.
A record will be created under the Statutory Maternity Pay section on the Statutory Payments page, and it will be added to the pay runs automatically.
Download and send a payment record
You can download a payment record as a PDF when you need to. Send them to the employee portal as a report which lists all due and paid payments. Payment status changes from Pending to Paid after the pay run.

- Go to Payroll and select Employees.
- Choose the employee's name.
- Select Statutory Payments.
- In the Statutory Maternity Pay section, select Payment record ▼.
- Choose Download PDF. The PDF will be generated and downloaded.
Send the record to the employee portal
- In the Statutory Maternity Pay section, select Payment record ▼.
- Choose Publish to employee profile. A success message will confirm that the SMP record has been published to the employee profile.
Change or delete a maternity record
To make changes to a maternity record:
- Go to Payroll and select Employees.
- Choose the employee's name.
- Select Statutory Payments.
- In the Statutory Maternity Pay section, select the pencil icon for the record you want to edit.
- Update the necessary fields.
- Select Save. The Statutory Maternity Pay record will be updated.

You can also edit the SMP within a pay run. You have the option to offset individual weeks for additional payment or include extra weeks in the pay run by selecting the Include box for the desired weeks.
Delete a maternity record
If no payment has been made to an employee, you can delete their Statutory Maternity Pay record. Here's how:
- Go to Payroll and select Employees.
- Choose the employee's name.
- Select Statutory Payments.
- In the Statutory Maternity Pay section, select the bin icon for the record you want to delete.
- Confirm the deletion by selecting Delete. The record will be removed from the Statutory Maternity Pay section.
Record an employee returning from maternity leave
- Go to Payroll, then select Pay Runs.
- Choose the pay run and then select the pencil icon to edit the details of the employee.
- Select Statutory Payments.
- In the Statutory Maternity Pay section, select the pencil icon for the SMP record you wish to edit.
- Under Advanced Settings, select Do not pay.
- Select You have started work after birth from the dropdown ▼ options.
- Select Save.
Run a report
To see your SMP NI deductions summary in a P32 Report, follow these steps:
- Go to Reports.
- Search for P32 Report and open it.
- Choose the appropriate Tax year.
- Select Run report.
- Once the report is generated, select the NI deductions summary tab.
If your SMP spans across a tax year, the new rates will automatically be adjusted for the new tax year. You can review when these changes are applied, as well as the previous payments you have made.
If the new SMP rate is higher than the 9/10ths earnings (first 6 weeks payments) of SMP, HMRC rules state that the lower rate should be applied. You can make the necessary adjustment using the SMP adjust field.
Keeping in touch (KIT) days
KIT days are optional work days for employees on maternity leave. They can work up to 10 days and still receive payment.
Both the employee and employer need to agree on the details, such as pay and the type of work. See how to pay Keeping in touch days in QuickBooks.
For more info, check out the Employee rights when on leave guide.
Sign in now for personalized help
See articles customized for your product and join our large community of QuickBooks users.