Learn how to set up your email service in QuickBooks Desktop.
In QuickBooks, you can send transactions through Webmail or Outlook. Once you're set up, you can send invoices, reports and more.
Before you get started, make sure you’re using Outlook 2010 or newer and you have an Outlook email profile.
Set up Outlook to work with QuickBooks
Step 1: Contact your internet or email provider to get the following info
- Username
- Password
- Incoming email server address
- Incoming email server type
- Outgoing email server address
Step 2: Set up Outlook
- Go to the QuickBooks Edit menu.
- Select Preferences and Send Forms.
- Select Outlook and OK.
Don't see Outlook? See what to do when Outlook is missing.
Set up webmail to work with QuickBooks
Before you get started
- Verify your webmail servers and port settings with your ISP.
- Webmail providers require users to enable their account settings for two-step verification.
- QuickBooks can auto-fill info for some of the most common providers.
Set up webmail
- Go to QuickBooks Edit menu and select Preferences.
- Select Send Forms.
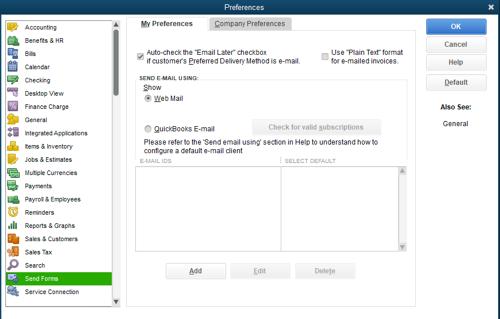
- Select Web Mail and Add.
- Fill out the Add Email Info and select OK.
- Select OK to save your changes.
Your webmail provider's login page will display. Sign in and select to grant Intuit access.
Things to know
- Hosted environments may still require you to sign in to your webmail when you send emails. (Such as Rightworks.)
- If your password isn’t accepted, see QuickBooks will not accept my webmail password for more info.
- For specific Google instructions, see Set up enhanced security in Gmail for QuickBooks Desktop.
Internet Service Provider (ISP) and Port Information
We don't support providers that use a starttls encryption.