Create and use custom fields in QuickBooks Desktop
by Intuit•3• Updated 2 years ago
Learn how to create custom fields to personalize QuickBooks Desktop for Windows and Mac.
In addition to general data fields, you can create custom fields to capture specific customer, vendor, employee, product, and service details. You can add custom fields to sales forms and reports to focus on the info that matters most to your business.
Note: Learn how many custom fields you can have in each edition of QuickBooks Desktop.
Create custom name fields
QuickBooks Desktop for Windows
Use custom name fields to track specific customer, vendor and employee info.
- Select the Customer, Vendor, or Employee menus. Then select Customer Center, Vendor Center, or Employee Center.
- Double-click any profile on the list to open and edit it.
- Select the Additional Info tab. Then select Define Fields.
- Name your custom field in the Label column.
- In the Use for column, select the checkbox to add the custom name field to customer, vendor, or employee profiles. You can track the same info for all three groups.
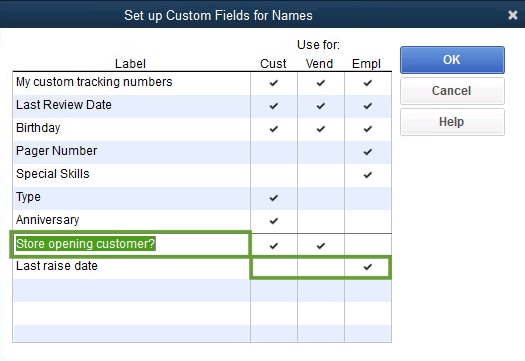
Tip: If you use QuickBooks Desktop Enterprise, you can also add preset data fields from the What kind of data? column. Select Any text to create a free-form text field. - Select OK to save the custom field.
Your custom name field now appears in the Additional Info section for the type of people you choose to track.
QuickBooks Desktop for Mac
- Go to Lists, then select the list you want to view (customers, vendors, or employees).
- Select the customer, employee, or vendor that you want to edit, then select the Pencil ✎ icon.
- On the Additional Info tab, select Define Fields.
- For each field:
- Enter the name of the field in the label column.
- Select the lists where you want the field to appear.Note: You can select a custom field for all three lists (customer, vendor, employee), but each list can only have a total of seven custom fields.
- Select OK.
Create custom item fields
Use custom item fields to track specific info for the products and services you sell.
QuickBooks Desktop for Windows
- Go to the Lists menu and select Item List.
- Double-click any item on the list to open and edit it.
- Select Custom Fields. Then select Define Fields.
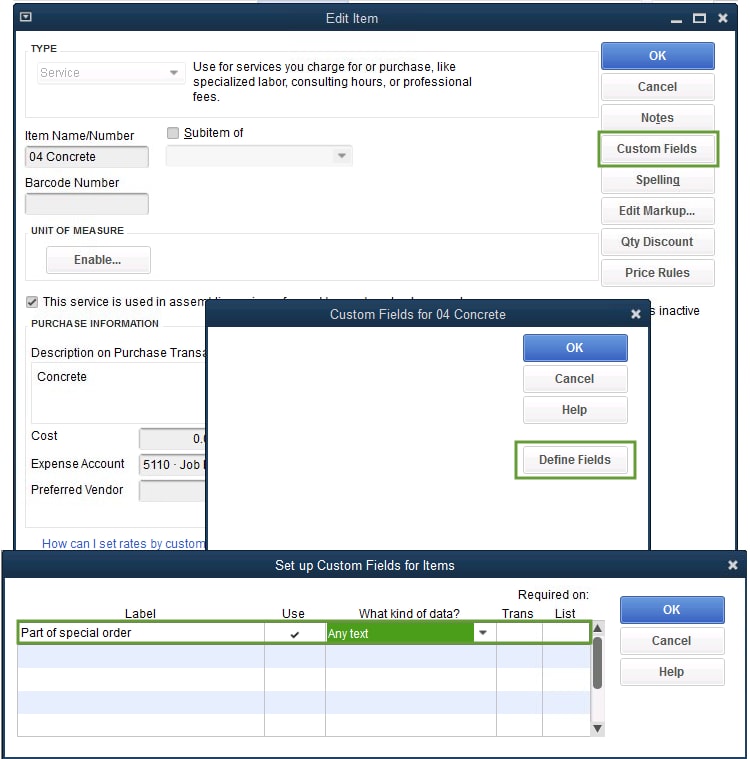
- Name your custom field in the Label column. Names aren't case-sensitive.
- In the Use column, select the checkbox to turn on the custom field.
- Select OK to save the custom field.
Your new custom item field now appears on the Custom Fields list for your products and services. You can also add custom item fields to custom transaction templates.
QuickBooks Desktop for Mac
Custom fields are available for all item types except subtotals, sales tax items, and sales tax groups.
- Go to Lists, then select Items.
- Select the item you want to edit, then select the Pencil ✎ icon.
- Select Custom fields.
- Select Define Fields.
- For each new custom field, enter the name of the field, then select the Use checkbox.
- Select OK.
Track custom name and item fields
Now you can track lots of custom data. Here are a few things you can do with your custom name and item fields.
Add custom item fields to a sales forms
- Create a new sales form, like an Invoice or Sales Receipt.
- Select the Formatting tab and then Customize Data Layout. If you are working in a locked template, select Make a Copy.
- In the window, select the tab for the section of the form you want to add your custom field to.
- Find your custom item field on the list. Select the Screen or Print boxes to add it.
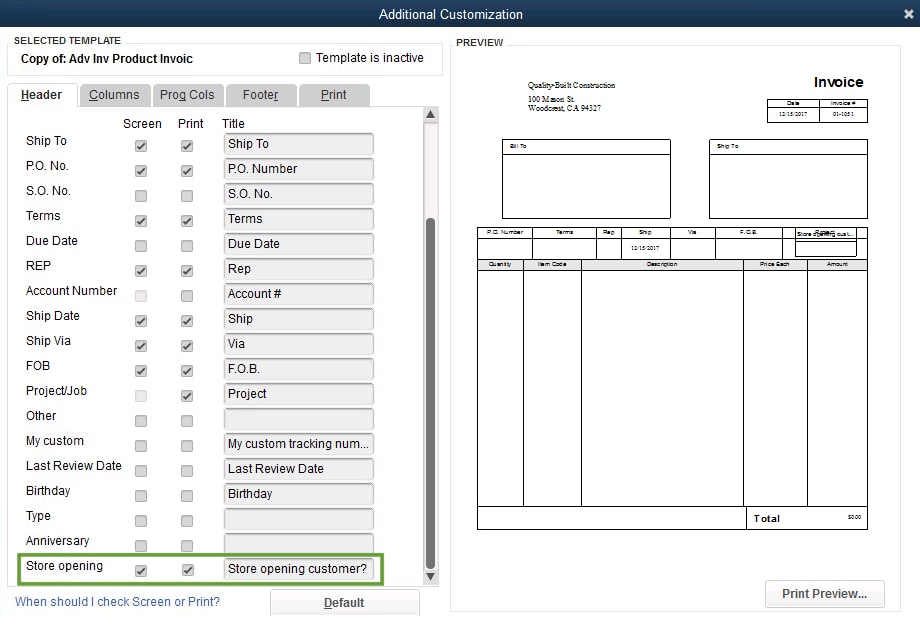
Note: Adding a field may affect the layout of your form. If you need to, here's how to adjust the layout. - When you're done, select OK.
Add custom name info to a customer, vendor, or employee profile
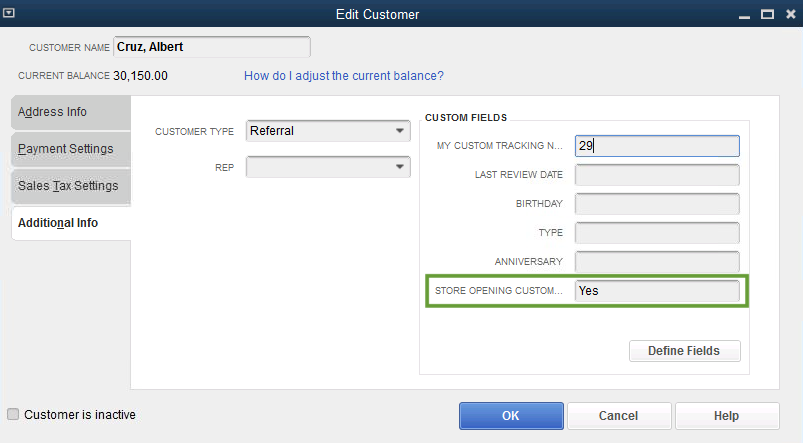
- Open a customer, vendor, or employee profile.
- Select the Additional Info tab.
- Fill out the field for your custom name field. These fields are freeform. You can enter whatever value you want to track.
Add custom name and item fields to reports
QuickBooks Desktop for Windows
- Go to the Reports menu and select Report Center.
- Open a report on the list. Note: Not all reports can show custom fields.
- Select Customize Report.
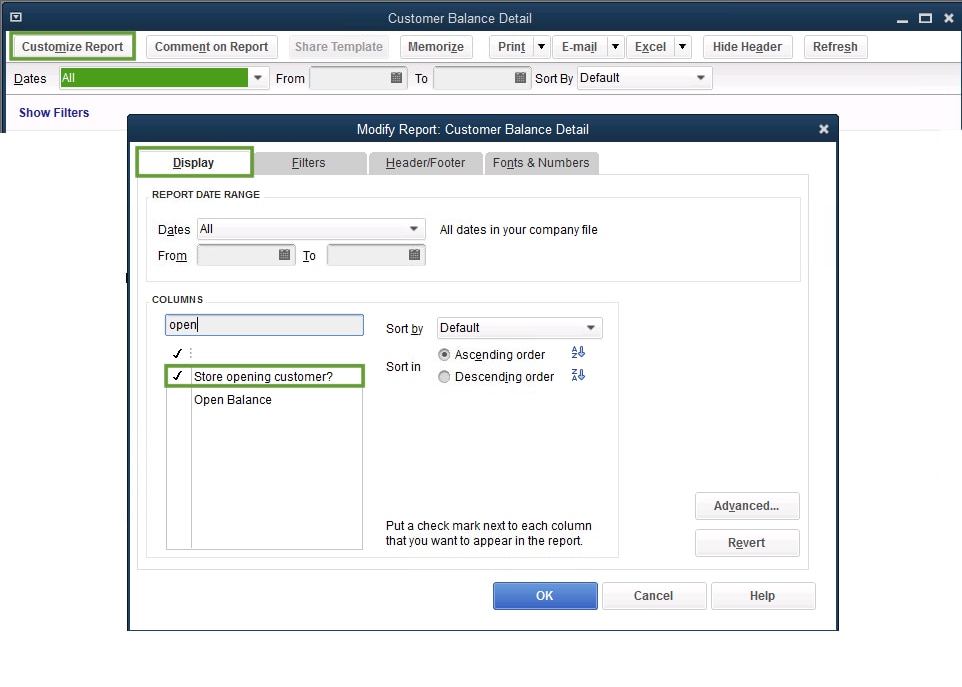
- Select the Display tab. In the columns section, search for the name of your custom name or item field.
- Select your custom name or item field. Then select OK to add it.
- Select Refresh on the report.
The custom field shows up as a column on the report.
QuickBooks Desktop for Mac
When you create a report, you can filter them to show only transactions associated with a selected custom field.
Note: You can create a report only on custom fields that appear on transactions. Reports can’t show which names on a list (customer:Job, vendor, or employee) are associated with a custom field.
- From the Reports menu, select the type of report you want to create.
- Select the Filters tab in the Customize panel.
- Select the custom field you want to use. To view all custom fields, select the Show All checkbox.
- Enter the info you want to restrict the report to. For example, if a custom field is Color and you want to show the sales of navy blue items, enter navy blue in the Color field.
Remove or rename a custom field (QuickBooks for Mac)
In transactions and reports
You can rename a custom field that changes all transactions and reports with the field, including those in the past.
- Go to Lists, then select the list you want to view (customers, vendors, items, or employees).
- Select the customer, employee, item, or vendor that you want to edit, then select the Pencil ✎ icon.
- Select the Additional Info tab (for customers, vendors, and employees) or Custom Fields (for items).
- Select Define Fields.
- Change the name of the field. Or, just clear the field name.
- Select OK.
In forms only
When you change the field name on forms only, QuickBooks retains the old name in the Report Filters window.
- Open the form you want to customize. For example, if it’s an invoice, go to Customers, then select Create Invoices.
- Select the Current template ▼ dropdown, then select Edit Current Template.... The Layout Designer window appears.
- Rename the custom field. To remove the field, uncheck the checkbox next to the custom field name.
- Close the window, then select Save.
- Enter a name on the Save As: field, then select OK.
More like this
- Set up and manage custom fields in QuickBooks Timeby QuickBooks
- Create and edit custom fieldsby QuickBooks
- Customize form templates in QuickBooks Desktop for Macby QuickBooks
- Use custom fields for vendors and expensesby QuickBooks