Create a Recurring Postcard
by Intuit• Updated 2 months ago
We’re retiring our postcards feature on October 30, 2024. You cannot create new postcards, but any recurring or ongoing postcards will continue to send until October 30.
Automate your postcards with a recurring campaign. Choose a schedule and audience, set a budget, and we’ll take care of the rest.
In this article, you'll learn how to create a recurring postcard campaign.
Before you start
Here are some things to know before you begin this process.
- Make sure you’re familiar with how postcards work in Mailchimp, including pricing and delivery estimates. To learn more, check out About Postcards.
- For GDPR compliance, you'll want to create and send to segments that only include contacts who have consented to direct mail.
- To address postcards with data from your audience, make sure your audience includes properly formatted First Name, Last Name, and Address fields. The associated merge tag for each field should be FNAME, LNAME, and ADDRESS, respectively. To learn more, read Verify or Format the Address Field or Format and Import Mailing Addresses.
- Postcards do not support inserting merge tags.
- Discounts and promotions do not apply to postcards at this time.
How it works

The recurring campaign automatically sends postcards at regular intervals on your behalf. You can use this campaign to showcase a product, remind people of events, share promo codes, and more.
With each new send, we’ll check your audience for new contacts or addresses, and order as many postcards as your budget allows. Between sends, you can pause and edit the schedule, budget, or content of your postcard at any time.
The people in the audience you choose will receive a postcard with every recurring send, unless you use segmentation to filter them out. For example, if you only want to send a monthly postcard to new subscribers, you might target a segment with the parameters Email Date Added | is within the past 30 days.
Create campaign
To create a recurring postcard campaign, follow these steps.
- Click Create.
- Click Postcard.
- Click Recurring.
- Enter a campaign name and click Begin.
This will take you to the builder, where you’ll decide on a schedule, choose an audience, set your budget, and add your content.
Edit schedule
To choose how often your recurring campaign will send, follow these steps.
- Click Edit Schedule.

- Click the drop-down menu and choose Every month, Every 3 months, or Every 6 months.

- Click Save.

Set audience and budget
You can send postcards to any type of contact, regardless of their email marketing status. If you want to use the mailing address data in your audience, make sure it’s properly formatted. If you're missing addresses for one or more contacts, our address finder tool may be able to help. The higher your budget, the more people you have the potential to reach.
With recurring postcards, your budget is the maximum amount you’re willing to spend on each recurring send. For example, if you set a $100 budget and schedule your campaign to send every month, you’ll be charged up to $100 a month as long as your campaign is active.
To set your audience and budget, follow these steps.
- In the To section of the postcard builder, click Add Recipients.

- Click the Audience drop-down menu to choose the audience you want to work with.
- Click the Segment drop-down menu to refine your audience. By default, this is set to target All contacts in your audience, including unsubscribed and non-subscribed. You can only send to a custom segment if you’ve saved it ahead of time.
- In the Budget field, enter the maximum amount you want to pay for each recurring send.

The more postcards you send, the less you’ll pay per unit. To see the different pricing tiers, click View postcard pricing. The amount you can spend on postcards is limited to $10,000 per day. - Click Save.

After you save, we’ll review your audience for available addresses. Then, we’ll display the total cost of your send, including postcards, postage, and sales tax. The cost of each recurring send may vary if you add or remove contacts or addresses, but will never exceed your budget.
Add content
Choose a main image for the front of your postcard, and add a heading, body text, and optional brand logo to the back. You can also include a promo code from your online store. Content will appear on the preview as you add it.
To add content to your postcard, follow these steps.
- In the Content section of the postcard builder, click Add Content.

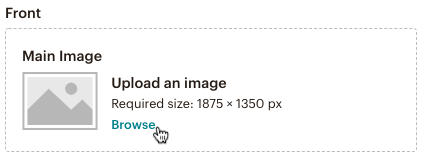
- In the Front section, click Upload An Image and choose an image from the content studio.

This will be the Main image for your postcard. Here are some things to consider when you choose this image.- Postcards support JPEG and PNG file types only.
- We recommend a minimum image size of 1875-by-1350px to ensure a high-quality print.
- The finished postcard size is 4.25 inches by 6 inches after printing and trimming the outer ⅛” bleed zone.
- The output file should be 72dpi.
- We’ll automatically convert your image to CMYK color.
- Digital photos display darker in print. If your image is very dark, you may want to brighten it a little bit.
- In the Back section, enter a Heading and Body.

- Optional: To include a promo code from your connected online store, check the Include promo code box, then click the drop-down menus to choose a store and code. You’ll need to create the code in your store before you can add it to a postcard.

We’ll track purchases made with this code and display the usage and revenue totals in your postcard report. For the most accurate results, we recommend you create an exclusive promo code for each postcard campaign. - Optional: In the Logo section, click Upload An Image to choose a JPEG or PNG image file from the content studio. This will appear on the bottom left of the back of your postcard.

- Click Save.

Nice job! Now that you’ve designed your postcard, you’ll want to preview it to make sure everything looks good and prints as expected.
Preview your postcard
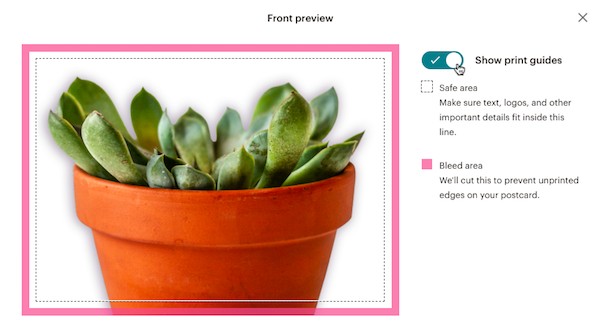
When your postcard goes to the printer, they’ll trim the sides so that the design extends to the edges. Our postcard preview tool shows you exactly where they’ll cut, so you can make sure important details won’t be removed.
To preview your postcard, follow these steps.
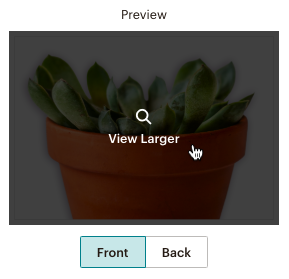
- Click the preview for the Front or Back of your postcard.

- In the preview modal, toggle on the Show print guides slider.

You’ll see lines that mark the Safe area and ⅛” Bleed area. We recommend you keep all important details, such as text, inside the dotted line. - Review your postcard and click the X in the upper-right corner to exit the modal.
Start sending
After you’ve entered your settings and previewed your content, you’ll be ready to send. We’ll begin to process the first postcard order as soon as you start your campaign.
To start your recurring postcard campaign, follow these steps.
- Click Start Sending.

- In the pop-up modal, click Confirm Order to confirm.

Great job! Your campaign will display as Processing as we prepare to send your order to the printer.
View report
To view your report, navigate to the Reports section of your Mailchimp account and click the name of your postcard campaign.
Here’s what you’ll find in your postcard campaign report.
- Tracking tool
Follows each send order to delivery. The tracking stages are: Order placed, Sent to printer, Printing complete, Mailed, and Delivered. The Delivered status is currently limited to U.S. recipients. - Status
Matches the tracking tool and includes a timestamp where possible. This will display as “Processing” as we review the most recent order. - Audience
Who you chose to receive your campaign. - Total Postcards sent (all time)
The number of postcards sent to date. If your audience includes recipients outside the U.S., we’ll also show you a breakdown of U.S. and international sends. - Total spent (all time)
The amount spent on all sends to date. - Promo code uses and revenue
If your postcard includes a promo code from your connected store, we’ll show you the number of times it's been used, as well as the total revenue generated from those purchases.
Your report will also display the front and back of your finished postcard.
Sign in now for personalized help
See articles customized for your product and join our large community of QuickBooks users.
More like this
- About Postcardsby QuickBooks•Updated September 04, 2024
- Schedule or Cancel a Postcardby QuickBooks•Updated September 04, 2024
- Getting Started with Reportsby QuickBooks•Updated September 04, 2024
- Create recurring transactions in QuickBooks Onlineby QuickBooks•2082•Updated 2 weeks ago


