Record a line of credit loan
by Intuit•102• Updated 1 month ago
Learn how to record yourQuickBooks Line of Credit loan once the invoice has been funded.
To record the loan correctly in QuickBooks, you’ll need to create a liability account to receive the Line of Credit funds.
| Note: We recommend you ask your accountant if you have questions about how to do this. |
Step 1: Create a liability account to track Line of Credit loans
Create a liability account in the Chart of Accounts.
- Go to Settings
 and select Chart of accounts (Take me there).
 - Select New, Account Type ▼and then Other Current Liabilities.
- In Detail Type ▼, select the detail type that best fits the transactions you want to track.
Tip: Customers who use Line of Credit generally choose Loan Payable as the detail type. - Give your new account a name. Use the detail type description to create a name that describes what you want to track. In this case, you could use Line of Credit Liability as an account name.
- Add a description.
- When you're done, select Save and Close.
Step 2: Receive Line of Credit funds after funding an Invoice
Once you fund an invoice and get the loan money, record the deposit inQuickBooks.
- If you have your bank account connected in QuickBooks Online
- Record an intercepted payment in QuickBooks Online
- If your customer pays the invoice outside QuickBooks
If your bank account is connected to QuickBooks
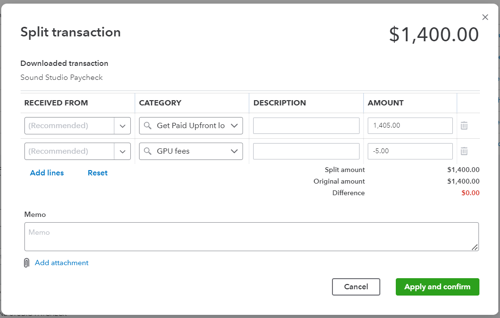
- Find the deposit in Banking. Check the bank account you use for Line of Credit funds. If the bank isn't connected, you can manually enter the bank deposit info.
- Select split transaction. In Category, select the liability account you created for the Line of Credit loan. Enter the original invoice amount.
- On the next line, select the expense account used to track Line of Credit fees. Enter the amount of the fee as a negative number. The deposit should be the same as the net amount deposited into the bank.
- Select Apply and confirm.
Record a payment QuickBooks automatically applies
If your customer pays the invoice within the first 30 days, QB Capital applies the payment to pay off your Line of Credit loan. This is known as an intercepted payment.
You won't get paid by your client like you normally would when the Line of Credit feature isn't used. To record the transaction, you'll need to do a few more things.
| Note: If your customer pays through the payment link on their invoice (the counterpart portal), QuickBooks creates a linked payment transaction to Undeposited Funds. The invoice is marked as paid. |
Step 1: Balance your Line of Credit payment
- Select + Create.
- Select Journal Entry.
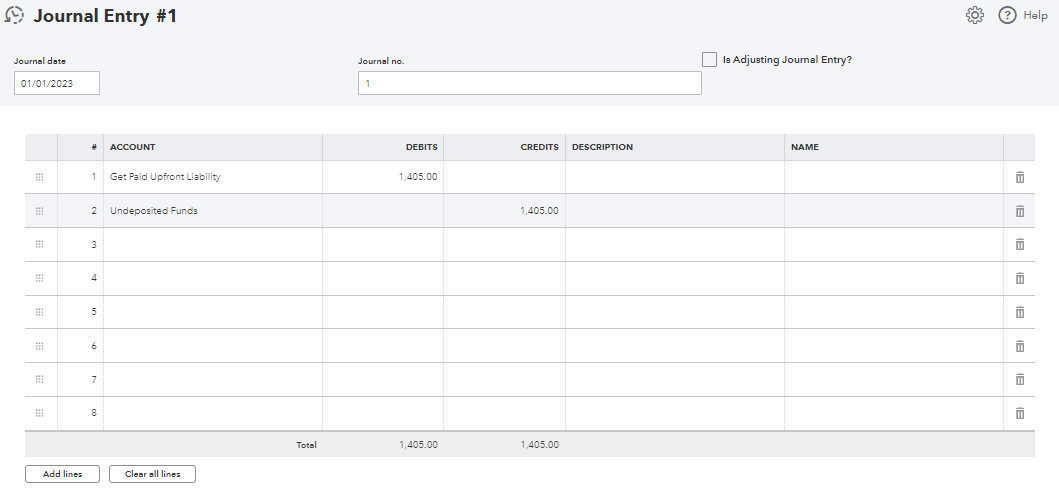
- In Account ▼, select the Liability account created to track Line of Credit loans. Enter the full amount received from the customer (full invoice amount) in Debit.
- On the next line, in Account ▼, select Undeposited Funds, and enter the full invoice amount in the Credit field. The entry should balance on both the debit and credit.
- Select Save and close.
Step 2: Clear the payment from your undeposited funds account
- Select + Create.
- Select Bank Deposit.
- In Account ▼, select the bank account.
- In Date, enter the date when the payment was received.
- Find the payment and check the box.
- Find the journal entry for the same amount and check the box. The deposit should show $0.00.
- Select Save and close.
Your customer pays the invoice outside QuickBooks
Step 1: Record the invoice payment
Record the invoice payment like you would normally.
Step 2: Repay the loan within 30 days.
- Select + Create.
- Select Expense.
- In Category ▼, select the liability account created to track Line of Credit loans.
- In Amount, enter the total payment. The payment should match the invoice amount to pay the loan off.
- Check to make sure the date and bank account are correct.
- Select Save and close.
More like this
- Manage expenses and increase cash flow with QuickBooks Line of Creditby QuickBooks
- Increase cash flowby QuickBooks
- QuickBooks Capital FAQby QuickBooks
- Record a loan for an asset in QuickBooks Onlineby QuickBooks