Set up vehicles and mileage tracking to use with the mobile app
by Intuit•153• Updated 5 days ago
Learn how to set up vehicles and mileage tracking in QuickBooks Online and the QuickBooks Online mobile app.
Note: This feature is limited for QuickBooks Online Free and QuickBooks Online Lite. Upgrade your plan to get more features. Go to Settings ![]() , then Subscriptions and billing. Then select Upgrade your plan.
, then Subscriptions and billing. Then select Upgrade your plan.
Use the QuickBooks Online mobile app to track business mileage for your vehicles. Keep track of your trips and vehicle info during the year so you have everything you need to make deductions at tax time.
For a better experience, open this article in QuickBooks Online. Launch side-by-side view
If you're already set up, follow these steps to automatically track your mileage.
The QuickBooks design has been updated! If this video doesn't match what you see in QuickBooks, use the in-app Search bar to navigate to the page you need.
Get payroll, time tracking, and accounting data seamlessly connect, so you can reduce inefficiencies and save nearly 4 hours a week with QuickBooks Time.
Add a vehicle to QuickBooks
You can add as many vehicles as you need. Follow the steps for your web browser or mobile experience.
Allow location access on your mobile device
For auto-tracking to work, allow location access for QuickBooks on your mobile device. Follow these steps depending on the mobile device you use:
Turn on mileage tracking
Turn on automatic mileage tracking in the QuickBooks Online mobile app. These steps work for both iOS and Android mobile devices.
Note:
- Add your vehicle info before you start tracking your mileage.
- Currently, only Primary Admin and Company Admin can track mileage in QuickBooks Online. Each user can only view their own mileage. Here’s how to change user permissions so your driver can track their mileage.
- Go to Menu ☰, then tap Mileage.
- Tap Auto-tracking.
- Tap the switch
to turn on Auto-tracking.
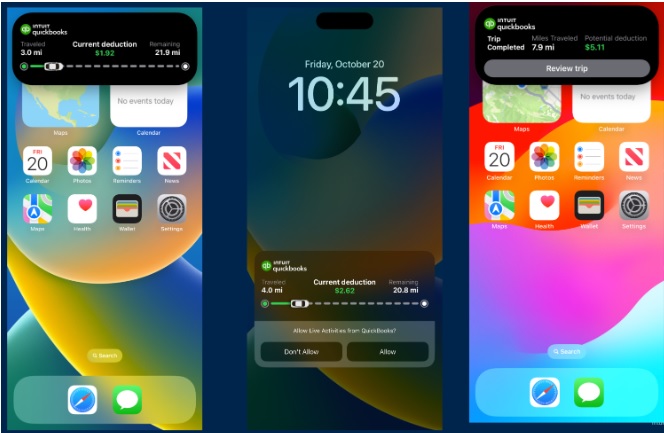
Use the Trips Live Activity feature
On an iPhone to use the Trips Live Activity feature for the Current Allowable Expenses:
Important: Only available for iPhone 14 models and above.
- Go to the Today tab and tap Track Trip from the Quick Actions menu, or go to the Menu (☰) and tap Mileage.
- Tap Track a Trip.
- Tap Start to begin tracking your trip.
- Enter the destination address in the Add Destination screen or select address from the list having previous address
- A Live Activity Message will be displayed and Dynamic Island will appear on the lock or home screen.
Note: Should you lose your connection, your trip will still be saved in the unreviewed section so you can review it once your connection is re-established.

Manage your vehicles
You can add as many vehicles as you need. Tip: Add your vehicle info before you start tracking your mileage.
Track business miles
Now that you’re all set up, check out how you can track trips with the QuickBooks Online mobile app.
Note: The accountant is the only one who has the view of "Download your client's trip log". If you don't, it's because you are the Primary Admin. You can only access the page if you are a firm user.
Add and edit favorite locations
You can create and manage a list of your favorite locations. These will auto-populate when it comes time to review your trips.
- Sign in to your QuickBooks Online account.
- Go to Expenses and select Mileage (Take me there).
- In the Add trip dropdown ▼, select Manage favorite locations.
- Select Add favorite location, or choose an existing location to edit.
- Enter an address in the Address field. QuickBooks may auto-suggest the location as you type.
- Enter a Name for this location.
- Select Save when finished.
More like this
- Learn how QuickBooks Self-Employed calculates mileage deductionsby QuickBooks
- Update vehicle info in QuickBooks Self-Employedby QuickBooks
- Why some deductions don't automatically export to TurboTax Self-Employedby QuickBooks
- Learn about standard mileage and actual expenses deduction methodsby QuickBooks
- Automatically track mileage in QuickBooks Self-Employedby QuickBooks