Write off inventory items given as promotional samples
by Intuit•23• Updated 1 month ago
Learn how to write off inventory items you used for promotional samples.
 Inventory features are available for QuickBooks Online Plus and Advanced. If you don’t have Plus or Advanced, upgrade your QuickBooks plan to start tracking your inventory.
Promotional samples given to customers count as inventory items. We’ll show you how to adjust your inventory and move the Cost of Goods to a Promotional Expense account.
|
Create an expense account to track
Here's how to create an expense account to track:
- Go to Settings
 and select Chart of accounts (Take me there).
 - Select New.
- From the Account Type dropdown, select Expenses.
- From the Detail Type dropdown, select Advertising/Promotional.
- Enter the name (ex. Promotional/Samples-Not for Sale).
- Select Save and Close.
Create an invoice for the item
Here's how to create an invoice for the item:
- Select + Create.
- Select Invoice and complete the fields.
- Select Save and close.
Notes:
- Creating an invoice will reduce the item count in your inventory.
- Under Description and Memo, explain the action (ex. to write off Promotional Sample Invoice #).
Run a Profit and Loss report
To see the income and cost of goods amount you need for your journal entry, run a Profit and Loss report on Accrual basis.
- Go to Reports
 , then Standard reports (Take me there).. Search for and open the Profit and Loss report.
 - Enter the invoice date.
- For Accounting method, select Accrual.
- Select Run report.
- Identify the amount of Income and Cost of Goods you need to adjust.
Create a journal entry
This removes the income, credits the customer in Accounts Receivable, and credits Cost of Goods to record the Expense.
- Select + Create.
- Select Journal entry.
- Enter the date.
On the first line:
- Under Account, select Sales of Product Income.
- Under Debits, enter the amount you are writing off.
- Under Description and Memo, type something like "To write off Promotional Sample Invoice # - [insert client name]".
On the second line:
- Under Account, select Cost of Goods Sold.
- Under Credits, enter the amount that the Cost of Goods are for this product.
- The Memo field should auto-populate.
- Under Name, select the customer name.
On the third line:
- Under Account, select Accounts Receivable.
- Under Credits, enter the same amount as the write-off.
- The Memo field should auto-populate.
- Under Name, select the customer name.
On the fourth line:
- Under Account, select Promotional/Samples.
- The Debits amount should auto-populate.
- The Memo field should auto-populate.
- Under Name, select the customer name.
- Select Save.
Apply the credit memo
Here's how to apply the credit memo:
- Select + Create.
- Select Receive payment.
- Select the customer name.
- All open transactions should be listed. Check the box beside the one(s) you want, then select Save and new. If there are no transactions, select Cancel.
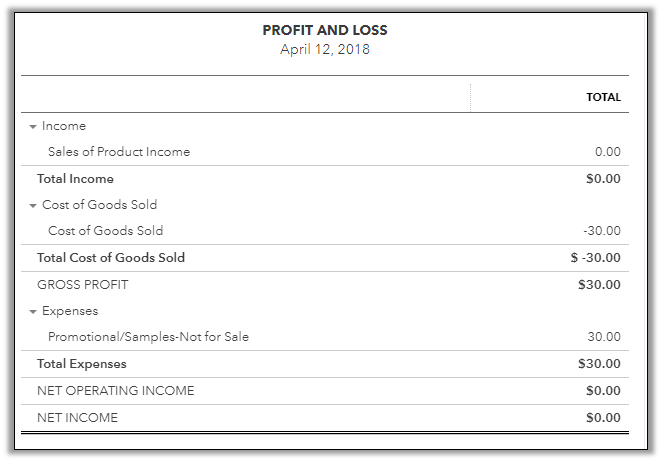
End result sample
The end result should look like this sample:

More like this
- Cash Basis reports are incorrect when inventory items have a zero sales priceby QuickBooks
- Accountant tools: Write off invoicesby QuickBooks
- Receive inventory with an Item Receiptby QuickBooks
- Write off bad debtby QuickBooks