Set up sales tax in QuickBooks Desktop
by Intuit•14• Updated 2 days ago
You may need to collect sales tax on certain goods and services you offer. QuickBooks helps you keep an accurate record of these taxes so you can monitor and remit them to the correct tax agency.
Note: always verify tax rates and requirements with your tax agency before setting up sales tax items or groups.
Turn on Sales Tax Feature
To start recording sales tax in QuickBooks Desktop, you need to turn on this feature and set up sales tax items or tax groups.
- Go to the Edit menu, then select Preferences.
- In the Preferences window, select Sales Tax.
- Go to the Company Preferences tab.
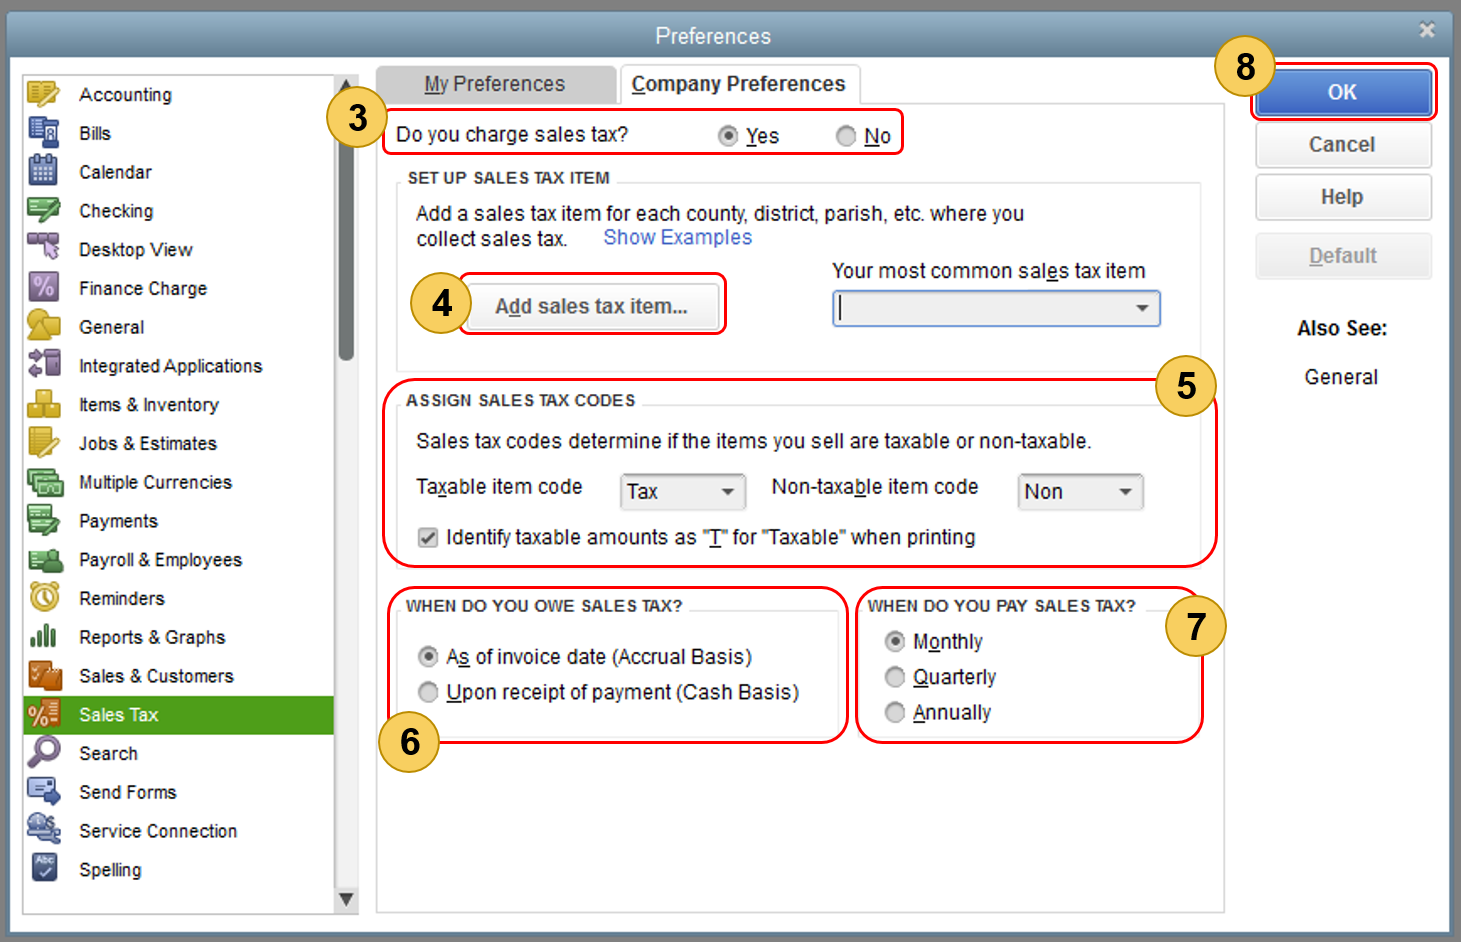
- Select Yes to turn on sales tax in the Do you charge sales tax section.
Configure Sales Tax Settings
While in the Company Preferences tab for Sales Tax:
- Set up Sales Tax Items: Add a sales tax item for each location (county, district, city) where you collect sales tax. Select Add sales tax item... to begin this process. See instructions below for creating items and groups.
- Assign Sales Tax Codes: These codes help differentiate taxable from nontaxable sales and customers for reporting. QuickBooks automatically creates TAX (taxable) and NON (nontaxable) codes when you turn on sales tax.
- use TAX for items/customers requiring tax collection.
- use NON for tax-exempt items/customers (for example, non-profits, out-of-state sales, resale items).
- Set Tax Basis: Choose when you owe sales tax:
- As of invoice date (Accrual Basis)
- Upon receipt of payment (Cash Basis)
- Consider your company's accounting preference.
- Set Payment Frequency: Choose how often you pay sales tax:
- Monthly
- Quarterly
- Annually
- Select OK to save the preferences.
Create Sales Tax Items and Groups
Sales Tax Item
A sales tax item calculates a specific tax charge amount on taxable sales.
To create a new sales tax item:
- From the Type dropdown (when adding a sales tax item), choose Sales Tax Item.
- In the Sales Tax Name field, enter a name, preferably related to the tax location. Add more details in the Description field.
- In the Tax Rate (%) field, enter the specific rate.
- In the Tax Agency field, enter the name of the collecting agency (set up as a Vendor). If the agency isn't listed, select Add New to set it up.
- Select OK.
To edit an existing sales tax item:
- Go to the Lists menu, then select Item List.
- Find the sales tax item you want to update.
- Right-click the item and select Edit Item (pencil icon in QuickBooks for Mac).
- Update the name, rate, or tax agency as needed.
- Select OK.
Sales Tax Group
Use a sales tax group when more than one sales tax item applies to the same transaction but needs to appear as a single line item on forms. You can still track and report each tax individually.
To create a sales tax group:
- From the Type dropdown (when adding a sales tax item), choose Sales Tax Group.
- In the Group Name/Number field, enter a preferred name for the group. Add more details in the Description field.
- Add each sales tax item that belongs to the group. If an item doesn't exist yet, select Add New and follow the steps to create a sales tax item.
- Select OK.
Assign Sales Tax Codes
Assigning the correct sales tax codes (like TAX or NON) to items and customers helps you report correctly on taxable, and non-taxable sales.
Set Up Non-Taxable Status
For an Item
- Go to the Lists menu, then select Item List.
- Select Item, then New (or Edit item to change an existing item).
- From the tax code dropdown, choose Non Taxable Sales (or Non Taxable Labor).
For a Customer
- Go to the Customers menu, then select Customer Center.
- Right-click the customer name and select Edit Customer:job. If the customer isn't set up yet, select New Customer & Job > New Customer.
- Go to the Sales Tax Settings tab.
- From the Tax Code dropdown, choose Non-Taxable Sales (or Service).
- Enter the customer’s resale certification number in the Resale No. Field.
- Select OK.
Create Specific Tax Codes
If the default TAX and NON codes are insufficient, you can create custom ones.
- From any Tax Code dropdown, select Add New.
Other Non-Taxable Codes: You might use these codes for specific situations:
| Sales tax code | When to use |
| OOS | OUT-OF-STATE SALES. Many states don't charge sales tax for out-of-state sales. You might give this sales tax code to a customer who bought your product from your store, but lives in another state. Many QuickBooks company files already include this nontaxable sales tax code. |
| LBR | LABOR. In many states, labor services are not taxed, so you might assign LBR to a service item. Some QuickBooks company files already include this non-taxable sales tax code. |
| NPO | NON-PROFIT ORGANIZATIONS. Such organizations are not charged sales tax, even if the products and services you sell are taxable. NPO would be assigned to a customer. |
| GOV | GOV. Sales to government offices, which are not taxed. |
| WHL | WHOLESALERS. Customers who are simply reselling the goods they buy from you. |
| RSL | RESELLERS. Customers who are reselling the products they buy from you or who are using your products to create a product of their own, which they then sell. |
More like this
- Set up sales tax in QuickBooks Desktop for Macby QuickBooks
- Set up sales tax in QuickBooks Desktop Point of Saleby QuickBooks
- Collect sales tax in QuickBooks Desktop for Macby QuickBooks
- Sales tax in QuickBooks Onlineby QuickBooks