Space for pervasive banner when authenticated
Fix issues at the end of a reconciliation in QuickBooks Online


Learn what to do if QuickBooks Online doesn't match your bank statement at the end of a reconciliation.
When you reconcile an account, you compare specific transactions in QuickBooks to your bank statement. If everything is in place, the difference between the ending balances should be zero.
If the ending balances don't match, find and fix issues, then finish reconciling.
| Tip: If you haven't already, start with our reconciliation guide. There may be other issues you need to fix first to get a correct ending balance. |
Prerequisite
Before you start, check out our reconciliation guide to learn more about reconciling your accounts.
Learn what causes ending balance issues
Someone entered an incorrect ending balance at the start of the reconciliation.
Someone entered transactions into QuickBooks that haven't cleared your bank yet.
There are missing or duplicate transactions in QuickBooks.
Get personalized help using QuickBooks with Intuit Experts.
Step 1: Review the opening and beginning balance
To make sure that you’re starting with accurate numbers, review the opening balance and the beginning balance in QuickBooks and on your bank statement.
When the balances are correct and identical, move on to step 2.
Step 2: Check the ending balance you entered
After you start a reconciliation in QuickBooks, you need to enter the ending balance from your bank statement. QuickBooks uses this balance to check for accuracy.
To make sure you entered the correct ending balance for a reconciliation, follow these steps.
Go to All apps
 , then Accounting, then Reconcile (Take me there).
In the Reconciliation window, select Edit info.
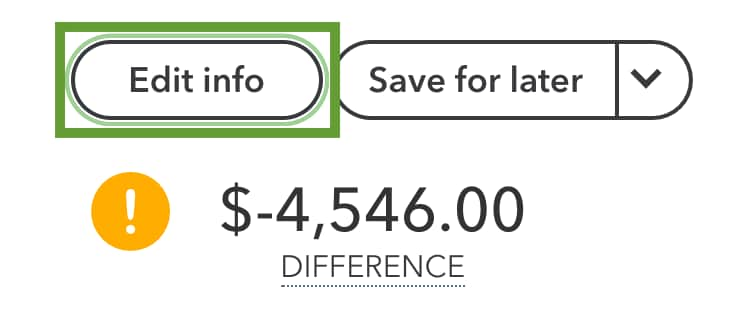
Review the Ending balance and Ending date.
Check the balances against your bank statement.
Make edits as needed.
When you're done, select Save.
If your balances in QuickBooks and on your bank statement still don’t match, move on to step 3.
Step 3: Combine multiple transactions into a single transaction
If your bank combined several payments as a single record, you should do the same in QuickBooks. Sometimes, individual payments appear as errors. If you notice that you didn't combine the same payments in QuickBooks that your bank combined on your statement, put them into the Undeposited Funds account. Then, make a bank deposit to combine them into a single record.
If your balances in QuickBooks and on your bank statement still don’t match, move on to step 4.
Step 4: Eliminate transactions you know are correct
After you review your opening, beginning, and ending balances, eliminate these as the reconciliation issue. After you combine individual QuickBooks transactions to match your bank statement, you can also rule these transactions out.
As a next step, review your bank statement again, then mark the specific transactions that match QuickBooks. This narrows down the list of potential issues.
If your balances in QuickBooks and on your bank statement still don’t match, move on to step 5.
Step 5: Enter transactions that aren't in QuickBooks
If your accounts are connected to online banking, review and categorize all of your downloaded transactions. You can't reconcile them until you do.
Next, review the list of transactions in the Reconciliation window.
If you see transactions on your bank statement that aren't in QuickBooks, follow these steps.
Check your sales and expense transactions to verify the transactions you see on your bank statement, but not in QuickBooks.
If you find any, select and open them.
Check the Deposit to or Payment account. Make sure the transactions are in the correct account. Select a different account as needed.
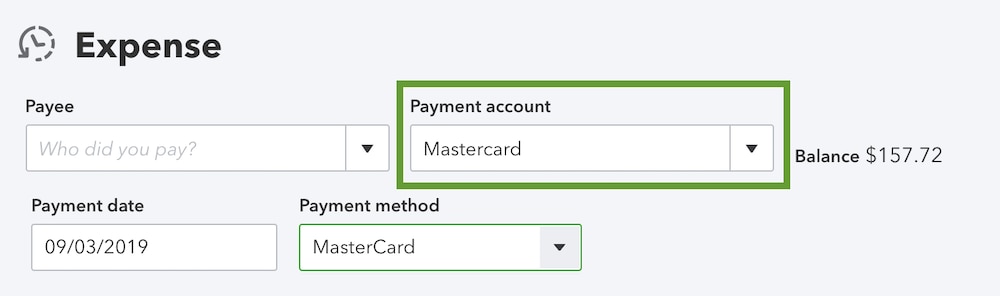
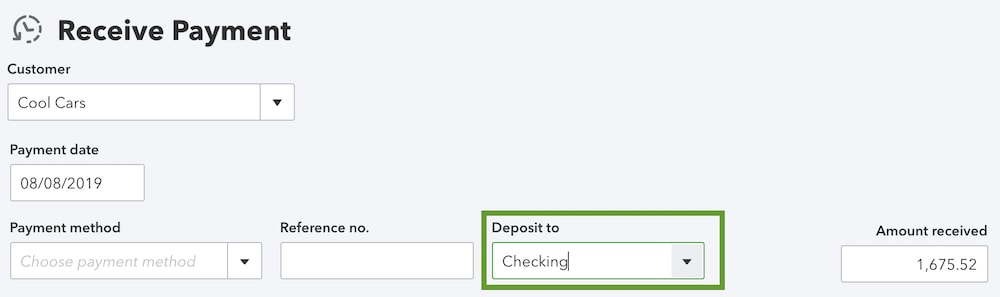
Now that you've triple-checked QuickBooks, enter any missing transactions. Use your bank statement as a guide. Enter any transactions that you see on your bank statement but not in QuickBooks as new sales receipts or expenses.
If your balances in QuickBooks and on your bank statement still don’t match, move on to step 6.
Step 6: Remove transactions that aren't on your bank statement
To cross-check, review the transactions in the Reconciliation window in QuickBooks with your bank statement.
If you see transactions in QuickBooks that aren’t on your bank statement, follow these steps.
Check the transaction date and review your bank statements for that time period.
Make note of the date and amount of the transaction.
Run a Past Reconciliation report for those dates.
If the transaction wasn't on the past reconciliation report
Go to All apps
, then Accounting, then Chart of accounts (Take me there).Find the account you’re reconciling and select View register.
Find the transaction and select it to expand the view.
If the box in the checkmark column is blank or has a C, make sure the transaction is correct.
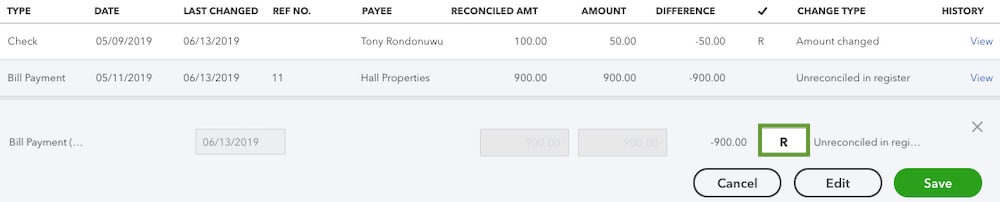
Select the box in the checkmark column until you see an R. If there's already an R in the checkmark column, leave it alone.
When you're done, select Save.
If the transaction was on the past reconciliation report
Check the transactions, Sales transactions (Take me there), and Expense transactions (Take me there) .
Sort the lists by date, customer, vendor, or amount.
If you find obvious duplicates, you can safely delete them.
Important: Only delete transactions if you're absolutely certain they're a duplicate or error. If not, check with your bookkeeper. Go to All apps
, then Accounting, then Chart of accounts (Take me there).Find the account you’re reconciling and select View register.
Find the transaction and select it to expand the view.
Select Delete and then Yes to confirm.
If your balances in QuickBooks and on your bank statement still don’t match, move on to step 7.
Step 7: Review transactions that are slightly off
A transaction in QuickBooks can closely match a transaction on your bank statement without being exact. If you find transactions that are slightly off, reach out to your accountant.
You shouldn't edit transactions, like invoices, that customers have already paid for.
Sometimes, banks add fees to transactions that weren't included when you originally entered it into QuickBooks.
If fees were added to transactions on your bank statement, follow these steps.
Select + Create.
Select Bank deposit.
Follow the steps to add a bank or processing fee to the account you're reconciling.
In the Memo section, add a note about which transaction it's tied to.
Bank or credit card statement mistakes
If you can't find errors in QuickBooks Online, there may be an error with the bank or credit card company. Here's how to check for mistakes on your bank or credit card statement.
Next steps: Finish reconciling
After your ending balance in QuickBooks matches your bank statement, finish reconciling.
Sign in now for personalized help
See articles customized for your product and join our large community of QuickBooks users.
Call Sales: 1-800-365-9606