Learn how to pay bills using QuickBooks Desktop.
With Online Bill Pay, you can directly pay your vendor bills in QuickBooks. It also records your payment automatically in QuickBooks so your records are accurate. Here’s how to set it up.
Note: QuickBooks Desktop Bill Pay provided by Fiserv was retired on December 2, 2019.
Set up direct connect in QuickBooks Desktop
To set up an account, you need to apply for online payment services through your bank. Once you’re approved, you can connect your bank account to QuickBooks. Then, you can pay your vendor bills directly in QuickBooks.
Pay your vendors using the Pay Bills window
Important: The bank controls online bill pay, which means that each bank determines their own buffer. If you get an alert about “Invalid Send On Date”, try forwarding the delivery date.
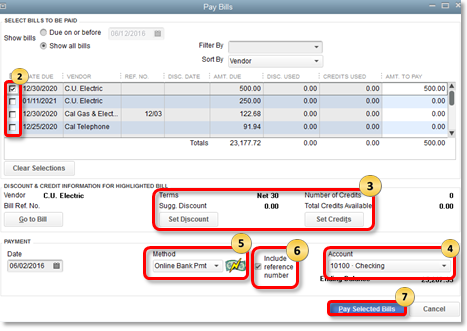
- From the Vendors menu, select Pay Bills.
- Select the bill(s) to pay.
- Set any discount or credits that you want to apply.
- From the Account dropdown, choose the checking account with the online vendor payment service.
- From the Method dropdown, choose Online Bank Pmt.
- Add a reference number or change the dates if needed (optional):
- Select the Include reference no. checkbox if you want bill or credit reference numbers to be sent along with your name and account number. If you select this option, the payment will not be sent electronically. The payment processor will print and mail a check to the payee instead.
- Change the date(s) as needed. If your payment processor requires lead time to prepare the payment, QuickBooks shows both the Process On date (the date the funds are withdrawn from your account) and a Delivery On date for the payment. Otherwise, there's only a payment date.
- Select Pay Selected Bills to record the bill payment. The Payment Summary window opens to show the bills that were successfully recorded.
The payment appears in the Items to Send list of the Bank Feeds. The payments aren't sent until you go online and select Send Items.
Pay your vendors using the Write Checks window
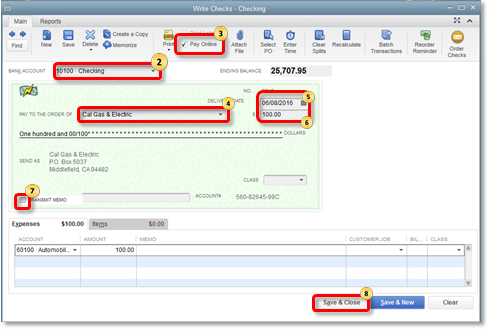
- From the Banking menu, choose Write Checks.
- From the Bank Account dropdown, select the checking account with the online vendor payment service.
- Select the Pay Online checkbox.
- From the Pay to the Order of dropdown, choose the vendor to pay.
- In the Delivery Date field, enter the date you want the check to be delivered or processed. (QuickBooks calculates the appropriate lead time for this vendor and enters the correct date.)
- In the $ field, enter the amount of the check.
- Follow one or more of the optional bullet steps as appropriate:
- Select the Transmit Memo checkbox, then enter a note to your payee in the memo field. Note that if you enter a memo, the payment won't be sent electronically. The payment processor will print and mail a check to the payee instead. Important: If the Transmit memo option is grayed out or not available, the extended payments service is not available at this FI.
- If you need to edit items displayed from a purchase order: Select the Items tab, then enter the purchased item in the detail area and associate it with the appropriate customer:job.
- If you need to enter new items, select the Items tab, then enter the new items in the detail area.
- To enter shipping charges, taxes, and other expenses not associated with any one item, select the Expenses tab. Then enter each charge and associate it with its correct expense account in the detail area.
- Choose Save & Close.
FAQs
How do I inquire about an online payment to a vendor?
If you pay vendors online, you can inquire about the status of a payment you have sent to your Financial Institution (FI) by following these steps:
- Open the register of the account from which you made the payment.
- In the register, locate then open the transaction you want to inquire about.
- Go to Banking , then select Bank Feeds.
- Select Learn About Online Bill Payment.
Note: To include a message with your inquiry, select the Include text message, then enter your question or comment about the payment in the Message section.
The inquiry appears in the Items to Send list of the Bank Feeds. When you go online, it's sent to the FI.
What information can be sent with online vendor payment?
This depends on the processing service your FI uses. Your FI may permit transmittal of the following items with your online vendor payment:
- Invoice information sent as a payment voucher
- A descriptive memo
- Discount information associated with a particular invoice
Contact your FI to find out your options.
How do I cancel an online payment after sending it?
When you create an online payment, you include a delivery date. Because your FI doesn't process the payment until that delivery date, there may be a short period of time when you can cancel a payment instruction even after it has been sent to the FI.
Note that canceling a payment instruction means that your FI won't issue an electronic payment or a check to the payee. It doesn't stop payment when the payment has already been processed or on a check that has already been sent to the payee. In these cases, contact your FI.
To cancel an online payment after sending it:
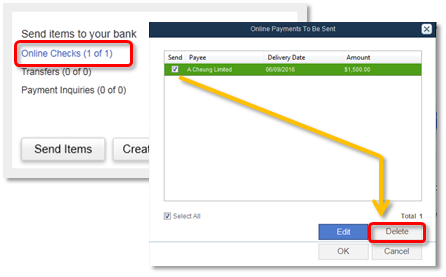
- Go to Banking, then select Bank Feeds.
- Select Bank Feeds Center.
- From the left pane, select the account set up to pay bills.
- In the Send items to your bank section, select the Online Checks link.
- Select the transaction(s) you want to cancel.
- Select Delete, then OK.
The cancelation appears in the Items to Send list of the Bank Feeds. When you send and receive transactions, it's sent to the FI.
Who do I contact for support?
If you have any questions about using Online Bill Pay, contact your FI for help.