Create and manage users and roles in QuickBooks Desktop Enterprise
by Intuit•102• Updated 5 months ago
Learn how you can create and manage users and roles in QuickBooks Desktop Enterprise.
QuickBooks Desktop Enterprise lets you add a user with a specific role to manage your books. You can create a user that has a specific role and access. Here’s how to create a user and assign its role.
Note: Only admins can create and manage users. Make sure to sign in as the admin user of the company file.
Add a QuickBooks user
Here’s how you can add a user, then assign a role to it.
- Go to the Company menu, then select Users.
- Select Set Up Users and Roles.
- Enter the admin password, then select OK.
- Select the User List tab, then select New.
- Enter a user name and an optional password.
- In the Available Roles section, select the user’s roles, then select Add.
- Select OK.
Invite Intuit account users
If you have users that don’t regularly work in QuickBooks and only need access to connected services like Payroll, Workforce, QuickBooks Time, or Capital, you can invite them to create an Intuit account. Here's how.
- Go to the Company menu, then select Users and select Intuit Account User Management.
- To add a new user to the file, select Add user. Enter a valid first name, last name and email id.
- Go to Roles and select therole for the user. You can select View role description to see available roles and their descriptions.
- Select send invitation to notify the user.
- QuickBooks displays a message of the invite status with the role(s) assigned and the QuickBooks Desktop Company file name. Select OK to close the message.
Have them check their email and select Accept Invite, then sign in with their email or user ID.
Use predefined roles
You can select from 14 predefined roles. These cover common roles for most businesses. Roles marked with an asterisk (*) have unrestricted access to view all transactions in your account. You can also customize predefined roles so you start with some existing permissions. Keep in mind, any adjustments you make apply to all users who have that role.
- Go to the Company menu, then select Users.
- Select Set Up Users and Roles.
- Enter the admin password, then select OK.
- Select the Role List tab.
- Select a role, then select Edit to review its permissions.
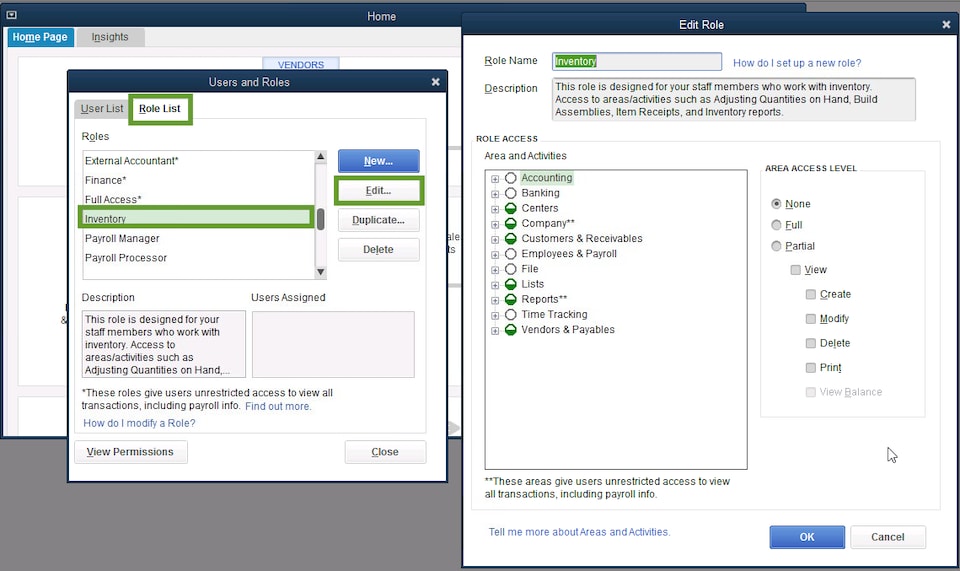
- In the Area and Activities section, select an area of your accounts. You can select None, Full, or Partial to set the access level.
- Once you set the permissions, select OK to save.
Create a new custom role
You can create brand new roles from scratch. This lets you determine which specific areas of your accounts can be accessed.
- Go to the Company menu, then select Users.
- Select Set Up Users and Roles.
- Enter the admin password, then select OK.
- Select the Role List tab, then select New.
- Give the role a name and description.
Note: Name something that indicates its permission level. - In the Area and Activities section, select an area of your accounts. Review each area and select None, Full, or Partial to set the role's permissions.
- Once you set permissions for each area, select OK to save.
Review roles and permissions
If you need to view all roles and their permissions, you can run a Permission Access by Roles report. Here’s how.
- Go to the Company menu, then select Users.
- Select Set Up Users and Roles.
- Enter the admin password, then select OK.
- Select the Role List tab, then select View Permissions.
- Select the roles you want to review, then select Display.
More like this
- Add and manage usersby QuickBooks
- QuickBooks Desktop users and restrictionsby QuickBooks
- Create data level permissions in QuickBooks Desktop Enterpriseby QuickBooks
- Add and manage custom roles in QuickBooks Online Advanced and Intuit Enterprise Suiteby QuickBooks