Deposit payments into the Undeposited Funds account in QuickBooks Desktop
by Intuit•21• Updated 2 weeks ago
Learn how to put payments into the Undeposited Funds account in QuickBooks Desktop.
The Undeposited Funds account holds customer payments in QuickBooks until you deposit them at your real-life bank. Once you have your deposit slip, you can combine these payments into a single record so QuickBooks matches your bank records.
Here’s how to put payments into your Undeposited Funds account before you combine them.
Step 1: Put payments into the Undeposited Funds account
Payments processed with QuickBooks Payments:
If you process invoice payments through QuickBooks Payments for Desktop, QuickBooks takes care of everything for you. You don't need to combine payments or move them to an account.
Invoice payments you process outside of QuickBooks:
When you follow the workflow to receive payment for an invoice, QuickBooks automatically puts them into Undeposited Funds. Move onto Step 2 and deposit the payments.
Sales receipts for payments you process outside of QuickBooks:
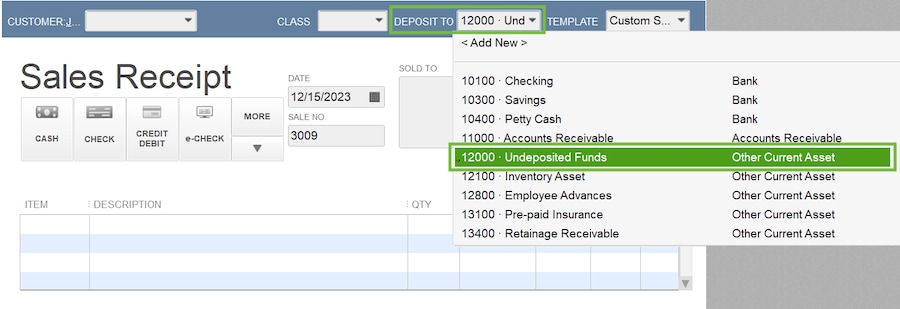
By default, QuickBooks puts sales receipt payments into the Undeposited Funds account. All you have to do is create a sales receipt and QuickBooks handles the rest.
If you'd rather select which account you put payments into:
- Go to the Edit menu and then select Preferences.
- Select Payments from the list. Then go to the Company Preferences tab.
- Select and uncheck the Use Undeposited Funds as a default deposit to account checkbox.
- Select OK.
Now you can select an Undeposited Funds or another account each time you create a sales receipt.
- On the Homepage, select Create Sales Receipt.
- Select the customer from the Customer drop-down menu.
- From the Deposit to drop-down, select Undeposited Funds.
- Fill out the rest of the form.
- Select Save & Close or Save & New.

Tip: Always review the “Deposit to” field so you know where your payments are going.
If your bank records a single payment as its own deposit, you don’t need to combine it with others in QuickBooks. Instead, you can put the payment directly into an account and skip Undeposited Funds.
Step 2: Make a bank deposit
With your deposit slip in hand, you can record a bank deposit and combine the payments in QuickBooks. All payments in the Undeposited Funds account automatically appear in the Bank Deposit window.
Next Steps: Review your Undeposited Funds account
It’s good to periodically check your Undeposited Funds account and clear out any payments waiting to be moved.
- From the Lists menu, select Chart of Accounts.
- Right-click Undeposited Funds and select QuickReport: Undeposited Funds.
- From the Dates drop-down menu, select All.
- Select Customize Report.
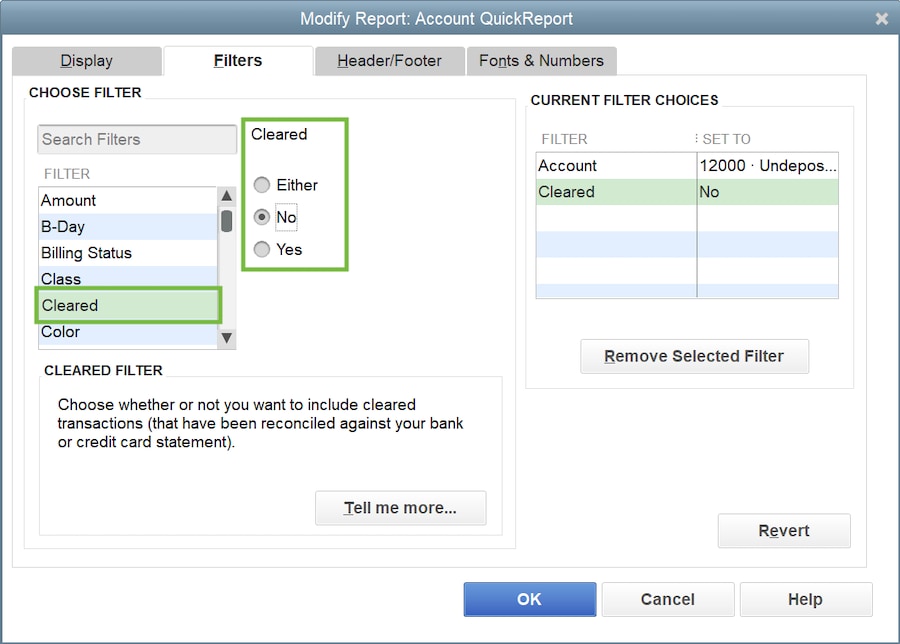
- Select to the Filters tab. Scroll down the Filter list and select Cleared.
- In the Cleared section, select No. Then select OK.

The report lists any transactions still in the Undeposited Funds account. To add these payments to a deposit, follow "Step 2: Make a bank deposit."
More like this