QuickBooks HelpQuickBooksHelpIntuit

Create and lodge a finalisation event

SOLVEDby QuickBooks248Updated 37 minutes ago

A finalisation event is basically when you let the Australian Taxation Office (ATO) know that all your business' payroll stuff is good to go for the year. This page will guide you through it!

By lodging a finalisation event through this process, you can also:

  • Bulk import Reportable Fringe Benefits (RFB) amounts for employees
  • Send notification emails once the finalisation event has been successfully lodged

Before you start

Check that you’ve reported every pay run in the financial year to the ATO. If not, you will need to lodge an update event to ensure all payroll information for the financial year has been reported.

Create and lodge your finalisation event

Once you’ve successfully lodged your last pay run for the financial year, you can begin the finalisation process.

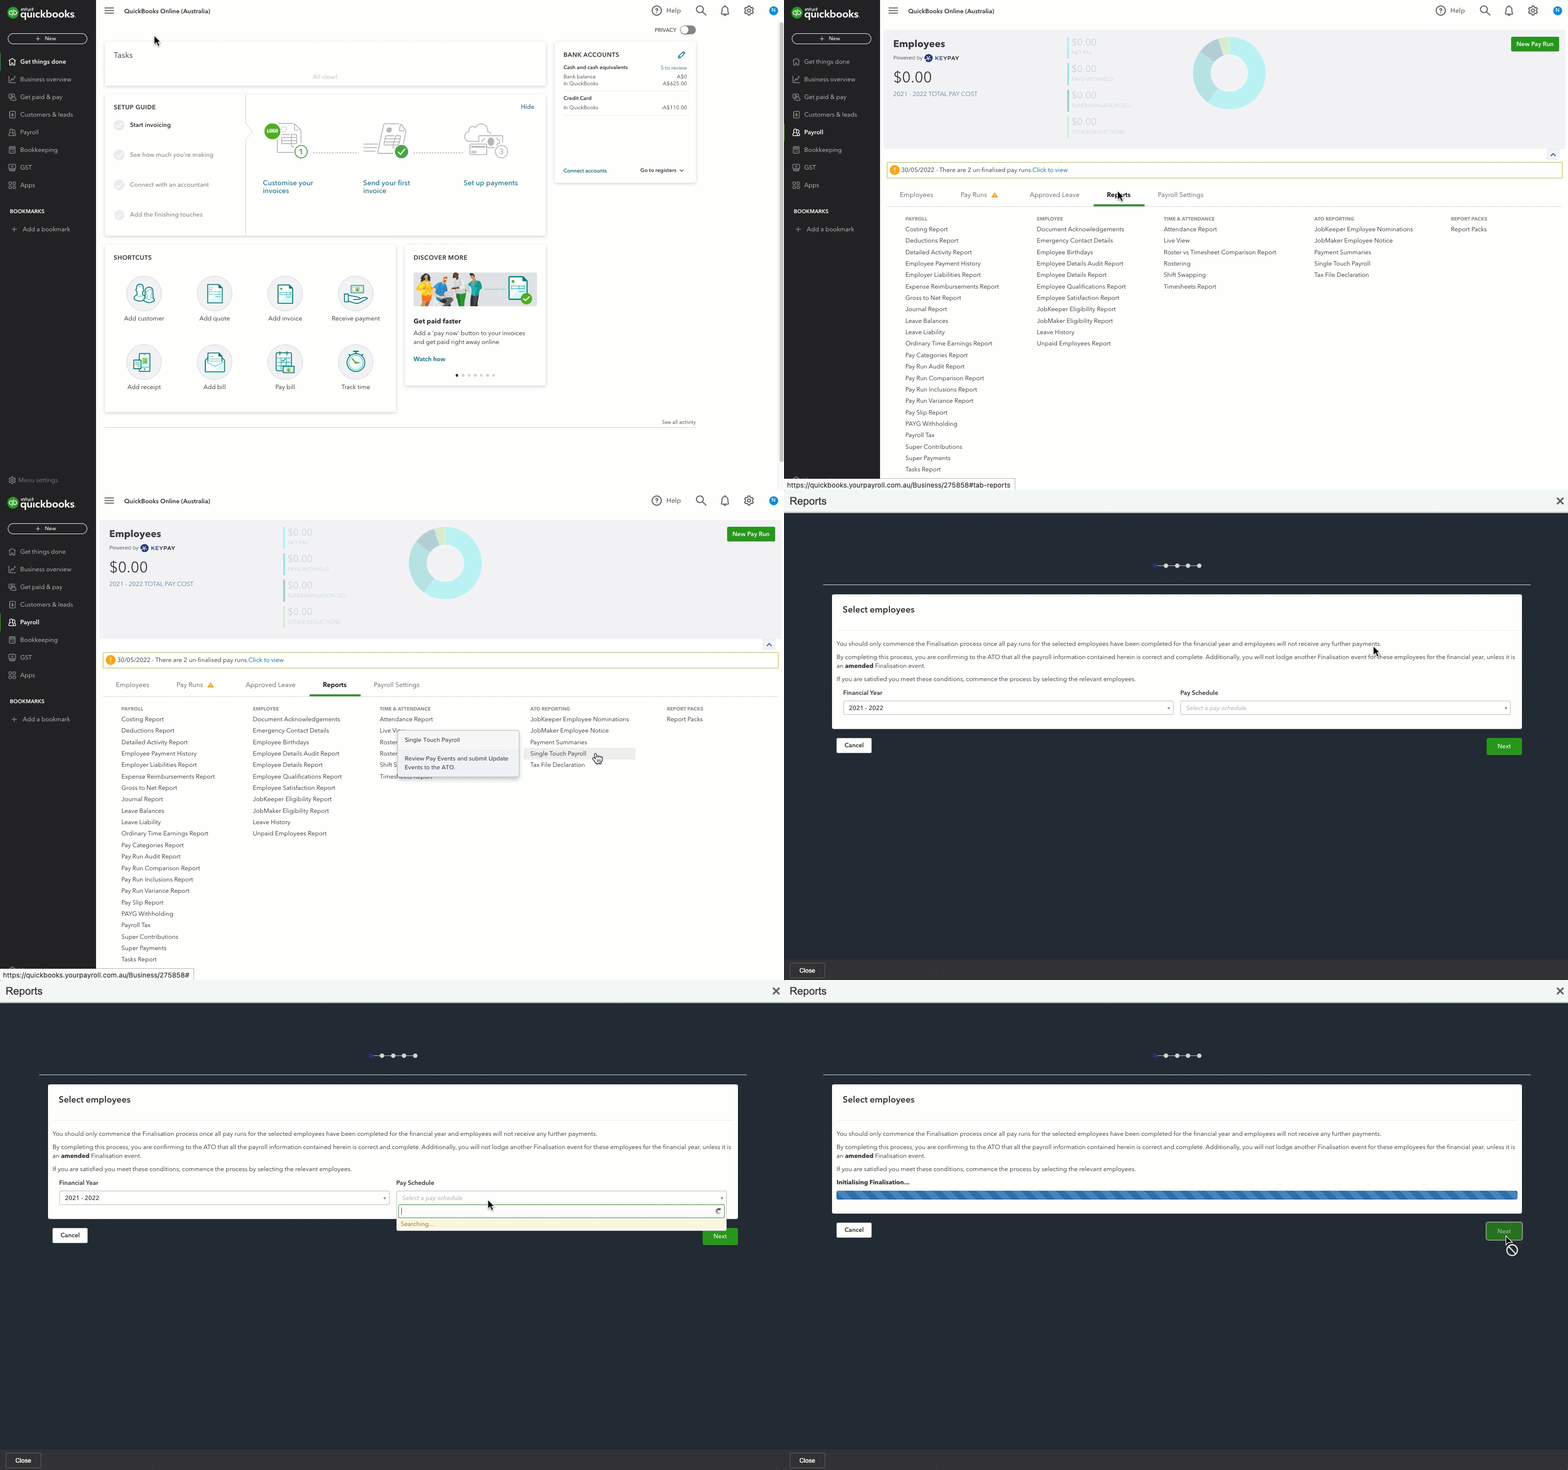
  1. Select Employees from the left navigation.
  2. Select the Reports tab, then select Single Touch Payroll.
  3. Select Start Finalisation Process.
  4. Select the relevant Pay Schedule and Financial Year.
  5. Select Next.

Note: If your employees have been paid using different pay schedules during the year, you only need to complete the finalisation event for the default pay schedule they are assigned to. 

For example, if an employee is normally paid every two weeks (fortnightly) but also received a one-time payment for back pay, all of their earnings for the year will be reported in the finalisation event for their fortnightly pay schedule.

  1. Make sure the year-to-date earnings are correct
  2. Selecting Actions and then Excel (YTD) to download an excel document containing all employees' year-to-date payroll data and compare these with the earnings.
  3. Fix any validation warnings for STP events 
  4. Refresh the data in this step by selecting Actions, then Refresh Data.
  5. Select Next to continue

Important to note: The finalisation event means that no more payments will be made to employees in this financial year. This is automatically done for all employees in the Is Final category.

This step is only applicable if you need to enter a reportable FBT. If not, move to step 4.

There are two methods to enter FBT:

  1. Select the Pencil icon next to the relevant employee.
  2. Enter the amount and then select the Tick icon.
  3. Repeat this process for each relevant employee.
  4. Select Next.

If you have many employees, it may be quicker to enter the amounts through the import feature.  

  1. Select Actions and then Export RFBA Template.
  2. Select Download to download an excel template.
  3. Open the excel sheet and enter the RFT amount for each relevant employee, then save the document.
  4. Now return to payroll, select Actions, then Bulk Import RFBA.

Important to note:

  • If you have multiple pay schedules, there will be separate tabs in the excel document for each pay schedule and the employees will be listed in their relevant tab (based on their pay schedule).
  • Use whole dollar amounts when reporting FBT. Do not enter any cents.
  • Do not include FBT amounts in the employee's gross earnings.
  • The amount entered should be the Year to Date amount. If an FBT amount has been previously entered in other events, the amount will already be included in the export. If you need to update an employee's YTD amount simply edit the relevant field.
  • You must only enter the grossed-up taxable value of these benefits.

If you’re not a tax/BAS agent, you can move on to step 5.

This choice will only show up for businesses who have said that a registered tax/BAS agent will be filing their reports to the ATO. This is based on what has been set up under the ATO Settings.

Before you continue, you'll need to get your client's permission. You can do this by assigning one or more people to approve the change. Then, add a note to explain why you're making the change. The people you assign will get an email to let them know there's a change waiting for their approval.

Select Save for later, while you wait for the approval.

If you have set up Email me when a pay event is approved or rejected through My Notifications you'll receive an email when the STP event approver has provided authorisation otherwise you can return to this later once the authorisation has occurred.

The next step is to complete a declaration. Read the declaration then select Lodge Finalisation Event.

Note: If you have the notification setting Email me when there is a Lodgement error switched on (located in My Notifications), you will be sent an email if there is an error with the lodgement.

Before you can lodge the finalisation event:

  1. Select the 'Registered Tax Agent' option when choosing who is lodging.

Assign the authority who has approved the event. If the selected authority's status is showing as awaiting authorisation, the Lodge Finalisation Event button will be disabled until authorisation has been approved, you can reach out to your client to remind them if required.

Once you've filed the finalisation event with the ATO, you can send automatic email notifications to the employees involved. Here's how:

  1. Select Employees from the menu.
  2. Select the Reports tab and then select Single Touch Payroll. 
  3. Open the event by selecting the ID number of the finalisation event.
  4. Select Actions, then select Send Notifications.

Congratulations! You've successfully created and lodged your finalisation event with the ATO. Here are some extra resources incase you need them at any point throughout this process.

If at any time, you selected Save for later in the finalisation event process, you can easily navigate back t continue your lodgement:

  1. Select Employees from the menu.
  2. Select the Reports tab and then select Single Touch Payroll.
  3. Select Continue Finalisation.

If you filed a finalisation event for a pay schedule but realise you need to make a change or add an ad-hoc payment, you'll need to create a new, corrected finalisation event right away.

Learn how to create and lodge an amended finalisation event here. If you're unsure of when you'll be able to do this, we strongly suggest you create and lodge an update event for the employee and mark as Is not final so that the status of the employee's Income Statement is no longer 'Tax ready'.

Have any other questions for our team?

If any of your questions were left unanswered, we'd love to hear them!
Pop over to our QuickBooks Community's discussion on payroll processes where you can ask your questions, have them answered by qualified QuickBooks Online experts, and hopefully help others with the same questions out in the process.

Was this helpful?

You must sign in to vote, reply, or post
QuickBooks Online EssentialsQuickBooks Online Payroll StandardQuickBooks Online PlusQuickBooks Online Simple Start

Sign in now for personalized help

See articles customized for your product and join our large community of QuickBooks users.

More like this