How to automate Overtime using Rule Sets
by Intuit•1• Updated 1 month ago
Learn how to use QuickBooks Online Advanced Payroll powered by Employment Hero to apply automated overtime conditions, such as applying overtime pay if time worked exceeds hours worked on a day or week.
Notes:
- For these rules to apply, you need to be using QuickBooks Payroll timesheets to enter employee pay run data.
- The Rule Sets feature is only available on Advanced Payroll.
Step 1: Configure the overtime pay categories
Before you start, check that the overtime pay categories are set up in a way that is relevant to your business. The system automatically creates overtime pay categories which are located under the main pay category (such as Permanent Ordinary Hours).
To find them:
Follow this link to complete the steps in product
- Select Payroll Settings.
- Select Pay Categories under the Pay Run Settings section.
- Navigate to the main pay category, then select it to expand the section and show all linked pay categories.
- Check that the overtime pay categories have the Payment classification show Overtime.
- Check the Penalty Loading column to ensure the overtime rates are correct for your business. If you make changes to the penalty loading percentage, don't forget to modify the name of the linked pay category to reflect that.
- Select Save.
Step 2: Create 'OT Clearing' pay category
In addition to the above pay categories, you'll need to create a new one called 'OT clearing'. The objective of this pay category is similar to the accounting concept of 'clearing accounts'.
It won't appear on any pay slips - instead it's a pay category that we will use as part of the automation process to isolate hours that need to be used for different pay condition scenarios.
- From the Pay Categories screen, select Add.
- Name the new pay category 'OT Clearing', then select Save.
- Tick Hide units on pay slip, then select Save.
Step 3: Configure the rule sets
If your employees are already attached to a rule set, you will need to add the rules in addition to the existing rule set so that they are still linked to the other existing rules.
To navigate to rule sets:
Follow this link to complete the steps in product
- Select Payroll Settings.
- Navigate to Rule Sets under the Pay Conditions section, then select the existing rule set. Or, select Add if you don’t want these rules to be part of any existing rule set.
- Note: If they are attached to an award, you'll need to select the award first from the dropdown box.
- Select Create Rules on the right-hand side of the screen and follow the steps below for the scenario that applies to you.
Note: Rule sets work in order of evaluation from top to bottom, meaning the processing of the rules at the bottom happens last. In most cases, you want something that pays the employees more to happen at the bottom.
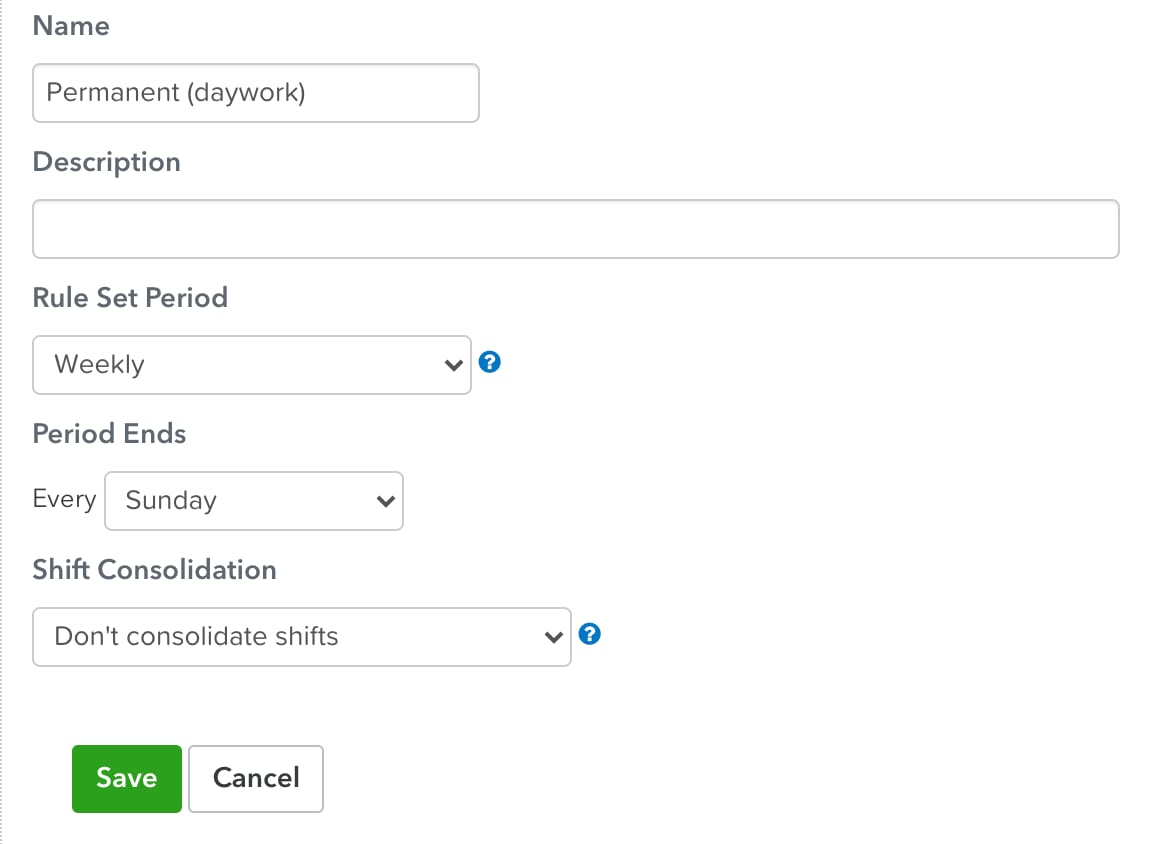
In the example below, we are going to assess the timesheets over the course of a week, so if we create a new rule set, select 'weekly' as the shift period, and choose not to consolidate the shifts.

The 'shift consolidation' setting determines whether or not multiple shifts will be treated as one if they start on the same day or within a certain time frame of each other.
Now, create a rule for the specific scenario below that applies to your business.
Scenario 1: Apply overtime if time worked is outside of specified hours
- From the Rule Sets page, select Create Rules next to your Rule set.
- Select Add a rule.
- Name the rule Spread of hours or similar, then under the WHEN dropdown menu, select Time worked, then select in a day.
- Select the cog icon on the right of the screen, then select Add ‘Where’. Under the WHERE dropdown menu, select Time of day, then enter the times you want overtime to apply between.
- In the next dropdown menu, select is greater than and enter 0 hours.
- Under the THEN dropdown menu, select Apply pay category, then select OT Clearing from the pay category list.
- Select Save.
Here’s an example of what the configuration should look like before saving:

Scenario 2: Apply overtime when employee works more than standard hours per day
- From the Rule Sets page, select Create Rules next to your Rule set.
- Select Add a rule.
- Name the rule Maximum daily hours or similar, then under the WHEN dropdown menu, select Time worked, then select in a day.
- Select the cog icon on the right of the screen, then select Add ‘Where’. Under the WHERE dropdown, select Pay category, then select is not one of in the next dropdown menu. In the Pay category field, select OT Clearing.
- In the next dropdown menu, select is greater than, then enter the daily standard/agreed hours of work (e.g. 9 hours).
- Under the THEN dropdown menu, select Apply pay category, then select OT Clearing.
- Select Save.
Here’s an example of what the configuration should look like before saving:

Note: If you're using this in conjunction with Scenario 1, use the Reorder button to move this scenario to sit above Scenario 1.
Scenario 3: Apply overtime when employee exceeds maximum hours per shift period
In this scenario we are calculating hours over a weekly period, however, this can be changed to suit your needs and can be calculated over whichever shift period you have configured when first creating the rule set. A shift period can be set to:
- Weekly
- Fortnightly
- Three weekly
- Four weekly
- Monthly
- Calendar month
- Six weekly
- Eight weekly
Then, create the rules as below:
- From the Rule Sets page, select Create Rules next to your Rule set.
- Select Add a rule.
- Name the rule Maximum hours per period or similar, then under the WHEN dropdown menu, select Time worked, then select in a shift period (in this scenario the shift period is set to weekly).
- Select the cog icon on the right of the screen, then select Add ‘Where’. Under the WHERE dropdown, select Pay category, then select is not one of in the next dropdown menu. In the Pay category field, select OT Clearing.
- In the next dropdown menu, select is greater than employee standard hours. For this to work however, you need to ensure the correct standard hours are entered on their Employee's settings > Pay run defaults page.
- Under the THEN dropdown menu, select Apply pay category, then select OT Clearing.
- Select Save.
Note: Reorder this rule so that it is at the bottom of the list.
Here’s an example of what the configuration should look like before saving:

Step 4: Convert the OT clearing hours to pay the overtime
Once you have isolated the overtime hours for varying scenarios using the 3 rules sets above by sending them to the OT Clearing pay category, you'll need to let the system know what you want to do with them.
In the example below, we'll be applying the following overtime hours:
- Monday to Friday tiered
- Permanent overtime 0.5x for the first 2 hours
- Permanent overtime 1x for hours after that.
- Saturday all overtime at permanent overtime 1x
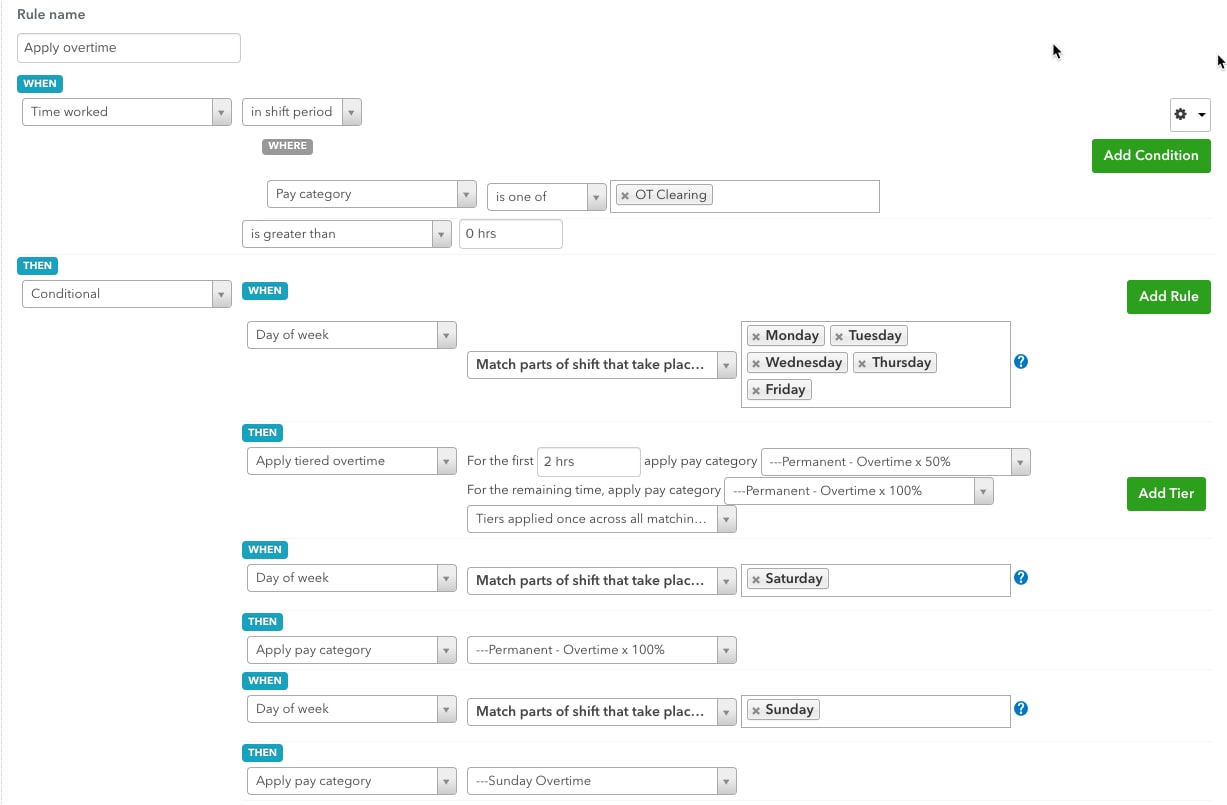
- Sunday overtime all at permanent Sunday overtime hours.
Change this however you need to in order to meet your business requirements.
- From the Rule Sets page, select Create Rules next to your Rule set.
- Select Add a rule.
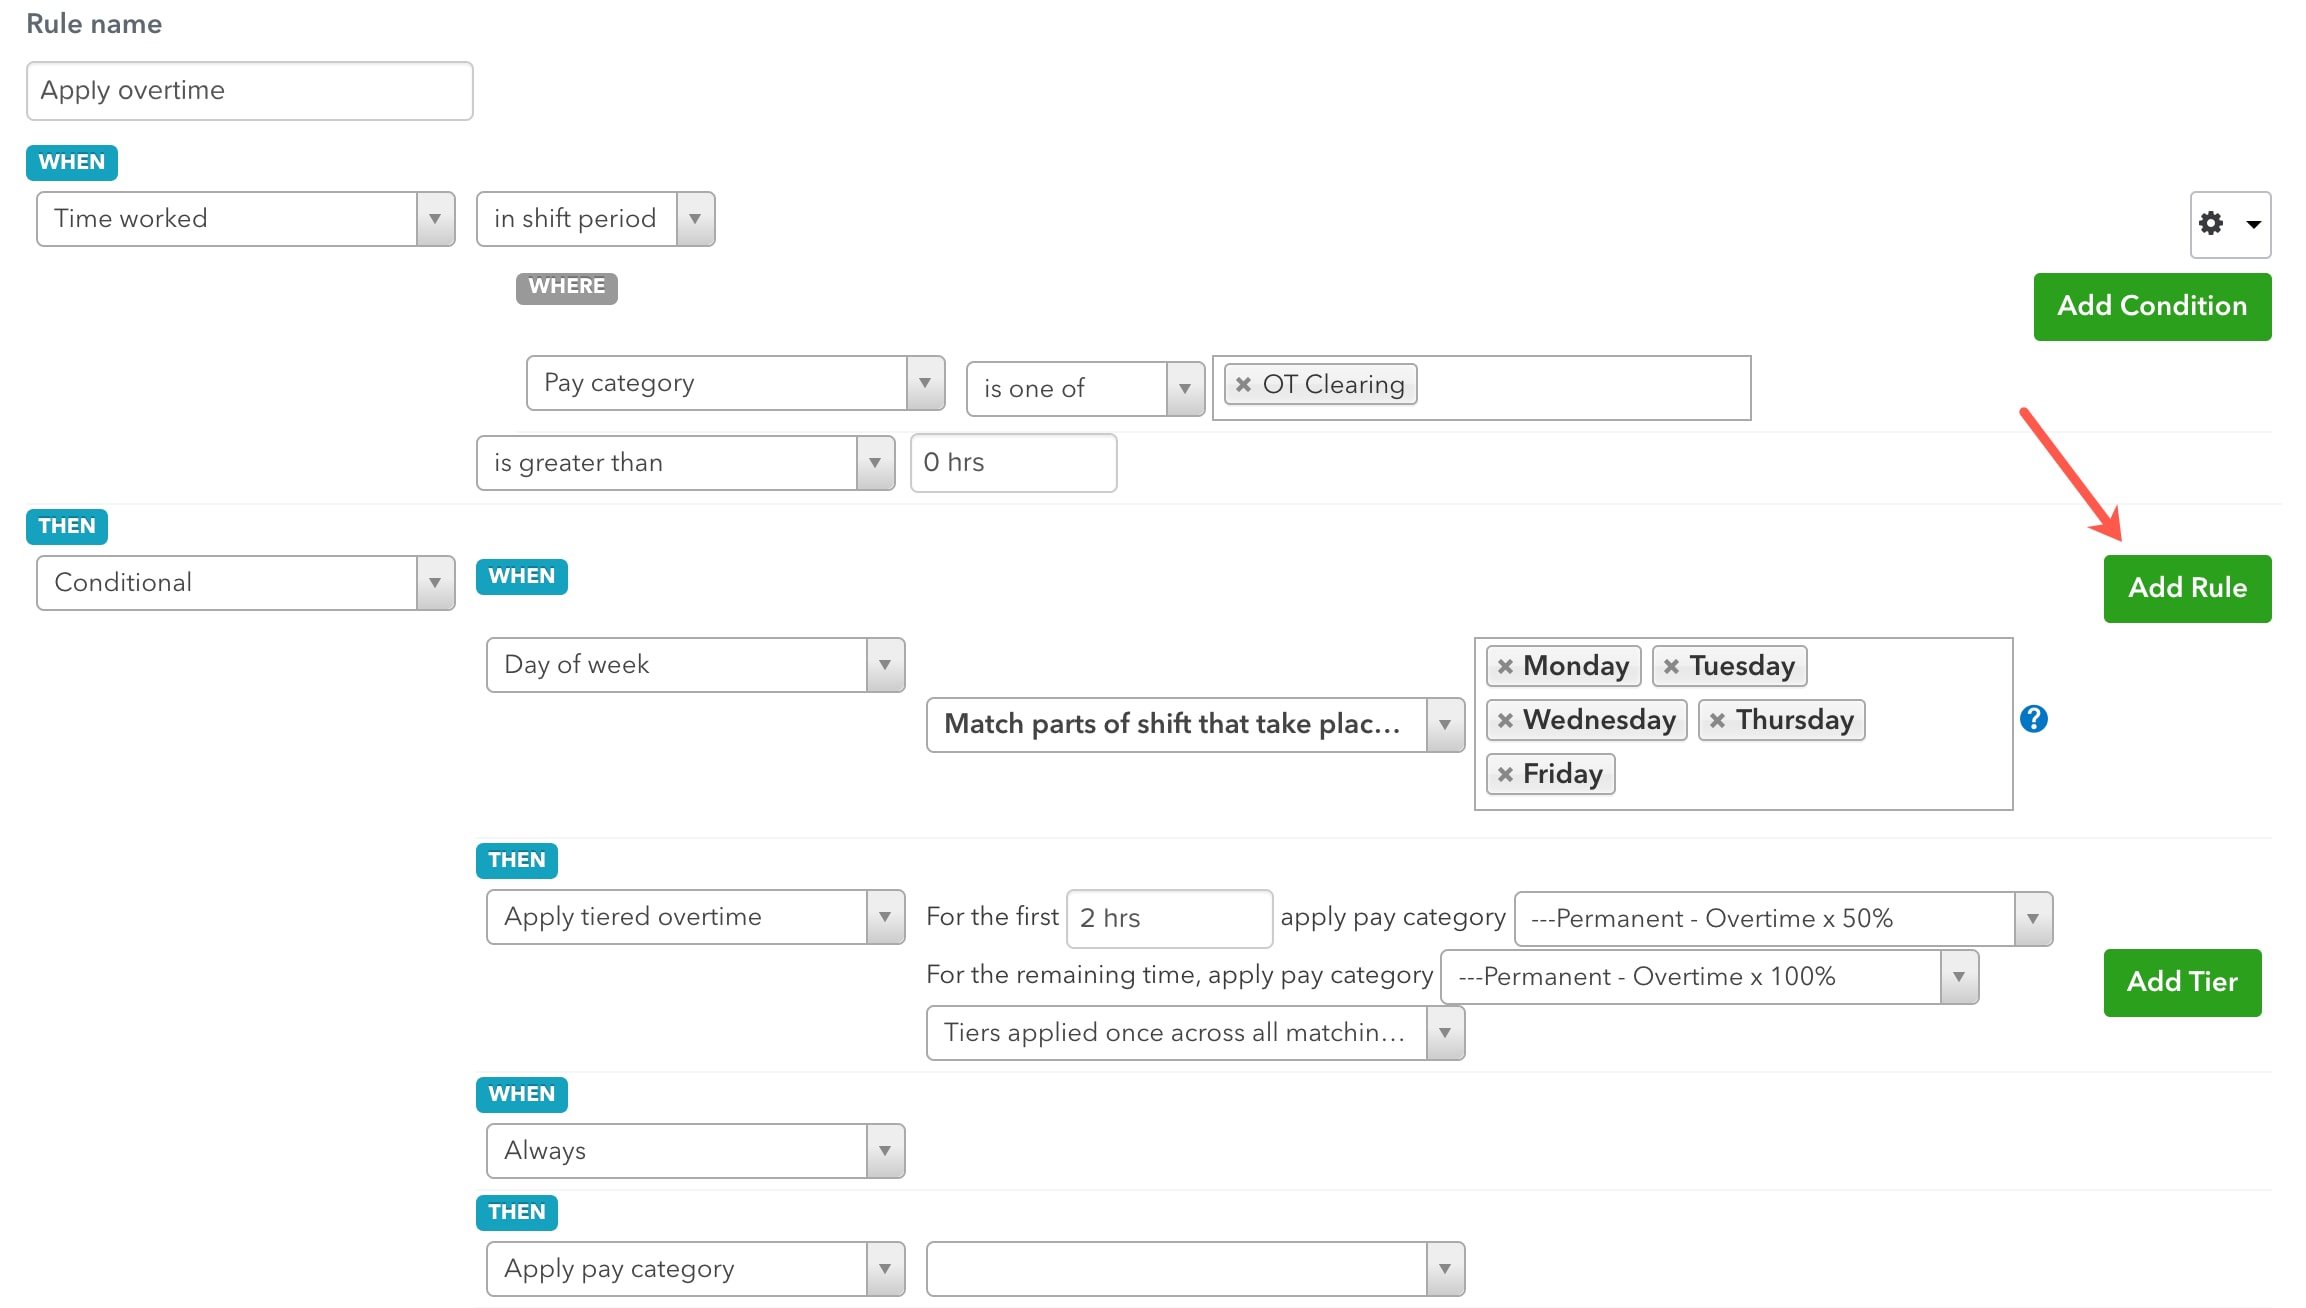
- Name the rule Apply overtime or similar, then under the WHEN dropdown menu, select Time worked, then select in a shift period (in this scenario the shift period is set to weekly).
- Select the cog icon on the right of the screen, then select Add ‘Where’. Under the WHERE dropdown, select Pay category, then select is one of in the next dropdown menu. In the Pay category field, select OT Clearing.
- In the next dropdown menu, select is greater than, then enter 0 hours.
- Under the THEN dropdown menu, select Conditional, and under the WHEN dropdown menu, select Day of week, and in the next dropdown menu select Match parts of shift that take place on. In the corresponding field, enter all workdays (e.g. Monday-Friday).
- Under the THEN dropdown menu, select Apply tiered overtime, then enter for the first 2 hours, and select Permanent - Overtime x 50% in the pay category dropdown menu. In the following dropdown menu, select the pay category Permanent - Overtime x 100%. Finally in the last dropdown menu, select Tiers applied once across all matching shifts.
- On the right side of the screen, select Add Rule. This will bring up another WHEN and THEN dropdown menu below.
- Repeat steps 6 and 7 with the desired days and pay categories in this second set of WHEN and THEN dropdown menus.
- Once finished, select Save.
- Select Reorder and move this rule to the bottom of the rules list.
Here’s an example of what the configuration should look like before saving:

To configure this to include Sunday hours, refer to the example below:

If you do not need to pay overtime hours differently according to the day or other conditions then you do not need to use the 'conditional' action - however, it is extremely handy when you need to cater for different scenarios.
Step 5: Test the rules
You can check what's happening for each shift by using the rules tester:
Follow this link to complete the steps in product
- Select Payroll Settings.
- Navigate to Rule Sets under the Pay Conditions section, then select the existing rule set.
- Select Test Rules on the right side of the screen.
- Check the current period dates. The pay run period dates should match exactly to the current period or a previous period.
- Select the Import button.
- Select the employee whose shifts you want to test, then select Import.
- Scroll to the bottom of the screen and select Run Test.
Once each day's earnings are displayed, you can expand the day you want to check and select the question mark to show you the list of rules that have been triggered by that shift.
Then, you can go check each rule that was triggered and see how/why it has been applied to that shift - keep in mind that rules are applied in order from top to bottom so a rule that's triggered may be overridden by another rule further down the list.
More like this