Automate employee allowances using Rule Sets
by Intuit• Updated 2 weeks ago
Learn how to use pay condition rule sets to automatically apply allowances for employees. The scenarios we'll be focusing on below are:
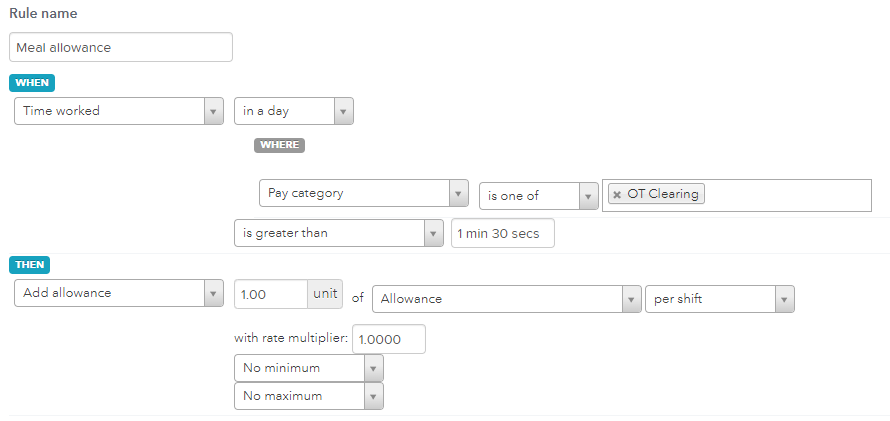
- Meal Allowance (using overtime hours)
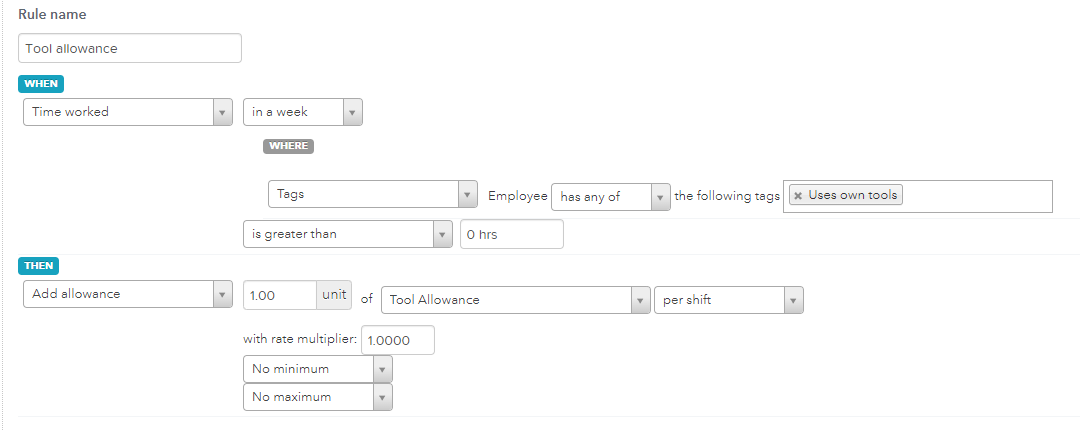
- Tool allowance (using Tags)
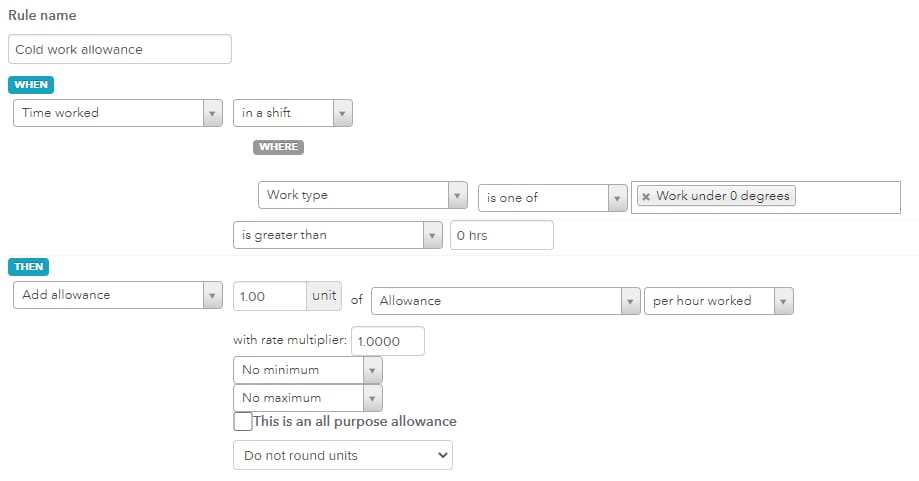
- Cold work allowance (using Work Types)
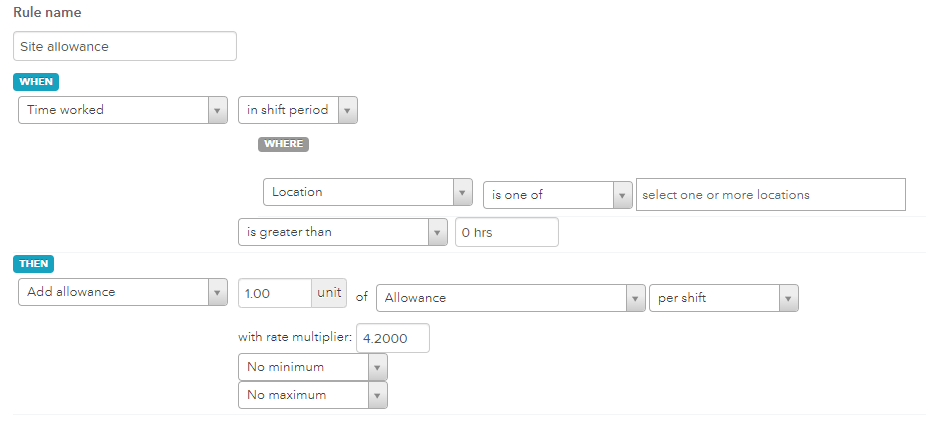
- Site allowance (using locations)
Notes:
- Pay condition rules work by interpreting timesheet data into the pay run so, if you aren't using timesheets the rules won't/can't do anything.
- These steps can only be done on QuickBooks Online Advanced Payroll powered by Employment Hero.
Step 1: Configure Pay Categories
- Select Payroll, then select Payroll Settings.
- Select Pay Categories under Pay Run Settings.
- Select Add to create a new pay category, called 'Allowance' (or similar).
- Ensure that the Units dropdown shows Fixed. Depending on type of allowance, the other settings are varied:
- For meal and tool allowances, select PAYG Exempt and enter the Super rate as 0%.
- For site allowances, do not select PAYG Exempt and do not change the Super rate.
Step 2: Configure Work Types
You'll also need to create a work type so employees can indicate that they are due an allowance via timesheets. We are going to create one for the 'Cold work' allowance scenario.
Go to All apps ![]() , select Payroll, then select Employees (Take me there).
, select Payroll, then select Employees (Take me there).
- Select Payroll Settings.
- Select Work Types under Pay Conditions.
- Select Add, then name it 'Work under 0 degrees' (or related to your allowance).
- Enable this work type for full time, part time and casual employees.
- In the Work maps to section, select Pay Category and select the Permanent Ordinary Hours pay category instead of the allowance pay category because the rules will apply it as needed.
- Select Save.
Configure Tags (if preferred)
You can apply tags to specific employees, and then use them in rule sets as a way of specifying individual or groups of employee in which a specific rule should apply.
In the case of allowances, we can use a tag to decide whether an employee gets a specific type of allowance or not.
Go to All apps ![]() , select Payroll, then select Employees (Take me there).
, select Payroll, then select Employees (Take me there).
- Select Payroll Settings.
- Select Tags under the Pay Conditions section, then select Add.
- Name the tag something like 'Uses own tools' (or similar to your situation).
Step 3: Configure the rule sets
Go to All apps ![]() , select Payroll, then select Employees (Take me there).
, select Payroll, then select Employees (Take me there).
- Select Payroll Settings.
- Select Rule Sets under the Pay Conditions section.
- If you want to add the rule in addition to an existing rule set/award, select the rule set/award you want to use and select Edit Rules. Otherwise, select Add on the top right of the page and name the rule set, then select Save and select Edit Rules.
- Follow the scenario below that best suits your situation.
These 4 different scenarios can be applied to other allowances (e.g. first aid, clothing) as required.
Testing the rules
You can check how the rule plays out with other rule sets or awards you have:
- From the Rule Sets page, select the rule set you want to test.
- Select Test Rules, then enter the period dates you want to check.
- Select Import, then select the employee whose shifts you want to test.
- Select Import, then scroll down to the bottom of the page and select Run Test.
Once each day's earnings are displayed you can expand the day you want to check and click on the question mark to show you the list of rules that have been triggered by that shift.
Then you can go check each rule that was triggered and see how/why it has been applied to that shift.
Keep in mind that rules are applied in order from top to bottom so a rule that's triggered may be overridden by another rule further down the list.
More like this
- Disabling Rules in Pay Condition Rule Setsby QuickBooks
- Set up employee allowancesby QuickBooks
- Automate Time in Lieu calculations in QuickBooks Advanced Payrollby QuickBooks
- How to Install and Configure a Pre-built Award or Employment Agreementby QuickBooks