Use QuickBooks Time GPS Tracking as admin or manager
by Intuit• Updated 2 months ago
Learn how to use GPS tracking in QuickBooks Time so you can manage your team and make sure everyone gets where they need to. Before you can use GPS tracking, make sure you turn it on.
If you need to, you can also troubleshoot GPS.
Learn about:
- GPS overview
- How to find GPS data from Timesheets
- How to find GPS data from Who’s Working
- How to find GPS data from Workforce app
- GPS point colours
- How to run a GPS data report
GPS overview
- GPS tracking only works if team members are clocking in through QuickBooks Workforce.
- GPS points can be saved at clock in or out, opening the app, switching job codes, and periodically while on the clock.
- GPS points are not saved when on a break, clocked out, or signed out of the app.
- Various environmental factors can prevent the satellite from acquiring a GPS point.
- Points aren't pulled if the phone is powered off, or the application is force closed.
- GPS points can't be changed or edited after they’re recorded.
- The exception is, if a timesheet is edited and loses some time during which a point was lost, that GPS point no longer displays.
- Admins and managers can only view GPS points, the device must be connected to Wi-Fi or data.
- It can take around 15 seconds to display a GPS point during a solid Wi-Fi or data connection.
- If a manager clocks a team member in remotely, location isn't displayed until the team member confirms the shift from their mobile device.
- If the team member rejects the shift, the timesheet is deleted and location is never displayed.
- If the team member doesn't see the notification before the manager ends the timesheet, no locations are displayed but the timesheet remains.
Where to find and how to read GPS data
From Timesheets
- In QuickBooks Time on the web dashboard, go to Time Entries, then Timesheets.
- Locate the correct timesheet, and select
 display map.
 - In the map, if there’s more than one timesheet that day, select the start and end times in the dropdown to move between timesheets.
- Under Timesheet Timeline, view the timeline and date stamps.
- Review flagged timestamps here, which appear if the team member wasn't inside a set geofence for that customer at a certain time. You must have geofencing set up for this feature.
- Select Play
 to see a playback of the team member's location for that timesheet.
 - Select a point to see the date and time it was pulled, its accuracy in metres (displayed as a circle around a point), and the device it was pulled from.
From Who's Working
Individual team member:
- In QuickBooks Time on the web dashboard, go to Who's Working.
- Select a team member, then select
 .
.
All team members:
- In QuickBooks Time on the web dashboard, go to Who's Working. If you need to, adjust the Filter and Sort/Group options by selecting the links.
- Do one of the following:
- To see an overview of all team member locations: Select the map icon
 . All active, on-the-clock team members display their location.
Note: There can be a few minutes delay in updating this map. View the personal GPS map for team members to get the most recent point pulled. - If multiple team members are in the same location, a marker with the number of team members displays. To see a list of team members in that location, hover over the marker.
- To see a cluster of individual team member markers (see example image shown), select the numbered marker. To close the cluster, select
 in the centre of the cluster.
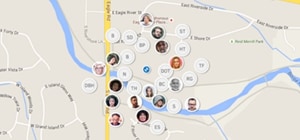
- To see an overview of all team member locations: Select the map icon
From Workforce app
From Timesheets:
- In the Workforce app, select Track Time, then Timesheets.
- Select All timesheets, or My timesheets then All timesheets.
- Select a daily timesheet to view, then select the specific timesheet.
- Go to Location, and select the map.
From Who's Working:
- In the Workforce app, select Who's Working or More, then Who’s Working.
- Select a team member, then More
 to Show Accuracy Bubbles or not.
 - Select a point to see the time it was pulled, and its accuracy in metres.
- Select play to get a playback of their movement throughout their time clocked in.
GPS point colours
GPS points display in one of four colours indicating the following:
- Green: Team member is clocked in.
- This is the first pulled GPS point when they clocked in. It might differ from clock-in time if a timesheet was edited or there was an issue pulling a point at clock-in.
- Red: Clocked out.
- This is the first pulled GPS point when they clocked out. It might differ from clock-out time if a timesheet was edited or there was an issue pulling a point at clock-out.
- Blue: Point pulled while on the clock.
- Orange flag (displays on desktop only): This point isn't within the geofence set for that customer. You must have geofencing set up for this feature.
- It can also be a point pulled from a secondary device the user is logged into.
How to run a GPS data report
To create a spreadsheet that lists the latitude and longitude information:
- In QuickBooks Time, go to Reports, select Tracking, then select GPS Points.
- Choose how you want to filter the data, then Download CSV.
More like this
- Change QuickBooks Workforce settings and permissionsby QuickBooks
- Use the Who's Working window for QuickBooks Timeby QuickBooks
- Troubleshoot QuickBooks Workforceby QuickBooks
- Troubleshoot GPS for QuickBooks Workforceby QuickBooks