Create and lodge an update event in QuickBooks Online
by Intuit•3• Updated 1 month ago
An update event is used to report any changes to employee year-to-date (YTD) amounts previously reported to the Australian Taxation Office (ATO).
You’ll need to create and lodge an update event if:
- You want to finalise payroll and make adjustments for the end of the financial year.
- You have recently moved your payroll data from another software and need to align the details of a pay event.
- You need to update the details of a pay event recently reported to the ATO.
- You’re transitioning from Single Touch Payroll (STP) Phase 1 to STP Phase 2.
Note: Update events are not associated with any pay runs and can only be created when an employee payment has not been made.
Step 1: Create an update event

Follow this link to complete the steps in product
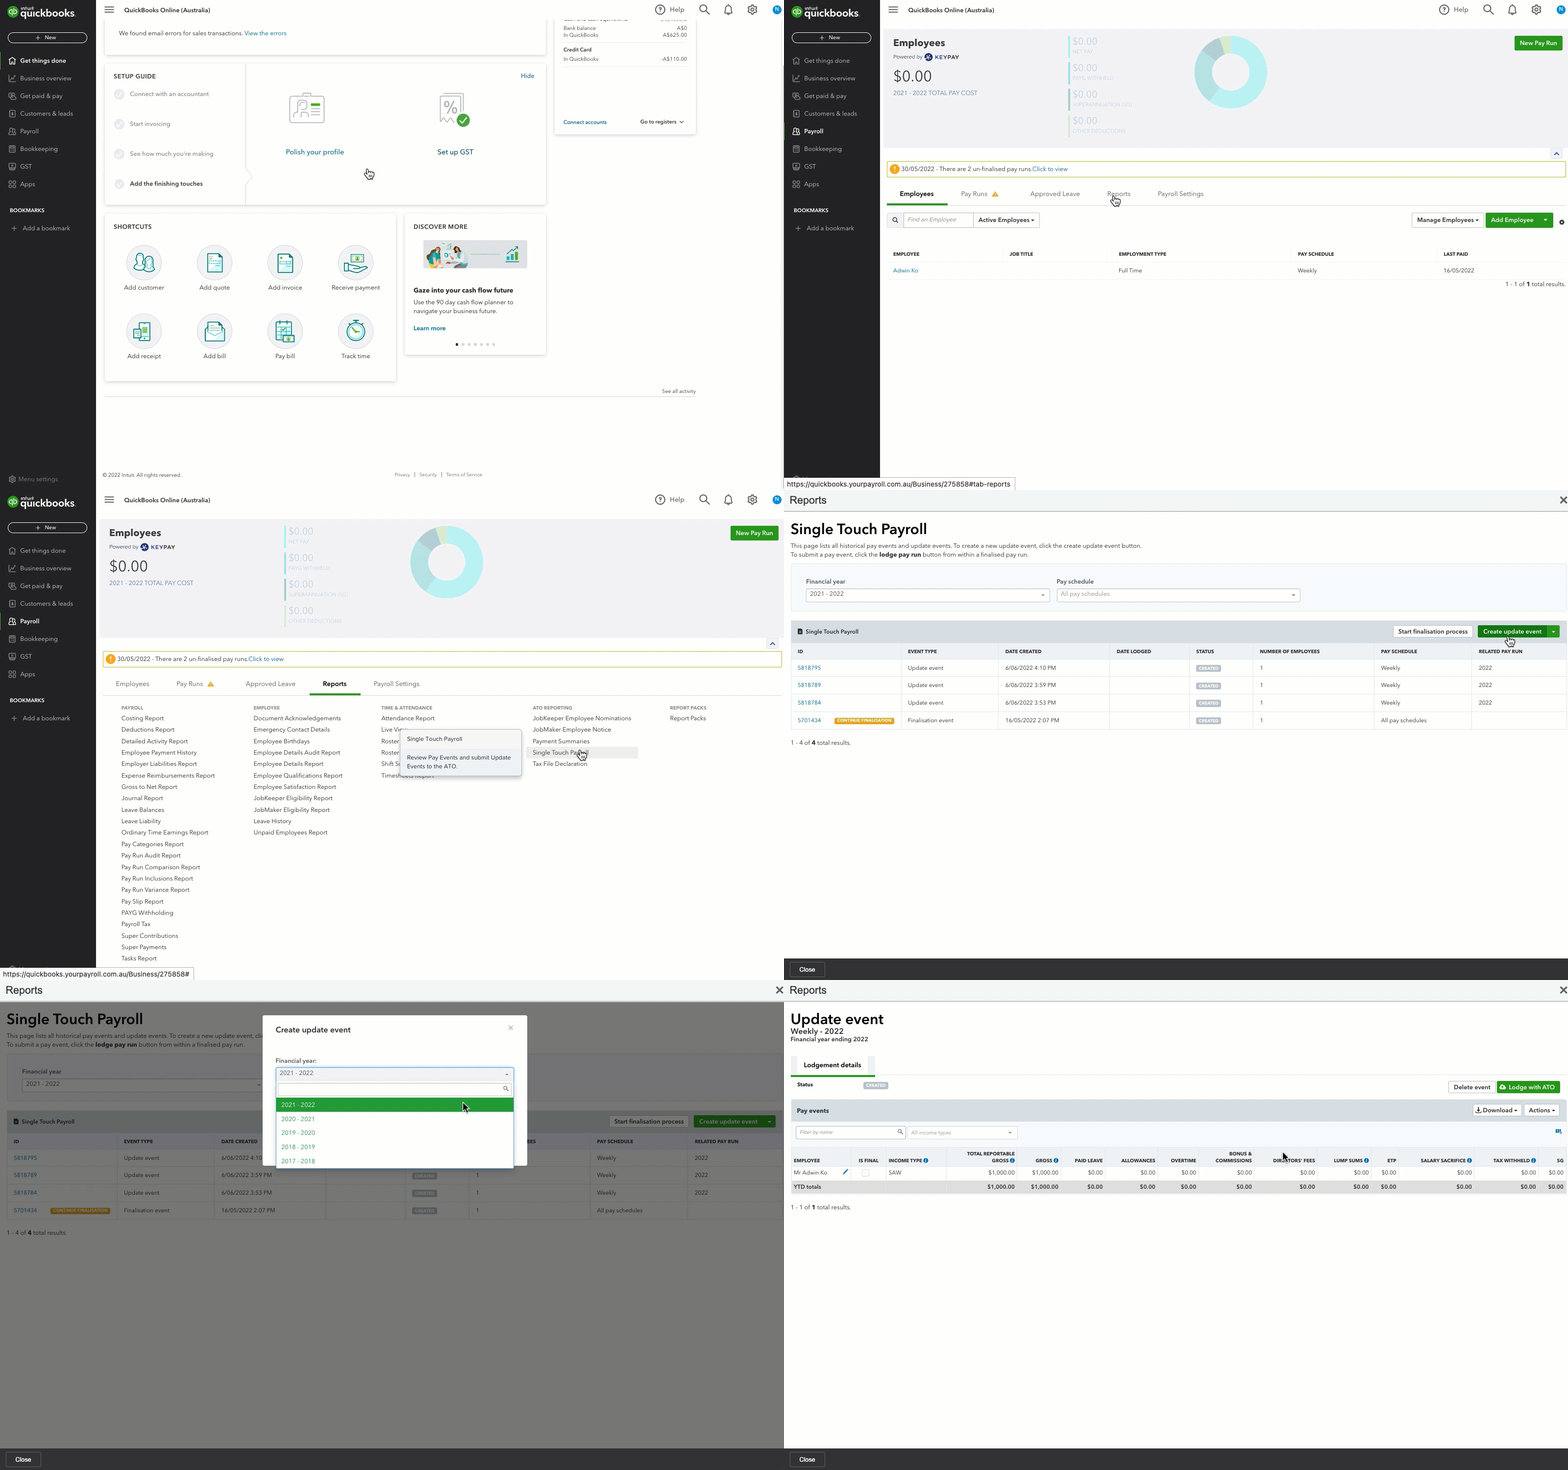
- Select the Reports tab.
- Select Single Touch Payroll (found in the ATO Reporting column).
- Select Create update event.
- Select the appropriate Financial year and Pay schedule, then select Create.
All list of all employees related to that pay schedule will appear along with their year-to-date payroll details.
When an update event is generated:
- You can filter your view by searching for a specific employee or by the employing entity (if you have more than one employing entity set up in the business). When the event is lodged, it'll lodge for all employees in that pay schedule.
- Employees who have been employed by more than one employing entity during the financial year will have a row of data per employing entity.
- Employees who have changed between a working holiday maker (Type: H) and a non-working holiday maker (Type: S) during the financial year will have a row of data per tax change.
- Terminated employees who have received an employment termination payment (ETP) will still appear in the event with the Is Final checkbox automatically ticked.
Client Authority required to action an update event
This only applies to update events lodged with the ATO as a registered tax or BAS agent.
An assigned client authority will be notified that they are required to action an update event via email. The email will include a link to the update event.
The authoriser will see the same information as the user who made the request but can only perform the following actions:
- Approve lodgement
- Reject lodgement
- Export an excel report of the update event
If the authoriser rejects the lodgement, they'll need to add a reason for the rejection. Once this is done, you will be notified by email.
If you sent a request to more than one client authority, there is still the opportunity that another client authority approves the lodgement. However, if you have not, you will need to send another client authority request.
Note: You can't send the request again to the same client authority who rejected the lodgement.
When the authoriser approves the lodgement, they will be required to complete a declaration that will appear in the form of a pop-up.
The client authority will need to tick the checkbox and then select Approve Update Event. Once this is done, you will be notified by email. The lodgement status will change from Waiting on client authority to Client Authorised and you can now start the lodgement process.
Step 2: Lodge the update event
The steps to lodging an update event are different depending on your ATO Settings:
Delete an update event
You can only delete update events if they have not yet been lodged with the ATO. To delete an update event:
- Select the Delete Update Event button.
- Select Delete.
Content sourced from Employment Hero
More like this
- Create and lodge a finalisation eventby QuickBooks
- Processing Finalisation Events using an Update Event in QuickBooks Onlineby QuickBooks
- Create and lodge a pay event in QuickBooks Onlineby QuickBooks
- How to Lodge an STP reset event to fix incorrectly reported business or employee settingsby QuickBooks