Handle Non-Sufficient Funds (NSF) or bounced cheque from customers
by Intuit•4• Updated 1 month ago
Learn how to record bounced or NSF cheques from customers in QuickBooks Desktop.
You can record NSF or bounced cheques from customers with the Record Bounced Cheque feature, or by manual process. QuickBooks ensures that all related details on bounced cheque transactions are addressed to keep your account balanced and well-documented.
QuickBooks for Windows
Important: Record Bounced Cheque feature can only be used in single-user mode and only applies to cheque payments done through the Customer Payment window. If you have a returned ACH item, switch the payment type to Cheque before proceeding with the steps. If the payment method is greyed out or you’re unable to follow the steps proceed to Option 2.
Option 1: Use the Record Bounced Cheque feature
- Go to Customers.
- Select Customer Centre.
- Select Transactions tab, then select Received Payments.
- Double-click the payment you want to record as NSF.
- On the receive payments window, select the Record Bounced Cheque icon on the Main ribbon tab.
Note: The cheque must not be waiting to be cleared in the Undeposited Funds account, as it would have to have cleared the bank in order to bounce. - In the Manage Bounced Cheque window, enter the following information, then select Next.
Note: All these fields are optional. You can leave them blank if there weren’t any additional charges from the bank or if you don’t want to charge your customer for it.- Bank Fee and Date
- Expense Account for the Bank Fee
- Class
- Customer Fee (how much you will charge the customer)
- QuickBooks will show you the Bounced Cheque Summary, for you to know what will happen behind the scenes. For example, you may see:
- The following invoices will be marked unpaid
- These fees will be deducted from your bank account.
- This invoice will be created for the fee you want to charge your customer.
- Select Finish.
Option 2: Manually record bounced cheque
- Create an item and income account for tracking bounced checks and their associates charges.
Important: This only needs to be set up once, if you've done this before, proceed to step 2.- Create an income account:
- Type: Income Account
- Account Name: Bounced Checks Income
- Create Bad Cheque Charge item:
- Type: Other Charge
- Item Name: Bad Cheque Charge
- Amount or %: Leave it at 0.00
- Tax Code: Non-taxable
- Account: Select Bounced Checks Income (created in step a).
- Create an income account:
- Create a journal entry to reverse the original payment.
- From the Company menu, select Make General Journal Entries.
- In the Make General Journal Entries window, debit your account receivables for the same amount of the NSF cheque.
- Enter a note in the Memo column describing the transaction.
Example: Bounced cheque #123 - NSF - Select the name of the customer or job associated with the NSF cheque, under the Name column.
- Credit the checking or bank account that received the original deposit.
- Select Save & Close.
- Switch the payment for the invoice to the reversing journal entry.
- Go to Reports, select Customers & Receivables, then select Customer Balance Detail.
- Double-click the original payment line for the NSF transaction.
- In the Receive Payments window, move the check mark from the invoice to the reversing journal entry.
- Select Save & Close.
Important: This will reduce your bank account by the amount of the bounced cheque. The invoice where the bounced cheque came from will be marked unpaid.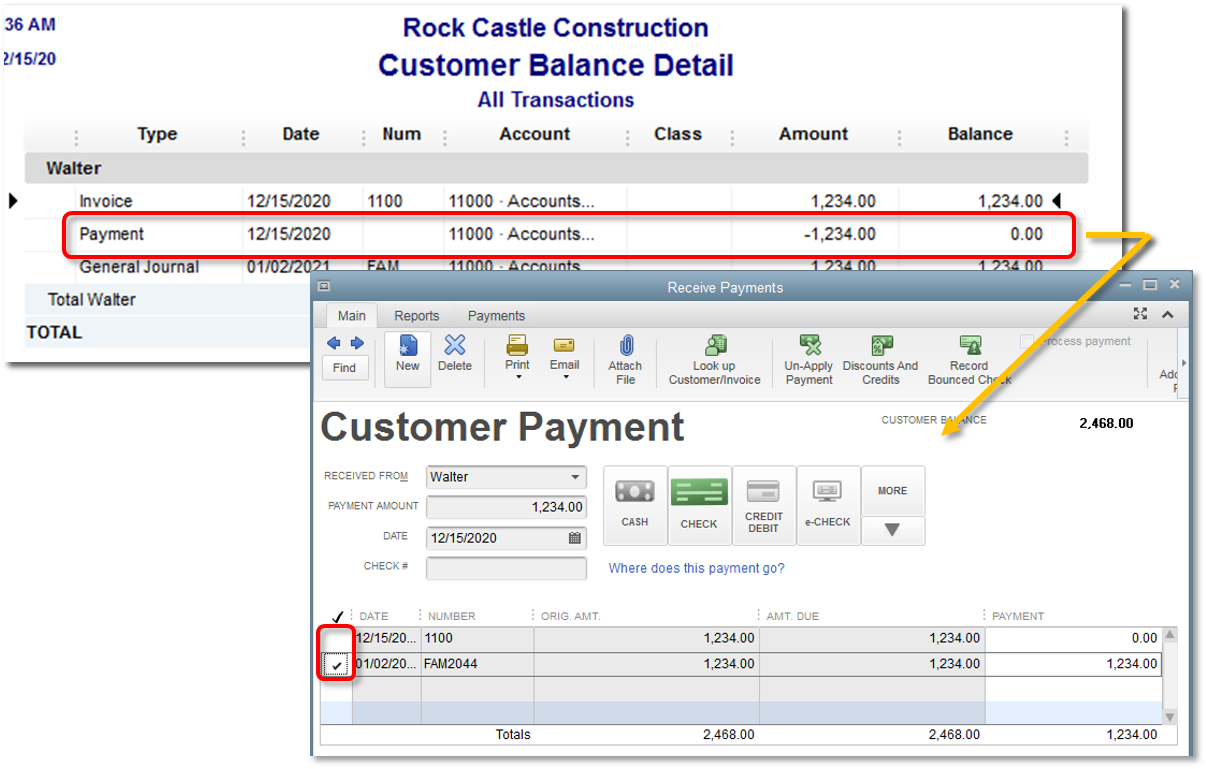
- (Optional) Resend the open invoice.
- Go to the invoice where the bounced cheque originated.
- Add the item Bad Cheque Charge (created in step 1). Note: You can skip this step if there weren't any additional charges from the bank or if you don't want to charge your customer for it.
- Select the Email icon on the Main ribbon tab, then follow the next steps.
More like this