Set up payment terms
by Intuit• Updated 2 years ago
Learn how to set up payment terms in Quickbooks Desktop.
When you receive a payment from a customer or when you pay bills to your supplier, QuickBooks has a list of payment terms you can use. These can help you record a discount if you receive payment before due date or on your agreed upon date. Here's how.
Add payment terms
- Go to Lists.
- Select Customer & Supplier Profile Lists (for Windows), Customer & Supplier Profile (for Mac).
- Select Terms.
- From the Terms dropdown, select New (for Windows), select the + icon (for Mac).
- Enter a name for the payment term, then select either:
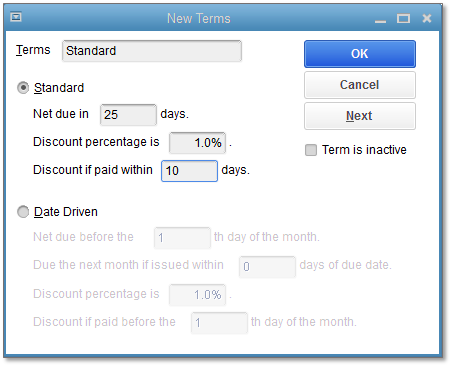
- Standard - If you want to have a payment due within a specific number of days from the invoice date.
For example: Your invoices are due within 25 days of receipt and you give your customer a 1% discount if they pay within 10 days.
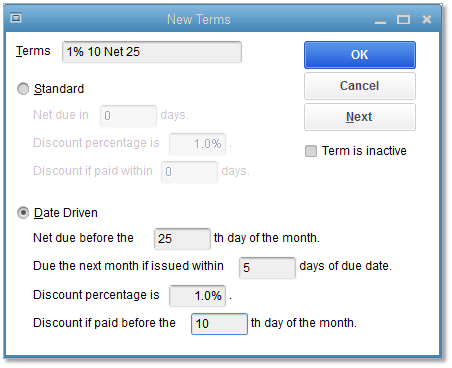
- Date Driven - If you want to enter the day of the month that a payment is required within the due date.
For example: Your invoices are due on the 25th day of the month and you give your customers a 1% discount if they pay before the 10th of the month.
To let QuickBooks know that "25" means the "25th day of the month" and not "25 days after the invoice date", enter 1% 10 Net 25.
- Standard - If you want to have a payment due within a specific number of days from the invoice date.
- Select OK to close or Next to create another payment term.
Here's a guide to payment terms fields.
| Payment terms | Standard | Date - Driven |
| Net Due | Enter the number of days in which payments from customers or bills to supplier are due. | Enter the day of the month by which payment is due. |
| Due the next month if | To handle cases in which invoices or bills are issued just prior to the due date. If the invoice or bill is issued within the number of days you enter, payment is not due until the following month. | |
| Discount percentage | Enter the discount percentage a customer earns for early payment of an invoice or that your business earns for early payment of a bill. If there is a discount, complete the next field ("Discount if paid"). If there is no discount, enter zero. | |
| Discount if paid | Enter the number of days within which a customer or your business can pay and receive a discount for early payment. Be sure to enter the discount percentage in the previous field ("Discount percentage"). | |
To add discount to early payment, learn more about recording invoice payment.
Sign in now for personalized help
See articles customized for your product and join our large community of QuickBooks users.
More like this
- Set up Payments in QuickBooks Self-Employed (application or apps)by QuickBooks
- Record a company loan from a company officer or owner in QuickBooks Onlineby QuickBooks
- Edit company settings in QuickBooks Onlineby QuickBooks
- Receive and process payments in QuickBooks Online with QuickBooks Paymentsby QuickBooks