Manage Your Website in Mailchimp
by Intuit•3• Updated 1 year ago
After you build your website, you may want to add or remove content over time to keep it up to date. Regular website management helps grow your audience and keep them interested in your brand.
In this article, you’ll learn how to manage your website in Mailchimp.
Before you start
- To complete the tasks in this article, you’ll first need a website with Mailchimp. To learn more, check out Create Your Website with Mailchimp.
- If you delete the audience associated with your website, be sure to delete and replace any signup form sections on your website.
- Before you can publish your website, you must agree to our additional terms.
Edit domain name
Website domains allow your brand to establish a trusted online identity.
To edit your website's domain name, follow these steps.
On your website dashboard, click Settings.

Choose the General settings option.

In the Domain section, click Edit.

Choose whether you want to use a custom or Mailchimp domain. For a Mailchimp domain, type in the subdomain you’d like to use for your website. For a custom domain, enter your website name, then go to the Domains Overview page to add it. To learn more about domains, check out Getting Started with Domains.

Click Save.

Nice job! Now you have a branded URL to share after you publish your website.
To publish a Mailchimp website on a custom domain, you need a paid Websites plan. To find out what features are included in each plan, check out our pricing page.
Add a page to your website
You can add pages to your website using our pre-built layouts designed for specific uses, such as Contact pages or About pages. You can also add a Blank page that you can design from scratch.
To add a web page to your website, follow these steps.
On your website dashboard, click Edit Site.

In the Manage Site menu, click Pages.

Click the Add drop-down, then click Page.
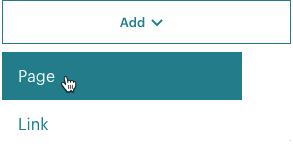
In the Pages menu, select the page type.
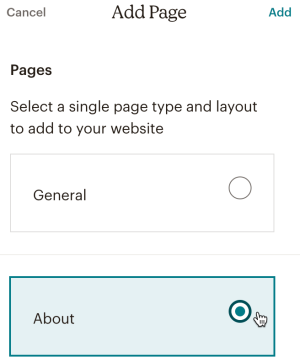
The General page is checked by default. When you choose another page, you'll see the pre-built layouts in the website preview window.
Select the layout you want to work with, then click Add Page.

The page layout title will auto-save in the Name field and URL Path field. You can type in a new name or URL if you want.
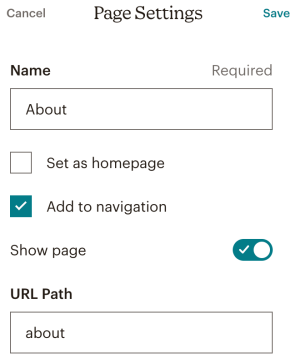
Add to navigation is checked by default. Uncheck this if you want to exclude this page from your site’s navigation bar.
Check Set as homepage to select the current page as your homepage. If you want your homepage to remain hidden until you’re ready, toggle off the Show page slider.
When you're ready, click Save.

That’s it! Your new page will be listed in the Navigation menu.
Duplicate a web page
Duplicate an existing page on your website to create a new page with the same content. If you’re building multiple pages with shared features, it may be helpful to duplicate existing web pages to avoid starting from scratch. You can duplicate any page except a homepage.
To duplicate a page on your website, follow these steps.
On your website dashboard, click Edit Site.

In the Manage Site menu, click Pages.

Click Settings next to the page you want to replicate.

Click Duplicate Page.

You’ll see the Your new page has been added message appear on the screen.
In the New Page Settings menu, enter a Page Name or adjust the URL Path for your duplicated page.

To avoid confusion, give the duplicate page a different name than the original. In the New Page Settings menu, the Add to navigation option is checked by default. Uncheck this if you want to exclude the duplicate page from your site’s navigation bar.
You can also check Set as homepage to set the duplicate page as your homepage, or hide your duplicated page by toggling off the Show page slider.
When you're ready, click Save.

Good job! Your duplicate page will be listed in the Navigation menu.
Add a link to your website
To add a link to your website, follow these steps.
On your website dashboard, click Edit Site.

In the Manage Site menu, click Pages.

Click the Add drop-down, then click Link.
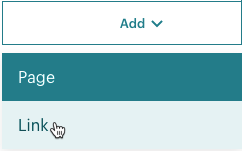
Type the name and URL of the new link in the Name and Website Address fields.
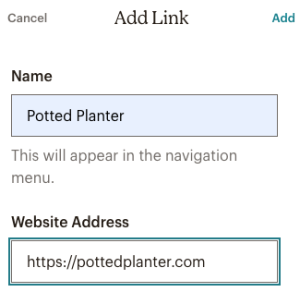
Click Add.
Good job! Your new link will be listed in the Navigation menu.
Edit URL, SEO, and social share settings
Each page that you manually add to your website has individual settings that control how it displays on your site’s navigation bar, in web browsers, in search results, and in social share posts. You can also change each page’s URL path. This is where you can apply SEO (search engine optimization) tactics to help make your page more findable and increase traffic.
For step-by-step instructions on how to edit your page settings, check out Edit Your Page URL, SEO and Social Share Settings.
Hide a web page
If you need to take a page offline without unpublishing your entire website, you can hide it from public view at any time. When hidden, any visitor who goes to the page’s URL will see a We can’t find that page message instead.
To hide a page, follow these steps.
On your website dashboard, click Edit Site.

In the Manage Site menu, click Pages.

In the Manage Pages menu, click Settings next to the page you want to hide.

In the Page Settings menu, toggle off the Show page slider.

This option is available for all web pages that are not set as your homepage.
Click Save.

That's it! Your hidden web page will be removed from your site’s navigation bar, and it will remain offline until you return to your Page Settings and toggle on the Show page slider.
Delete a web page
When you delete a web page from your website, you permanently take it offline and remove it from Mailchimp. This action cannot be undone.
To delete a web page from your website, follow these steps.
On your website dashboard, click Edit Site.

In the Manage Site menu, click Pages.

In the Manage Pages menu, click Settings next to the page you’d like to delete.

Click Delete Page.

In the Delete Page pop-up modal, click Delete.

Hide a link
To hide a link from your web page, follow these steps.
On your website dashboard, click Edit Site.

In the Manage Site menu, click Pages.

In the Manage Pages menu, click Settings next to the link you want to hide.

In the Link Settings menu, toggle off the Show link slider.

That's it! Your hidden link will be removed from your site’s navigation bar, and it will remain offline until you return to your Link Settings and toggle on the Show link slider.
Delete a link
To delete a link from your website, follow these steps.
On your website dashboard, click Edit Site.

In the Manage Site menu, click Pages.

In the Manage Pages menu, click Settings next to the link you want to delete.

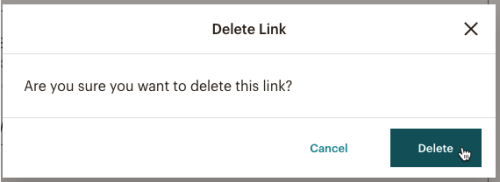
Click Delete link.

In the Delete Link pop-up modal, click Delete.
Unpublish your website
Unpublish your entire website to take all of your web pages offline at once. This is necessary if you need to change your tracking settings.
To unpublish your website, follow these steps.
On your website dashboard, click Settings.

Choose the General settings option.

In the Site Status section, click Edit.

Click Unpublish Site.

In the Unpublish Website pop-up modal, click Unpublish.

If someone tries to visit your unpublished website, and it was originally published on a purchased or connected domain, the visitor will see a Mailchimp-branded placeholder page.
If you originally published your website with a mailchimpsites.com URL, the visitor will see a We can't find that page message instead.
Delete your website
If you no longer wish to host a website with Mailchimp, you can permanently take it offline. This action cannot be undone, and the content of your website cannot be recovered.
To permanently delete a website from your Mailchimp account, follow these steps.
On your website dashboard, click Settings.
Choose the General settings option.

In the Site Status section, click Edit.

Click Delete Site.

In the Delete Site pop-up modal, type DELETE, then click Delete.

Your website will be permanently deleted. If someone tries to visit your deleted website, and you originally published your site on a purchased or connected domain, the visitor will see a Mailchimp-branded placeholder page.
If you originally published your website with a mailchimpsites.com URL, the visitor will see a We can't find that page message instead.
Next steps
Your website is up and running. Now what? Here are a few ways to optimize your Mailchimp website.
Customize your website favicon
Change your site icon to a custom image that matches your brand style and brings a polished look to your website. To learn how to customize your website favicon, check out Customize the Favicon of Your Mailchimp Website or Landing Page.View reports
We’ll start to compile reporting data as people visit your site. You can see who visits your website, clicks links on your web pages, and subscribes to your emails.Promote your website
Promote and share your new website through marketing campaigns in Mailchimp. Run an ad for your website. Link to your website from a regular email campaign. You can also share your website URL on social media.Add a pop-up signup form
A pop-up signup form helps you connect with your website visitors. Design and customize it to fit your brand, and add special offers or discounts to help grow your audience and boost sales. To learn more, check out Add a Pop-Up Signup Form to Your Website.
More like this
- Create Your Website in Mailchimpby QuickBooks
- Design Your Website in Mailchimpby QuickBooks
- About Your Website in Mailchimpby QuickBooks
- Use the Cookie Banner on Your Websiteby QuickBooks


