Space for pervasive banner when authenticated
Convert from Sage 50 to QuickBooks Desktop


Learn how to use the QuickBooks Conversion Tool to move your data over from Sage 50.
Do you want to move your accounting data from Sage 50 (formerly Peachtree) over to QuickBooks Desktop? Use the QuickBooks Conversion Tool to move your data automatically. Here’s how to download and use the tool.
Note: There's a known issue when you try to convert from Sage50 to QuickBooks Pro/Premier 2021. If you see a "Something went wrong" message, contact us to download a QuickBooks 2020 trial.
Step 1: Review the conversion requirements
Before you start, check the system requirements for the conversion tool.
| Operating System: | Windows 10, Windows 8.1, Windows 8 |
| Processor: | 500 MHz Intel Pentium II (minimum) |
| Memory (RAM): | 512 MB (minimum) |
| Hard Drive: | 2.5 GB of free space (recommended) |
| Microsoft .NET Framework: | Version 2.0 (minimum) |
| QuickBooks Desktop: | Pro, Premier, or Enterprise 2018 or higher |
| Sage 50, Sage 50 Quantum | Version 2015 and above |
Note: If you have have Peachtree, Sage 50 (2014 or older), Sage100, Sage 300, or Sage Industry Specific, this tool won't work for you. You can still move your data with Excel.
To check which version of Sage you have, select Help and then About Sage.
If you haven’t already, make sure your computer meets the QuickBooks Desktop system requirements.
Learn what converts
You can convert:
Account, Employee, Item, Customer, and Vendor lists
Account balances
Customer and vendor transactions
Employee profile and contact info
Payroll General Ledger account balance info
Paychecks (convert as journal entries)
You can’t convert:
Payroll transactions and employee year-to-date info (paychecks, year-to-date adjustments)
Payroll items used to calculate paychecks (hourly and salary payroll items, deductions, medical insurance, etc)
Individual employee wage or deduction information
Fixed Assets
Closed or partially closed Sales Orders, Purchase Orders, and Estimates
The following limitations of service can happen when you move from Sage 50 to QuickBooks Desktop with the QB Conversion Tool:
Position for Chart Of Account numbers
QuickBooks Desktop doesn't support chart of account numbers more than seven numbers. The tool will fail if any account numbers are seven numbers or longer.Future Transactions
If the journals have a future date, the transactions will post in the future to QuickBooks Desktop.Multi-currency limitations
All foreign currency data is transfered in home-currency.Some reversed journals are posted
Some reversed journals are posted to QuickBooks. Clearing them can cause differences in your Quickbooks.Some debtor or creditor transactions may not post as you expect
QB Conversion Tool might need to use a "dummy" customer or vendor to align your AR and AP history.
You can only convert versions of Sage 50 and QuickBooks Desktop from the same region. If you have a US version of Sage 50, you need to convert it to a US version of QuickBooks Desktop.
Step 2: Prepare for the conversion
Important: To avoid conversion tool error, make sure to save your file locally.
If you haven't already, install QuickBooks Desktop on the same computer as Sage 50.
Make sure your Sage 50 and QuickBooks Desktop data are saved on your local hard drive. If it isn’t, move it to your local hard drive before you start. The conversion tool will encounter an error if you're hosting a file over a network or on a server.
Note: If your data file is located on a server, you need to convert it on the server computer.Create a backup of your Sage 50 data before you start.
Step 3: Setup Sage 50
Important: You should have admin user access to perform these steps.
Open Sage 50 and the file you want to convert.
From the main menu, select Maintain.
Select Users and then Setup Security.
Select the Data Access/Crystal Reports tab.
Select With the following login information option (Note: You can't change the ID field).
Select Change and set a password for the transfer.
Note: The new password has an 8-character limit and exceeding the limit will cause the conversion tool not to work.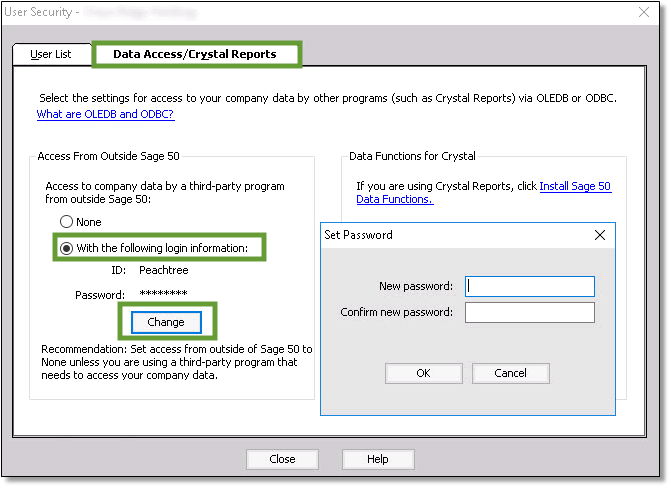
After you set your new password, select OK, then close Sage 50.
Step 4: Download the conversion tool
Find and open the folder you saved the downloaded file to.
Right-click on the QuickBooks Conversion Tool icon, then select Properties.
Under Compatibility mode, select the checkbox for Run this program in compatibility for: and choose Windows 8 (even if you have Windows 10) from the dropdown and then select OK.
Right-click QuickBooksConverstionToolSetup.exe and select Run as Administrator.
Step 5: Convert your data
In the conversion tool, select Browse.
Find and select the Sage 50 company file you want to convert.
In the Pervasive 32-bit ODBC engine DSN Setup window, select your Sage 50 company file from the Database Name dropdown menu. If you have multiple files you may need to scroll to find your company name and then select OK.
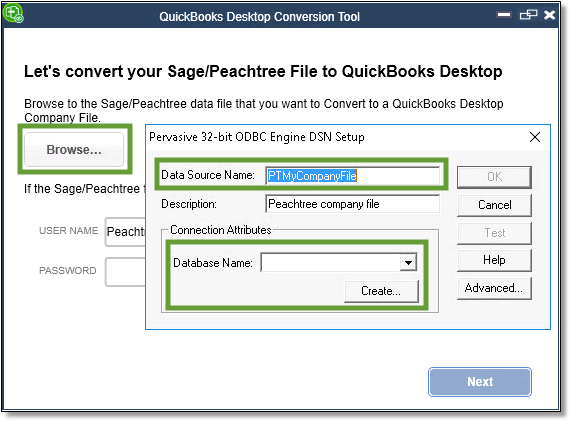
Enter the Sage 50 password you just created. Then select Next.
Select the QuickBooks Desktop version and edition you’re moving your Sage data into.
Note: Don't add any special characters (:Select Browse and choose the folder to save your converted data to, and then select Next. If you don't pick a folder, the default is your My Documents folder. We highly recommend you import into a file that is no more than 2 folders deep.
Review what you entered. If everything looks good, select Convert File to start the conversion. This will launch QuickBooks and the QuickBooks - Application Certificate window requesting access to the company file.
Quickbooks will launch automatically. A certificate will pop-up. Select Yes, Prompt Each time and then Continue.
Note: This may prompt twice.
The coversion tool runs automatically. It may take some time to convert your data. The tool will let you know if the conversion is successful.
Once the tool finishes, you'll see a prompt to Open in QuickBooks. It will take a few minutes to open your file.
Step 6: Review the conversion
When the tool is finished, select Open in QuickBooks. Review your data in QuickBooks and make sure everything is there. Then review the transfer log:
Open the Windows Start menu.
Search for and open File Explorer.
Go to C:\USERS\[Your Windows User Name]\My Documents\Intuit\QuickBooks.
Review the failed transaction log file in the folder. This tells you if any data didn't transfer over.
After you review the log, you're good to go. If you’re new to QuickBooks Desktop, here’s how to get started.
Possible errors:
If you get an error that says, "It looks like something went wrong", we can help.
Your file may not be saved locally. You'll get this error if you're hosting a file over a network or on a server. Install Sage50 on a different computer that's not on the network or server. Create a back up in Sage 50 and Restore Local to your computer. This is usually your C Drive.
Your file name has a special character in the saved name. Remove any special characters in the name before you save the file.
There's a known issue when you try to convert from Sage50 to QuickBooks Pro/Premier 2021. If you see a "Something went wrong" message, contact us to download a QuickBooks 2020 trial. With the trial, you can try the convertion again.
If you get an error that says, "We just need a little more info", we can help.
Looks like you need to run the Conversion tool in Compatibility mode.
Right-click on the QuickBooks Conversion Tool icon, then select Properties.
Under Compatibility mode, select the checkbox for Run this program in compatibility for:, then choose from the dropdown your Windows operating system and then select OK.
Right-click QuickBooksConverstionToolSetup.exe and select Run as Administrator.
If you continue to have issues with this error, contact us.
Sign in now for personalized help
See articles customized for your product and join our large community of QuickBooks users.
Call Sales: 1-800-365-9606