Set up enhanced security in Gmail for QuickBooks Desktop
by Intuit•92• Updated 1 year ago
Learn how to use Gmail with enhanced security through QuickBooks Desktop in a few steps.
If you’re looking to set up email other than Gmail, please see Connect your email to QuickBooks Desktop.
If you have Gmail without Enhanced Security checked, you’ll need to switch to Enhanced Security. On May 30, 2022, Google will no longer support using only your username and password. This might affect how you send transactions with Gmail in QuickBooks.
Scenario 1: Change the current Gmail account to use the secure webmail
- Turn on 2-step verification for your Google account.
- In QuickBooks, select Edit and then select Preferences.
- Select Send Forms.
- Select Web Mail.
- Select your Gmail User Id and Edit.
- Select Use enhanced security and select OK. We’ll also ask you to sign in to your Intuit account to complete the process.
- Your Gmail sign-in page will display. Sign in and grant Intuit access.
Scenario 2: Set up secure webmail when you first add Gmail
- Turn on 2-step verification for your Google account.
- In QuickBooks, select Edit and then select Preferences.
- Select Send Forms.
- Select Web Mail and Add.
- Select the email provider as Gmail from the drop-down and enter your email address from step 1.
- Continue with Use enhanced security selected and select OK. We’ll also ask you to sign in to your Intuit account to complete the process.
- Your Gmail sign-in page will display. Sign in and grant Intuit access.
If you've configured Gmail to use enhanced security, you'll be prompted to authorize QuickBooks Desktop when you send a transaction or report.
If you're using QuickBooks Desktop for Mac Plus
You will need to remove any Gmail accounts you've set up in QuickBooks, and change your Email preference.
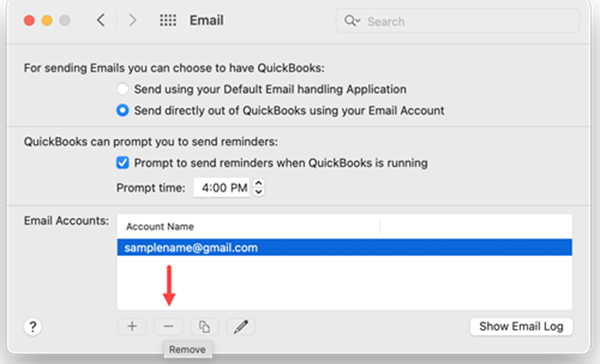
Step 1: Remove any Gmail address that uses SMTP:
- From the QuickBooks menu select Settings
- Select the @Email setting.
- Select Send directly out of QuickBooks using your Email Account.
- Select the Gmail account in the Email Accounts table. Then select Edit to view the connection details. If the Gmail account uses SMTP you will see a field containing smtp.gmail.com
- Select Cancel button
- Once you confirm the connection as SMTP, select the remove button (-) to delete the account.

Step 2: Setup Gmail using secure authorization:
- From the QuickBooks menu select Settings.
- Select the @Email setting.
- Select Send directly out of QuickBooks using your Email Account.
- Select Gmail as the email provider then select OK.
- Continue with Enhanced security selected and select OK. We’ll ask you to sign in to your Intuit account if you’re not already.
- Follow the prompts to sign in to your Google Account from the external browser
More like this