Learn how to set up vehicles and mileage tracking in QuickBooks Online and the QuickBooks Online mobile app.
Use the QuickBooks Online mobile app to track business mileage for your vehicles. Keep track of your trips and vehicle info during the year so you have everything you need to make deductions at tax time.
If you're already set up, follow these steps to automatically track your mileage.
Add a vehicle to QuickBooks
You can add as many vehicles as you need. Follow the steps for your web browser or mobile experience.
On an iPhone or iPad (iOS)
- Go to Menu ☰, then tap Mileage.
- Tap Auto-tracking.
- In the "Manage" section, tap Vehicles.
- Tap Add Vehicle.
Note: If you need to update an existing vehicle’s info, tap the vehicle you need to update. Make the changes, then tap Save. - Enter the vehicle’s make and model.
Note: If you want to set it as your primary vehicle, tap the switch . You can also enter more info for your vehicle when you tap Optional Information.
 - Tap Save.
Allow location access on your mobile device
For auto-tracking to work, allow location access for QuickBooks on your mobile device. Follow these steps depending on the mobile device you use:
Turn on mileage tracking
Turn on automatic mileage tracking in the QuickBooks Online mobile app. These steps work for both iOS and Android mobile devices.
Note:
- Add your vehicle info before you start tracking your mileage.
- Currently, only Primary Admin and Company Admin can track mileage in QuickBooks Online. Each user can only view their own mileage. Here’s how to change user permissions so your driver can track their mileage.
- Go to Menu ☰, then tap Mileage.
- Tap Auto-tracking.
- Tap the switch to turn on Auto-tracking.
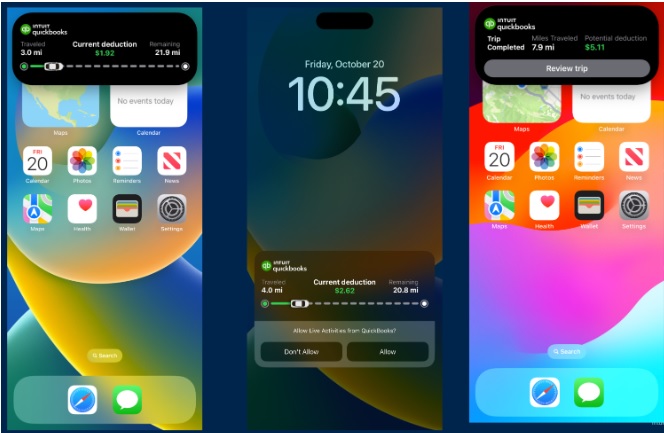
Use the Trips Live Activity feature
On a iPhone to use the Trips Live Activity feature for the Current Allowable Expenses:
Important: Only available for iPhone 14 models and above.
- Go to the Today tab and tap Track Trip from the Quick Actions menu, or go to the Menu (☰) and tap Mileage.
- Tap Track a Trip.
- Tap Start to begin tracking your trip.
- Enter the destination address in the Add Destination screen or select address from the list having previous address
- A Live Activity Message will be displayed and Dynamic Island will appear on the lock or home screen.
Note: Should you lose your connection, your trip will still be saved in the unreviewed section so you can review it once your connection is re-established.
Manage your vehicles
Assign a primary vehicle
If you use more than one vehicle, set the one you use the most as the primary vehicle. QuickBooks will automatically tag auto-tracked trips to it.
Tip: You can always assign a different vehicle when you categorize trips.
Note:
- You can only use active vehicles as your primary vehicle.
- If you only have one vehicle, it becomes your primary vehicle and you can’t deactivate it.
On a web browser
- Go to Expenses then select Mileage (Take me there).
- Select the ▼ dropdown next to Add trip. Then, select Manage vehicles.
- Select the vehicle you want to assign as the primary vehicle.
- Turn on the Set as primary vehicle switch.
- Select Save.
On an iPhone or iPad (iOS)
- Go to Menu ☰, then tap Mileage.
- Tap Auto-tracking.
- In the Manage section, tap Vehicles.
- Select the vehicle you want to set as primary.
- Tap the Set as primary vehicle switch.
Note: This won’t affect your previously-reviewed trips with your old primary vehicle. - Tap Confirm, then Save.
QuickBooks will now tag the new trips you take to this vehicle.
On an Android phone or tablet
- Go to Menu ☰, then tap Mileage.
- Tap + New, then tap Vehicle.
- Tap the vehicle you want to set as primary.
- Tap the Set as Primary vehicle switch.
Note: This won’t affect your previously-reviewed trips with your old primary vehicle. - Tap Confirm, then Save.
QuickBooks will now tag the new trips you take to this vehicle.
You can add as many vehicles as you need. Tip: Add your vehicle info before you start tracking your mileage.
Track business miles
Now that you’re all set up, check out how you can track trips with the QuickBooks Online mobile app.
Note: The accountant is the only one who has the view of "Download your client's trip log". If you don't, it's because you are the Primary Admin. You can only access the page if you are a firm user.
Add and edit favorite locations
You can create and manage a list of your favorite locations. These will auto-populate when it comes time to review your trips.
- Sign in to your QuickBooks Online account.
- Go to Expenses then select Mileage (Take me there).
- In the Add trip dropdown ▼, select Manage favorite locations.
- Select Add favorite location, or choose an existing location to edit.
- Enter an address in the Address field. QuickBooks may auto-suggest the location as you type.
- Enter a Name for this location.
- Select Save when finished.