Set up and modify Scheduled Reports
by Intuit•4• Updated 1 month ago
Scheduled Reports is a feature in QuickBooks Desktop 2018 and later versions that allows you to send reports on a regular and recurring scheduled time. If you’ve ever found yourself sending the same reports on a daily, weekly, monthly or quarterly basis, you can set up Scheduled Reports to automate this task. You can choose the time and frequency for sending out your scheduled reports. You can also send out multiple reports in one schedule.
| This article is part of a series that covers basic information about reports in QuickBooks Desktop. |
This article is part of a series that covers basic information about reports in QuickBooks Desktop.
Requirements for Scheduled Reports
QuickBooks can send out your scheduled reports, if at the time they're scheduled to send:
- The computer you set up the scheduled report on is running and NOT in sleep or hibernate mode.
- Make sure User Account Control is turned OFF.
Warning: Turning off User Account Control may result to security risk on your computer.
- Make sure User Account Control is turned OFF.
- QuickBooks is running.
- A company file with scheduled report should be open.
- If you have scheduled reports on multiple company files, NO Company file should be opened.
- QuickBooks is updated to the latest release.
- The company file is in single-user mode.
- An email account is setup up in QuickBooks. If the email preference is set to Outlook, make sure it's open and running.
- You have the Keep QuickBooks running for quick startups preference disabled. Here's how to check this:
- Select the Edit menu, then select Preferences.
- From the left menu, select General, then choose My Preferences tab.
- Uncheck the box for 'Keep QuickBooks running for quick startup'. Note: This preference is NOT available for QuickBooks 2018 and later.
If you have multiple versions of QuickBooks Desktop installed (e.g., you have both QuickBooks Desktop Pro 2018 and QuickBooks Enterprise 18.0 installed), and the sub-menu for Scheduled Reports is grayed out, make sure to download the latest update.
Set up a new scheduled report
Before scheduling reports, ensure there's an email account set up and integrated with QuickBooks. If you haven't done so, Set up your email service in QuickBooks Desktop.
Follow these steps to create a new scheduled report:
- From the QuickBooks Reports menu, choose Scheduled Reports > Schedule Setup.
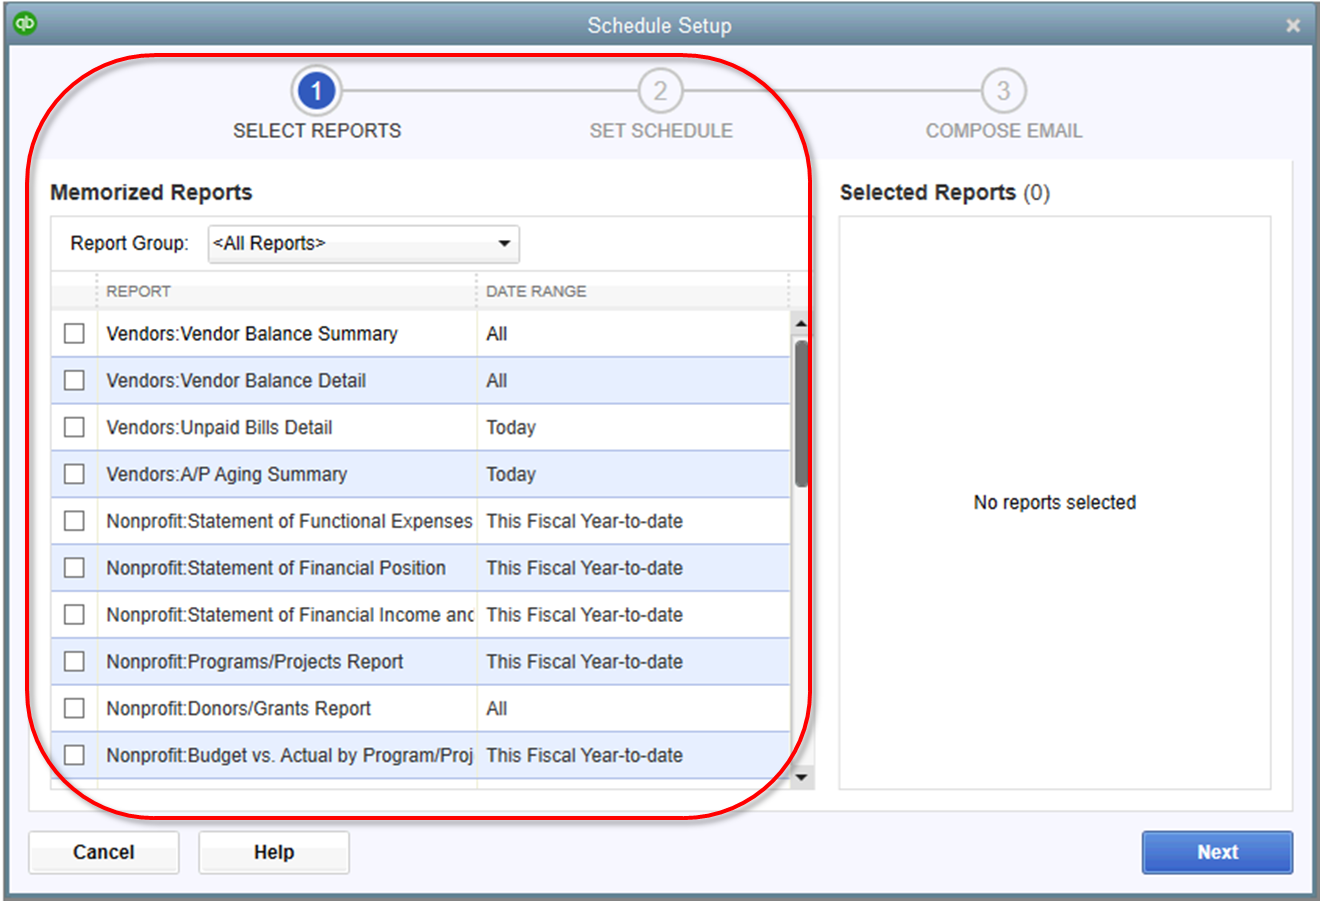
- Select the report you wish to send. You may select multiple reports to be sent in the same schedule. Once you have selected your reports, click Next.
Important: You can only set up a schedule for memorized reports. If you don't see the report you wish to send, open that report and memorize it.
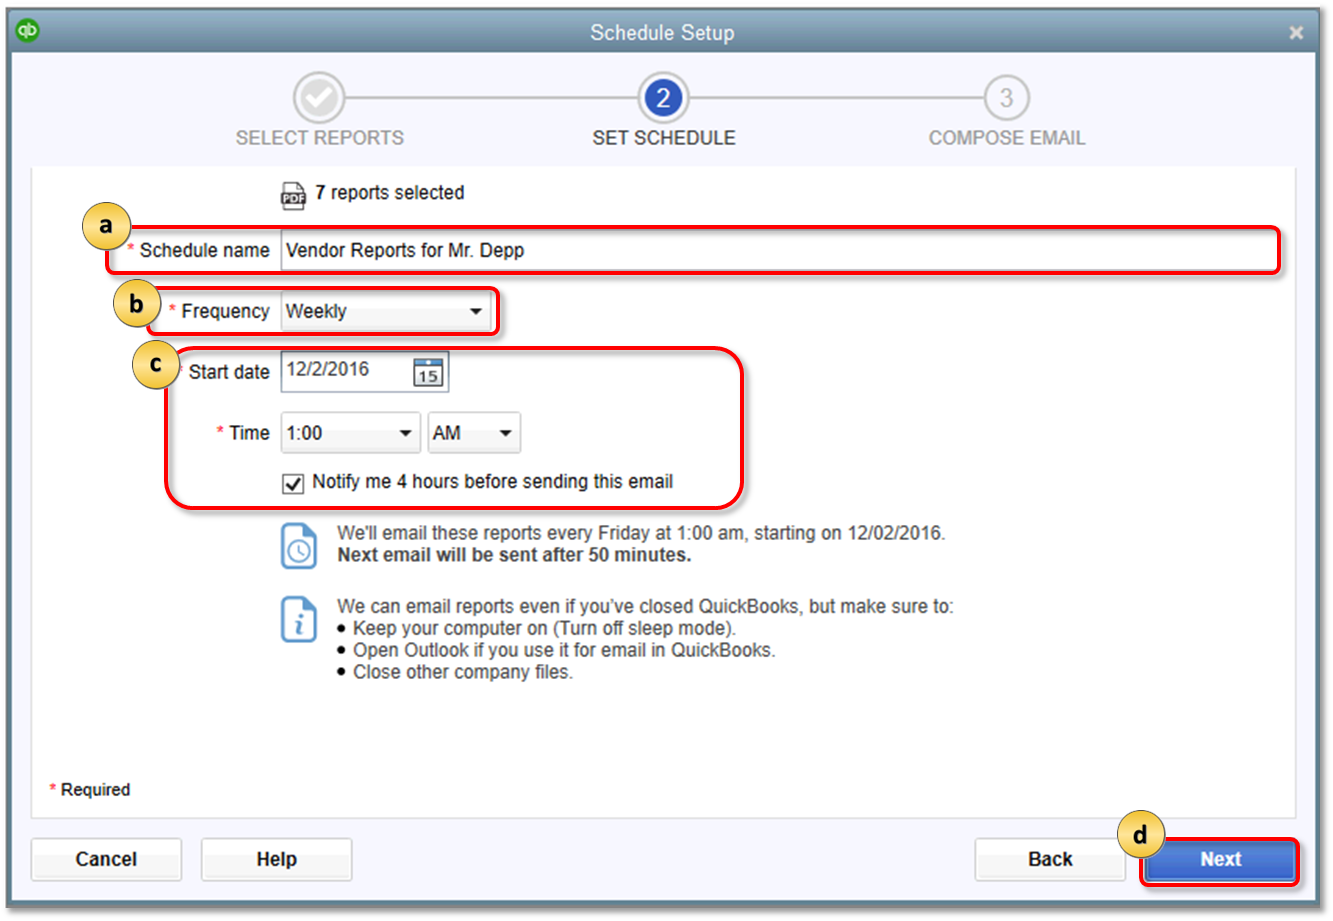
- Set up report schedule.

- Give your new schedule a name.
- Set how often you want to send the report.
- Select a Start date and Time. Additionally, you may choose to have QuickBooks notify you 4 hours before it sends the reports.
- Click Next to proceed.
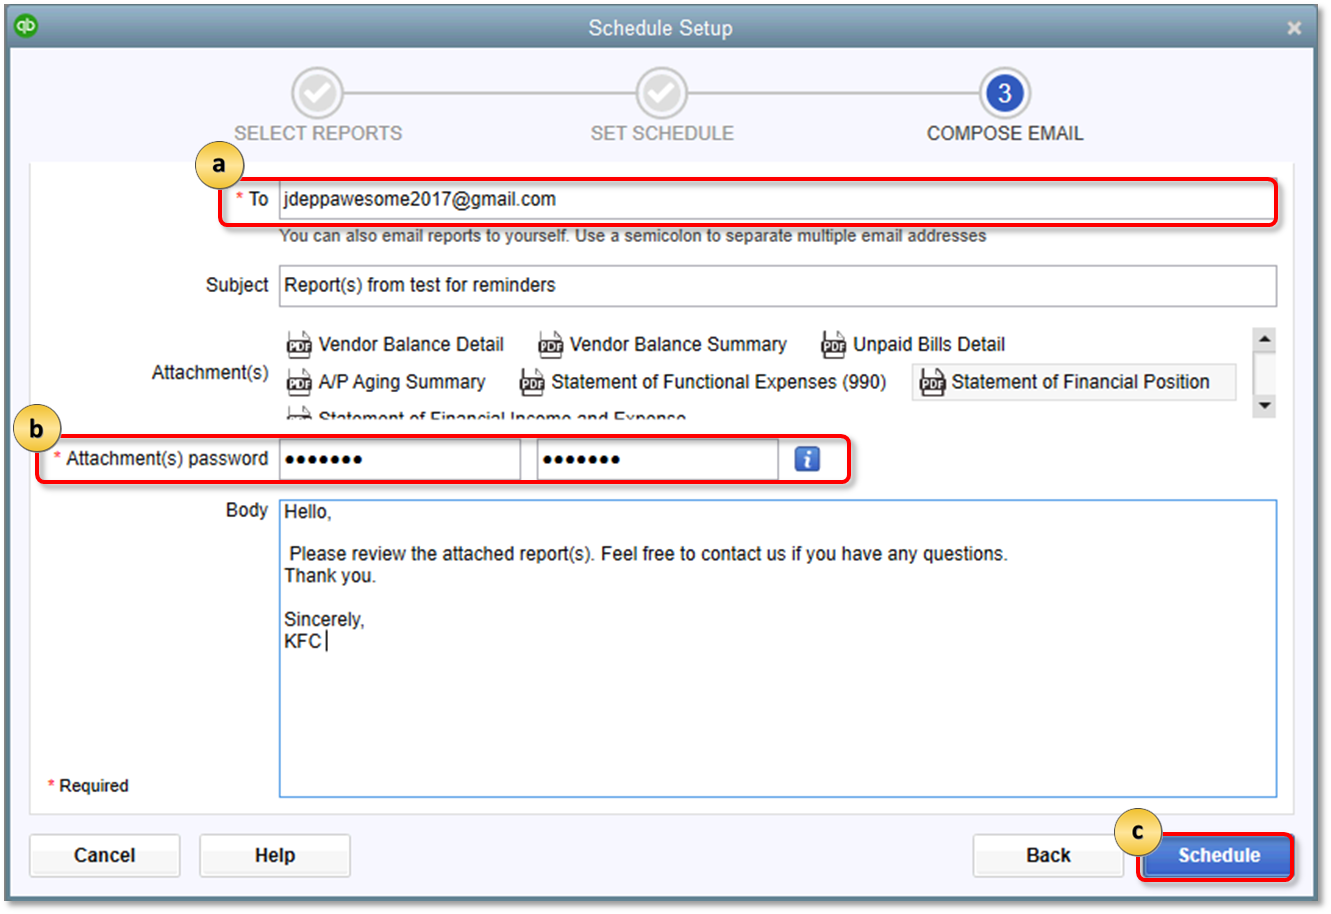
- Compose scheduled reports email.

- Enter the e-mail address you want to send the report to. You can send to multiple e-mail addresses by using a semicolon to separate them.
- Before finalizing the set-up, you must assign a password for the report attachments. For security reasons, Do NOT enter the password in to the subject or body fields of the e-mail.
- Click Schedule to complete the process.
- Check if the preferences is set up correctly.
- Select the Edit menu, then select Preferences.
- From the left menu, select Integrated Apps, then choose Company Preferences tab.
- Put a check on Scheduled Reports, then select Properties.
- On the Access Rights tab make sure both permissions are selected.
- Select OK, then choose OK.
Edit or delete an existing scheduled report
Follow these steps to modify an existing scheduled report:

- From the QuickBooks Reports menu, choose Scheduled Reports > Scheduled Report Center.
- Select the Action dropdown, select either Edit Schedule or Delete.
- If you want to make a Scheduled Report inactive, remove the check mark in the Active box. This will retain the settings of a scheduled report but will prevent it from running until re-activated.
Advanced Reporting: Information at your fingertips.
QuickBooks Desktop Pro and Premier users can get advanced reporting features by upgrading to QuickBooks Desktop Enterprise. Give us a call at 888-566-4671 and see if it's right for you.
Set up Scheduled Reports for QuickBooks for Mac
Learn how to automatically email reports or save them to your computer on a repeating schedule.
You can do this in single and multi-user modes.
Note: You must memorize the reports first before you schedule.
- From the Reports menu, select Scheduled then select Set up Schedule. The first pane of the Setup Report Schedule window will show the memorized reports you can select.
- Select one or multiple reports to create a batch for emailing or to save to your computer. Then select Next.
- Set the schedule. You may give this batch a schedule name and set the frequency and duration of the schedule. Then select Next.
- Save your schedule.
- If you select Save to disk, you must choose a destination folder on your computer.
- If you select Email as Attachments, you must enter an attachment password which the recipient must enter to open the attachments. Choose whether the reports will be delivered in PDF format or as a spreadsheet.
- In the To field, enter the recipient’s email address. You may enter more than one email address, separate them by a comma. You may also edit the subject line and edit the message.
- Select Finish.
Now you can view, run, or edit your scheduled reports using the Scheduled Report Center. Scheduled reports will automatically run as long as the company file remains open within QuickBooks.
Scheduled Reports Center
Once you create scheduled reports using the Setup Reports Schedule assistant, you can view, run, and edit them in the Scheduled Reports Center.
- From the Reports, select Scheduled and then select Scheduled Reports Center.
- Highlight any scheduled report and double-click it to open the Scheduled Report window where you can make changes. You may also select the Edit button in the lower right corner.
- Select the plus and minus icons to add or delete a schedule. You can also copy a schedule.
More like this
- Set up customized reports with scheduled emailby QuickBooks
- Set schedule and email information for a memorized report in QuickBooks Onlineby QuickBooks
- Manage schedule notifications and permissionsby QuickBooks
- Set report preferencesby QuickBooks