What to do if you didn't enter an opening balance in QuickBooks Online
by Intuit• Updated 4 days ago
Learn how to enter an opening balance after you already created an account to track transactions in QuickBooks.
When you create a new account in QuickBooks Online, you pick a day to start tracking transactions and enter the balance for your real-life account for that day. This starting point is the opening balance.
If you forgot to enter an opening balance when you created an account, don't worry. You can go back later and create a journal entry to record it. Then you can get back to business as usual.
Important: Only use this method if you haven't reconciled the account yet. Learn how to get more help with reconciliation, connect with a QuickBooks Certified accountant.
For a better experience, open this article in QuickBooks Online. Launch side-by-side view ![]()
Step 1: Make sure you don't already have an opening balance
Before you go further, check your account register. Double-check that you don't already have an opening balance:
- Go to Bookkeeping or Accounting, then select Chart of accounts (Take me there).
- Find the account and select View register from the Action column.
- Search for an opening balance entry. In the Payee Account column, it should say Opening Balance Equity, and in the Memo column, it should say Opening Balance.
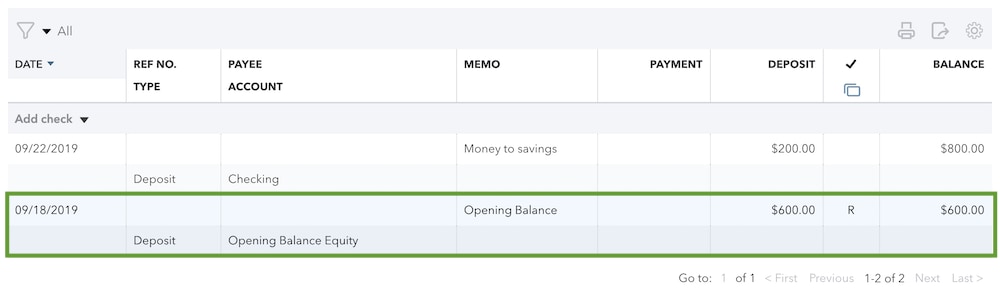
If you see an opening balance entry, don't go further. Take note of the date and amount. Use your bank statements to make sure the opening balance is correct.
If you don't see an opening balance, write down the date and amount of the oldest transaction in the account.
Step 2: Create a journal entry
If you didn't see an opening balance entry, you don't have one. You can now create a journal entry:
- Select + New.
- Select Journal entry.
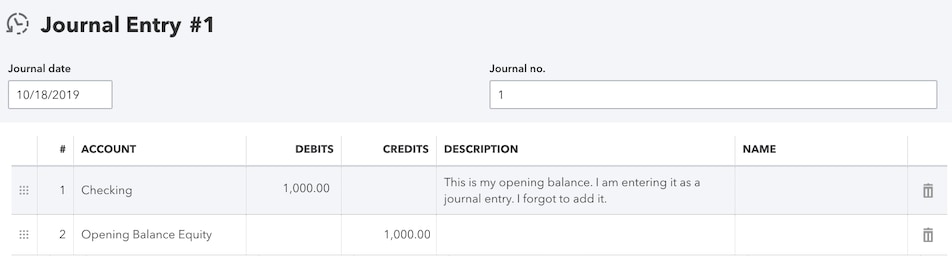
- Enter a date that comes before the oldest transaction in the account. This will be the opening balance date.
- On the first row of the Account column, select the dropdown menu to choose the account you want to enter the opening balance for.
- Add a note in the Description field so you know what the journal entry is for.
- On the second row of the Account column, select the dropdown and choose Opening Balance Equity.
- Use your bank statements to enter the balance of your real-life account on the date you picked as the opening balance. You'll need to enter both a debit and a credit to keep things accurate. Enter the debits and credits based on the type of account you entered on the first row.
- Asset (savings and checking) and expense accounts: Enter the opening balance in the Debit column on the first row. Then, enter the same amount in the Credit column on the second row.
- Liability, equity, and income accounts: Enter the opening balance in the Credit column on the first row. Then, enter the same amount in the Debit column on the second row.
- Accounts Payable: On the first row in the Name field, select the vendor you owe money to. Enter the opening balance as a credit to increase the balance. Or enter the opening balance as a debit to decrease the balance. Then, enter the same amount in the opposite column on the second row.
- Accounts Receivable: On the first row in the Name field, select the customers who owe you money. Enter the opening balance as a debit if you want to increase the balance. Or enter the opening balance as a credit if you want to decrease the balance. Then, enter the same amount in the opposite column on the second row.
- When you're ready, select Save and close.
Step 3: Mark the journal entry as reconciled
Even if you haven't reconciled the account yet, you need to reconcile the journal entry. This prevents it from showing up on a future reconciliation:
- Go to Bookkeeping or Accounting, then select Chart of accounts (Take me there).
- Find the account and select View register from the Action column.
- Search for the journal entry you just created. Select it to expand the view.
- Select the box in the checkmark column until you see an R. This reconciles the journal entry.
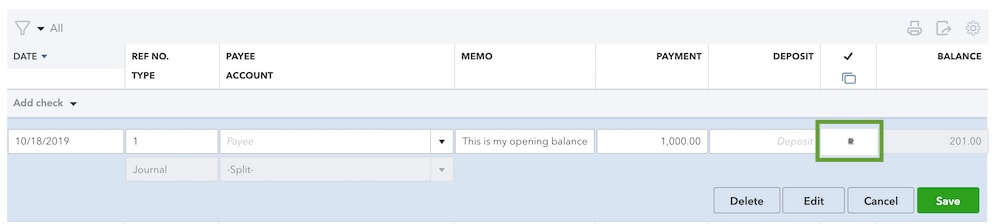
- When you're done, select Save.
Now that you've created a journal entry, the opening balance is reconciled in your account and QuickBooks won't count it in future reconciliations. This should balance your accounts and you can follow the usual steps to reconcile the account.
If your accounts still aren't balanced, here's how to fix opening balance issues.
Sign in now for personalized help
See articles customized for your product and join our large community of QuickBooks users.
More like this
- Enter and manage opening balances in QuickBooks Onlineby QuickBooks•2405•Updated 1 month ago
- Reconcile transactions that are older than your opening balance in QuickBooks Onlineby QuickBooks•907•Updated 1 month ago
- Fix issues the first time you reconcile an account in QuickBooks Onlineby QuickBooks•18404•Updated 1 month ago
- Void or refund customer payments in QuickBooks Onlineby QuickBooks•3115•Updated June 03, 2024
- Reconcile an account in QuickBooks Onlineby QuickBooks•4669•Updated 1 month ago