Set up Leave Allowance Templates
by Intuit•4• Updated 1 month ago
Learn how to set up leave allowance templates to help make managing leave for employees much easier.
By creating a template and adding employees to it, any changes you make to the template will automatically update for all those employees, saving time in manual data entry.
Any business created from 28 August 2020 will have three default leave allowance templates configured: one for casual employees and two for permanent employees.
The difference between the permanent employee leave allowance templates are as follows:
- Permanent Leave - No Loading: this template does not include a 17.5% annual leave loading. Additionally, the accrual and balance of personal/carer's leave is set in hours as opposed to days.
- Permanent Leave - With Loading: this template includes a 17.5% annual leave loading. Additionally, the accrual and balance of personal/carer's leave is set in hours as opposed to days.
You can use these templates as-is or change the settings within to suit your business. Alternatively, you can create your own.
Create a new leave allowance template
- Go to All apps
 , select Payroll, then select Employees (Take me there).
 - Select Leave Allowance Templates under the Pay Conditions section.
- Select Add to create a new template. Only leave categories that automatically accrue leave are displayed in the Leave Allowances section.
- Name the template, then select when the leave year should start on.
- In the Leave Loading section, select if you want leave loading amounts to be calculated from a different pay category. If left blank, the employee's primary pay rate will be used.
- Fixed pay categories cannot be selected here.
- If you select a pay category to calculate the leave loading on, you'll need to ensure that there is a rate set against this on the employee's own Pay Rates page, otherwise, the loading value will be $0.
- In the Enabled Leave Categories section, select which leave categories that employees can access.
- Follow the Leave Allowances section below to set up leave according to your specifications, then select Save once done.
Leave Allowances section
In the Leave Allowances section, you can override any displayed values and enter your own, by selecting the toggle in the Override section. The following options are available when it comes to setting leave allowances:
- Whether or not it accrues automatically - This setting is configured on the Payroll settings > Leave categories page and cannot be changed here. If it is not accruing automatically the employee's balance will not accrue without a manual adjustment being made

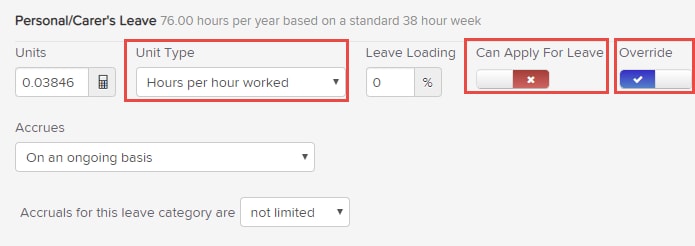
- Unit Type - if the leave category is not tracked, you can set whether the entitlement accrues in days, weeks or hours. If the leave category is tracked, you can set whether the entitlement accrues as 'standard days per year', 'standard weeks per year', hours per hour worked' or 'hours per pay run'
- Can Apply For Leave - you can switch on/off any leave category that the employee can access when applying for leave. If it is switched off, the employee will not see this option within the portal or Employment Hero Work when they apply for leave.
- Override - this determines whether an employee's leave allowance can be overridden or not. If the override is set to no, you will see that the fields are blocked and cannot be changed. To activate an override of a leave category, simply click on the left of the override box.
Then, for other leave categories you may see the below settings:
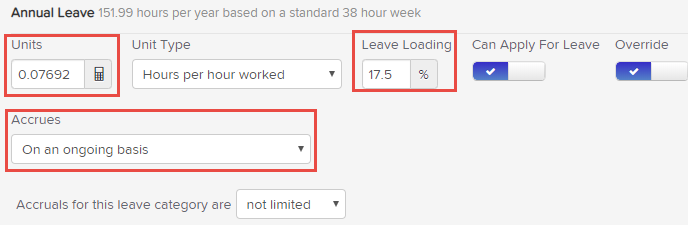
- Units - set the entitlement amount for each leave category. If you select the calculator icon you'll be able to view a breakdown of accrual amounts, and can view different results by entering a different figure for the hours per day and employee would work
- Leave Loading - enter a leave loading amount. E.g. if the employee is entitled to 17.5% loading when taking annual leave, you would enter 17.5
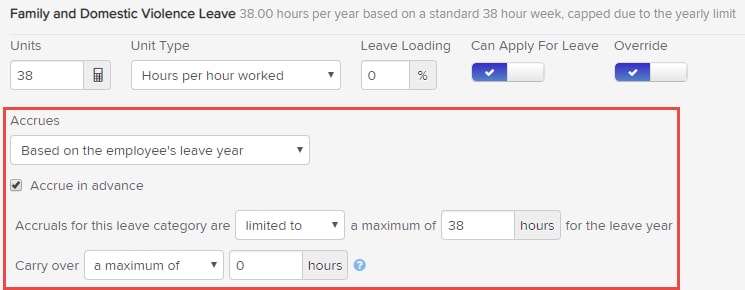
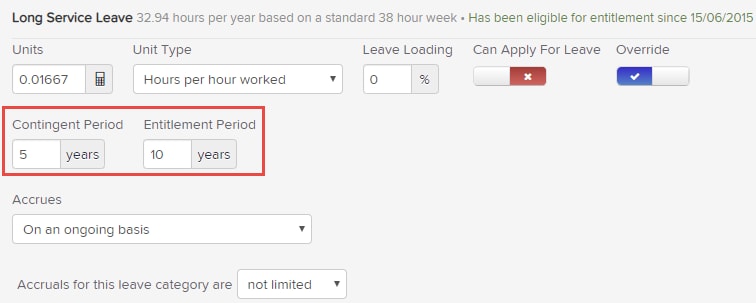
- Accrues - This can be set to either accrue on an ongoing basis, or to accrue according to the employee's leave year. If you select 'on an ongoing basis' you'll then only have the option of whether to limit or not limit the accruals for the leave.
Accruing leave according to the employee's leave year
If you select to accrue the leave according to the employee's leave year, you'll have more settings in which to specify the conditions. These include:
- Accrue in advance - The total amount of leave owed to the employee within the leave year will be accrued upfront in the employee's first pay run. The employee will then no longer continue to accrue leave during the leave year. At the start of the next leave year, the entire leave entitlement will again be added to the employee's balance in the first pay run dated AFTER the employee's leave year.
- Accruals for this leave category are - You can select from 'limited' or 'not limited' to and enter the required number of days.
- Carry over - You can choose to have only a maximum number of units' leave (accrued from the previous year) to be carried over upon commencement of a new leave year. If an employee's balance is greater than those units, the balance will be adjusted in the pay run.
Long Service Leave settings
- Contingent & Entitlement Period - Enter the number of years each period should be activated from. If the contingent period has occurred, this leave category will appear in an employee's termination pay and you can choose to pay it (if the leave is set to be paid out on termination). Additionally, if the entitlement period has occurred, the employee will be able to choose that leave category when applying for leave.
Copy an existing leave allowance template
- From the Leave Allowance Templates screen, find the leave allowance template you want to copy.
- Hover over the template and select the Copy icon on the right side of the screen.
- Another template will be added underneath with the same name, but with 'Copy' at the end.
More like this
- Managing Long Service Leave in QuickBooks Payroll powered by Employment Heroby QuickBooks
- Set up employee allowancesby QuickBooks
- How to Add Leave Categories in QuickBooks Payrollby QuickBooks
- Set up and configure Employment Agreementsby QuickBooks