Automate Employee Standard Hours
by Intuit• Updated 1 month ago
Learn how to create a rule in QuickBooks Online Advanced Payroll, to automate employee working hours for the following scenarios:
- Topping up standard hours of work where your employee works less than normal hours
- Restricting your employee to standard hours where they work more than usual
Before we get started, there are a couple of things to be aware of first:
- You must be on QuickBooks Advanced Payroll
- You may want this rule to only apply to selected employees. If this is the case, you'll need to configure tags
- You'll need to decide whether or not you need to add this rule to an existing rule set, or create a new one by configuring the rule sets.
Configuring the rule sets
If your employees are already attached to a rule set, you will need to add the rules in addition to the existing rule set so that they are still linked to the other existing rules.
To navigate to your existing rule set:
Follow this link to complete the steps in product
- Select Payroll Settings.
- Navigate to Rule Sets under the Pay Conditions section, then select the existing rule set. Or, select Add if you don’t want these rules to be part of any existing rule set.
- Note: If they are attached to an award, you'll need to select the award first from the dropdown box.
- Select Create Rules on the right-hand side of the screen and follow the steps below for the scenario that applies to you.
Note: Rule sets work in order of evaluation from top to bottom, meaning the processing of the rules at the bottom happens last. In most cases, you want something that pays the employees more to happen at the bottom.
Scenario 1: Topping up standard hours of work where your employee works less than normal hours
- From the Rule Sets page, select Create Rules next to your Rule set.
- Select Add a rule.
- Enter the name of the rule as ‘Top up of standard hours’ or similar, then under the WHEN dropdown menu, select Time worked, and in the next dropdown box, select in a week (or any other period to suit your needs).
- If you configured a TOPUP tag earlier, select the cog icon on the right of the screen, then select Add ‘Where’. In the dropdown underneath WHERE, select Tags, then select has any of, and enter the name of the tag in the field.
- Under the Tags dropdown menu, select is greater than employee standard hours.
- Note: The employee standard hours are those hours on the Employee's settings > Pay Run Defaults page.
- In the THEN dropdown menu, select Add remaining time.
- Select Save.
Here’s an example of what the configuration should look like before saving:

Scenario 2: Restricting your employee to standard hours where they work more than usual
In this scenario, even if the employee submits timesheets for hours greater than their standard hours, you can automate the system to ignore any hours above their standard.
- From the Rule Sets page, select Create Rules next to your Rule set.
- Select Add a rule.
- Enter the name of the rule as ‘Above standard hours’ or similar, then under the WHEN dropdown menu, select Time worked, and in the next dropdown box, select in a week (or any other period to suit your needs).
- If you configured a TOPUP tag earlier, select the cog icon on the right of the screen, then select Add ‘Where’. In the dropdown underneath WHERE, select Tags, then select has any of, and enter the name of the tag in the field.
- Under the Tags dropdown menu, select is greater than employee standard hours.
- Note: The employee standard hours are those hours on the Employee file > Pay run defaults page.
- In the THEN dropdown menu, select apply pay category, then select [NONE].
- Select Save.
Here’s an example of what the configuration should look like before saving:

Optional: Make employee accrue Time in Lieu when they work over standard hours
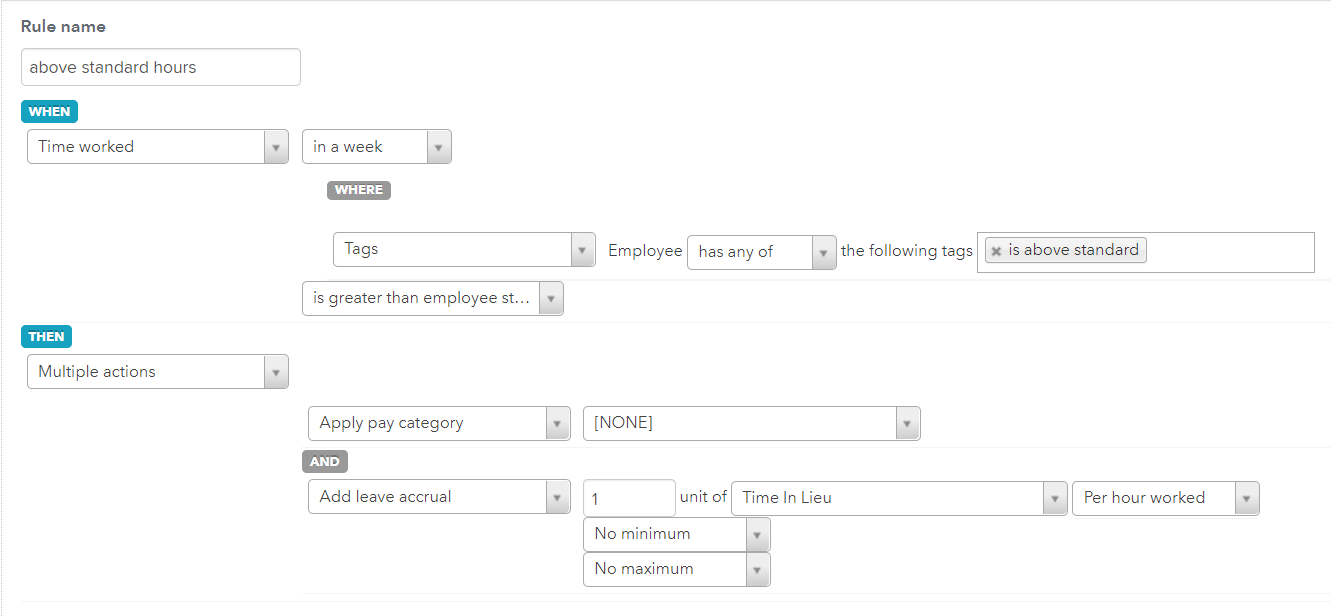
If you want the employee to accrue TIL when they work over their standard hours, you just need to tweak the rule a little to add an extra condition to the end:
- Under the THEN section, select multiple actions in the dropdown.
- In the next dropdown, select Apply pay category, then select [NONE].
- Select Add Action on the right side of the screen.
- In the dropdown under AND, select Add leave accrual, then enter 1 unit, Time in Lieu, and Per hour worked in their respective dropdowns.
- Select Save.
Here’s an example of what the configuration should look like before saving:

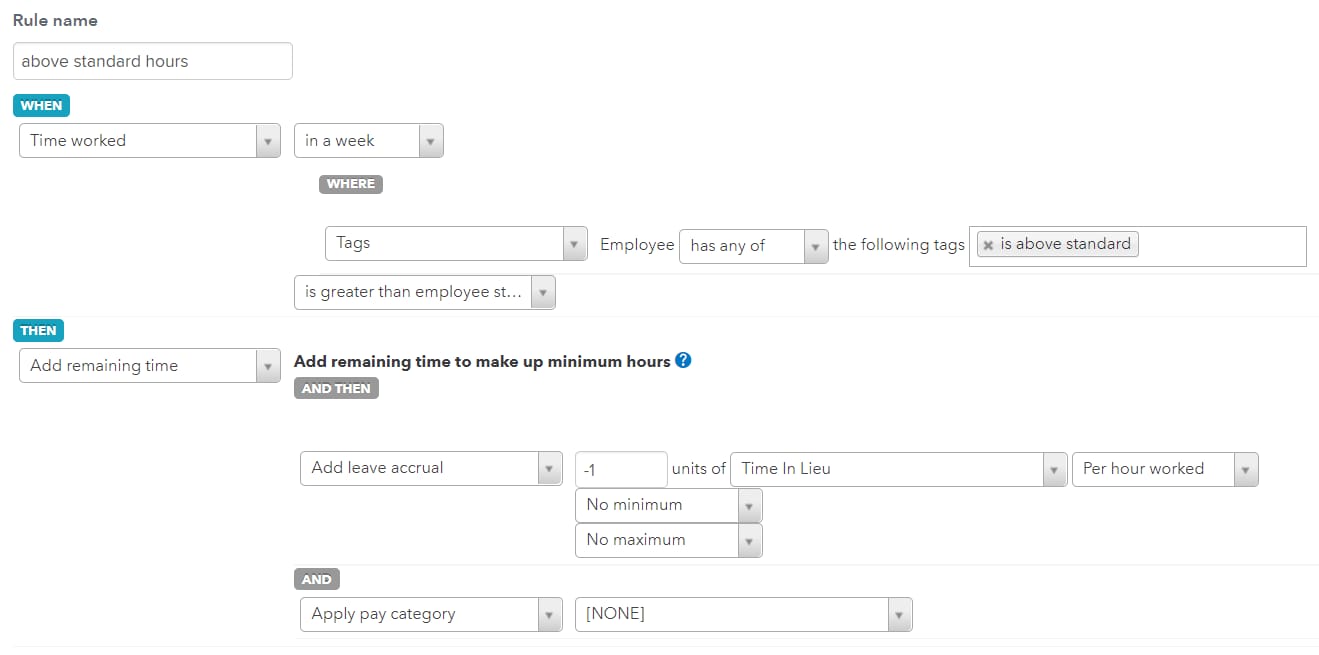
If you want the employee's TIL balance to reduce when topping up hours if they work less than their standard, you'll need to add the below conditions:
- Under the THEN section, select Add remaining time in the dropdown.
- Select Add Action on the right side of the screen.
- In the dropdown under AND THEN, select Add leave accrual, then enter -1 unit, Time in Lieu, and Per hour worked in their respective dropdowns.
- Select Add Action, then under AND, select Apply leave category, then select [NONE].
- Select Save.
Here’s an example of what the configuration should look like before saving:

Testing the rules
You can check what's happening for each shift by using the rules tester:
Follow this link to complete the steps in product
- Select Payroll Settings.
- Navigate to Rule Sets under the Pay Conditions section, then select the existing rule set.
- Select Test Rules on the right side of the screen.
- Check the current period dates. The pay run period dates should match exactly to the current period or a previous period.
- Select the Import button.
- Select the employee whose shifts you want to test, then select Import.
- Scroll to the bottom of the screen and select Run Test.
Once each day's earnings are displayed, you can expand the day you want to check and select the question mark to show you the list of rules that have been triggered by that shift.
Then, you can go check each rule that was triggered and see how/why it has been applied to that shift - keep in mind that rules are applied in order from top to bottom so a rule that's triggered may be overridden by another rule further down the list.
More like this