Migrating from QuickBooks Desktop to QuickBooks Online with Intuit's internal tool
by Intuit•108• Updated 3 months ago
Are you considering migrating from QuickBooks Desktop to QuickBooks Online, but a little unsure of where to start? This walkthrough guides you through the process.
Is migration right for you?
Review the following 2 sections to help you make the decision about moving to QuickBooks Online from QuickBooks Desktop using our internal tool.
What you need to know before migrating
QuickBooks Online and QuickBooks Desktop are both strong tools, but there are some things to think about to help you decide if your company should switch.
- QuickBooks Online (QBO) works differently than Desktop—some features may not transfer exactly or may need adjustments.
- Very large or complex files (lots of inventory, many years of transactions) may cause issues or limit how much can be converted.
- In Canada, QuickBooks Enterprise is not supported for direct migration.
Before you start the migration process, consider the features your company needs to run the business. Some of these differences are detailed in the feature comparison chart.
What will and won't convert from QuickBooks Desktop to QuickBooks Online
When you move from QuickBooks Desktop to QuickBooks Online, most of your company file info will copy over without you having to re-enter it. However, some info won't copy over automatically.
Information may change when moving from QuickBooks Desktop to QuickBooks Online. You might need to make some adjustments after the switch.
Data that doesn’t convert won’t transfer with your company file. You'll need to re-add it manually.
Review our article on how data converts from QuickBooks Desktop to QuickBooks Online for more information.
What does transfer (with possible adjustments): customer/supplier lists, transactions, account balances, chart of accounts, etc.
What doesn't transfer and needs manual setup: some payroll details, company settings (name, address), bank/credit card connections, custom templates, and certain features that don’t match between Desktop and Online.
Preparation for migration
There are a few steps to take before you start the conversion process to ensure your information migrates properly. Follow the steps below to make sure everything is ready to migrate.
1. Back up your company file
In QuickBooks Desktop, it’s wise to back up your data often. In QuickBooks Online, your data is stored securely in the cloud—there’s no need to back up manually.
To back up your data before you migrate, follow these steps:
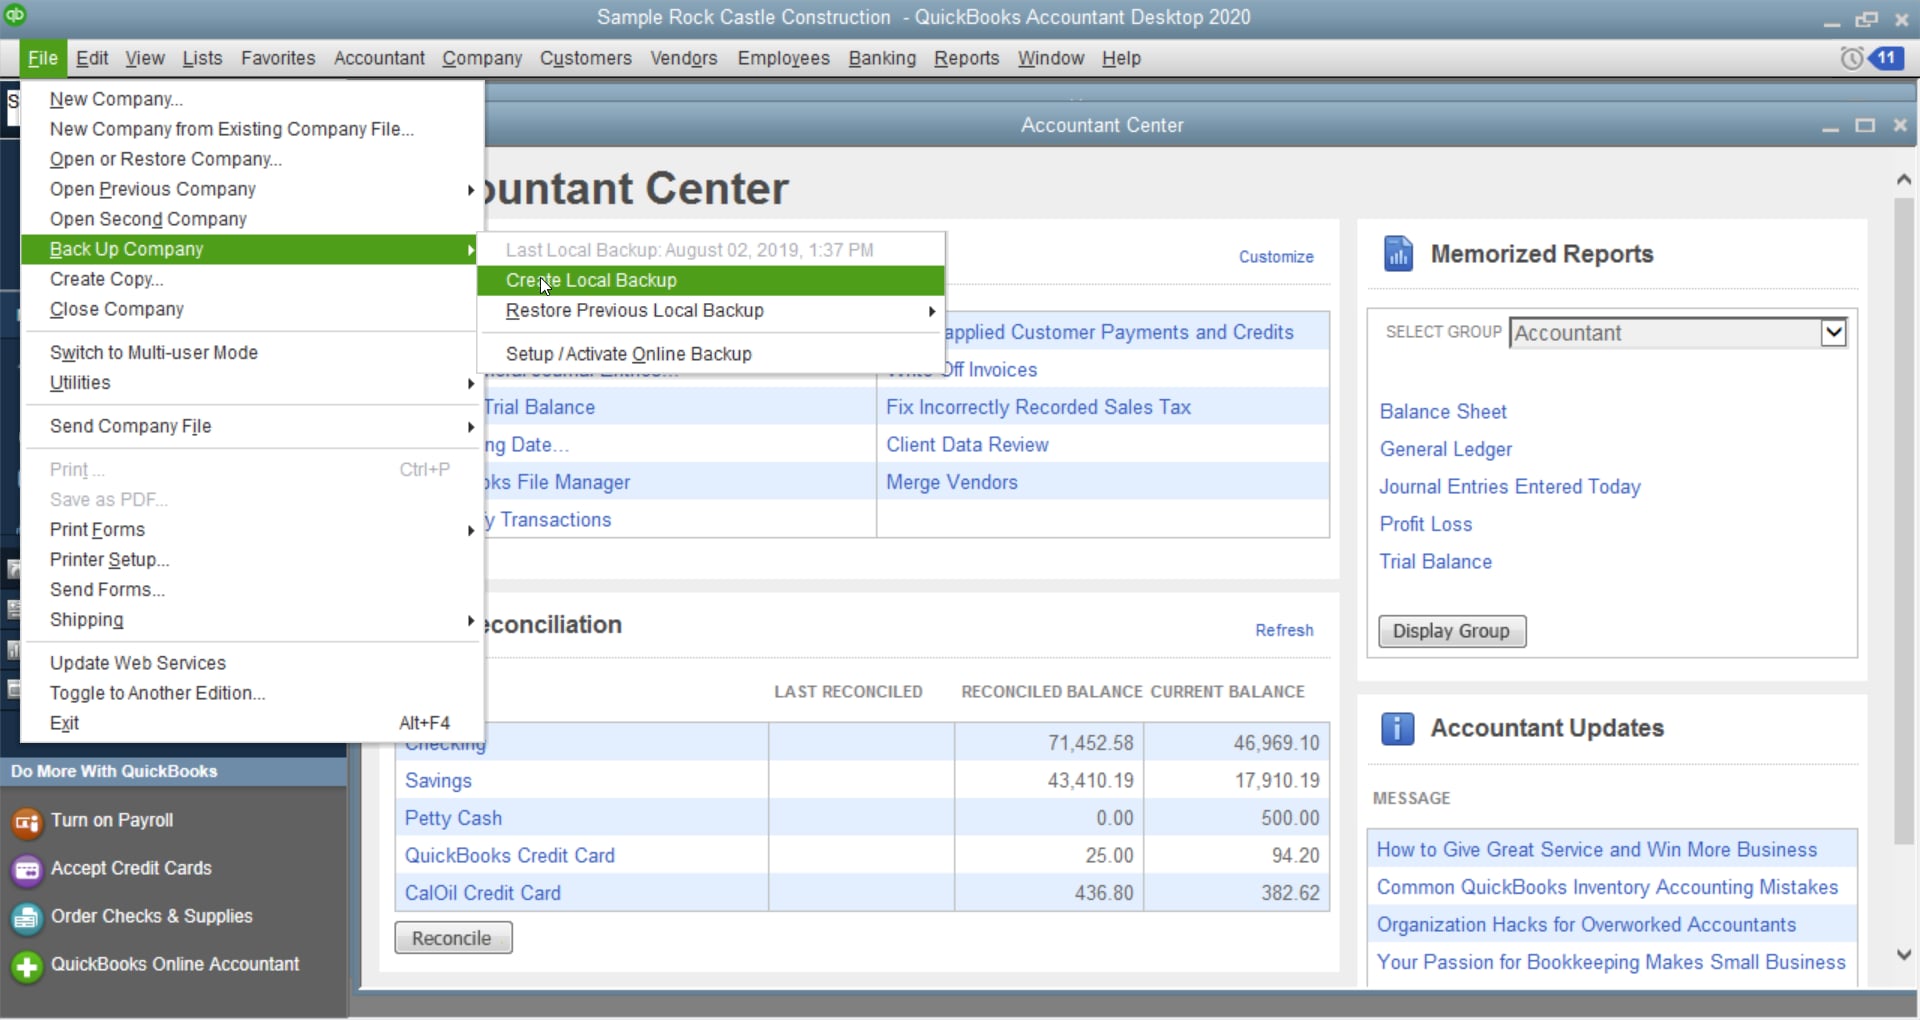
- If you’re currently in multi-user mode, go to the File menu, and select Switch to Single-user Mode.
- Go to the File menu and select Create Backup.... Then select Local backup.
- In the window, select Local Backup and then Next.
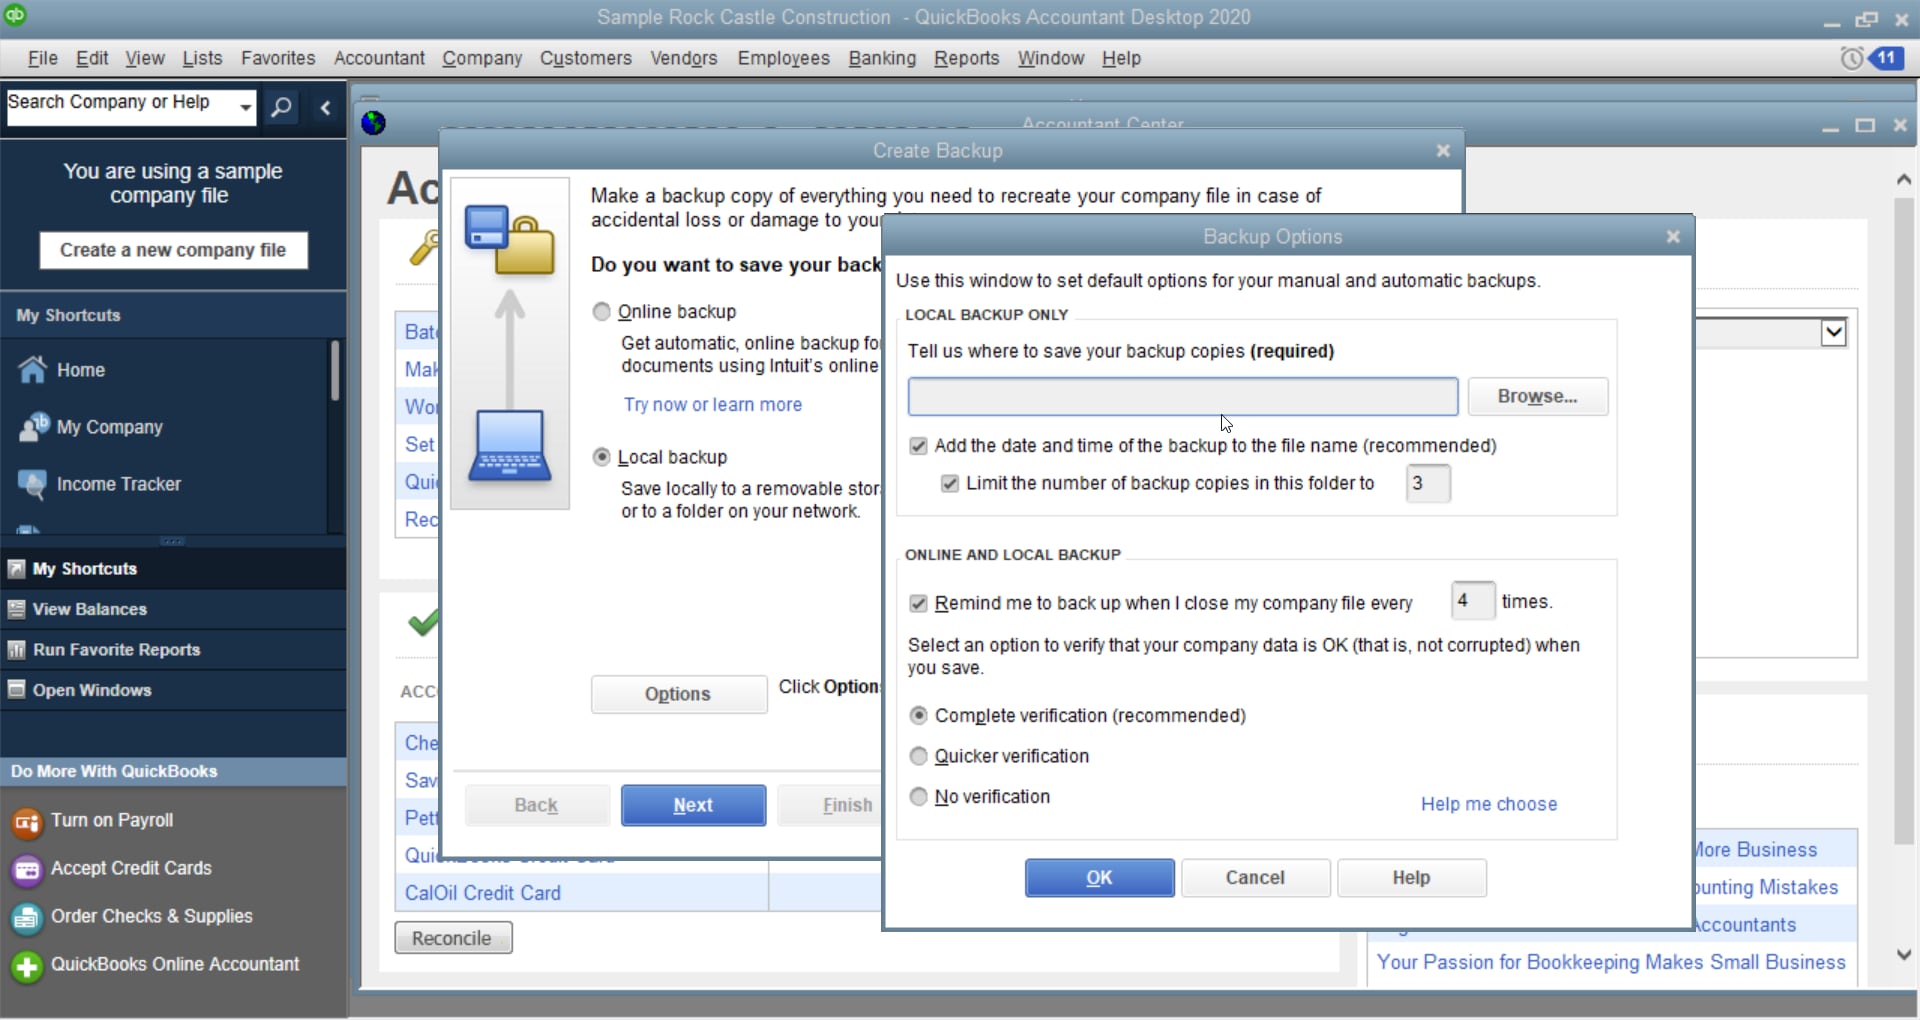
- In the Local Backup Only section, select Browse, then select where you want to save your backup company file.
- Set the number of backups you want to keep - this is optional.
- A test runs to ensure your backup file is correct before you save. If you encounter any issues, see our Troubleshooting section.
- Select OK when you’re ready to proceed.
- Select Save it now and Next. A confirmation message displays when the backup completes.
Backups can be run manually, as above, or automatically. Review our article to learn about the different ways to back up your data.
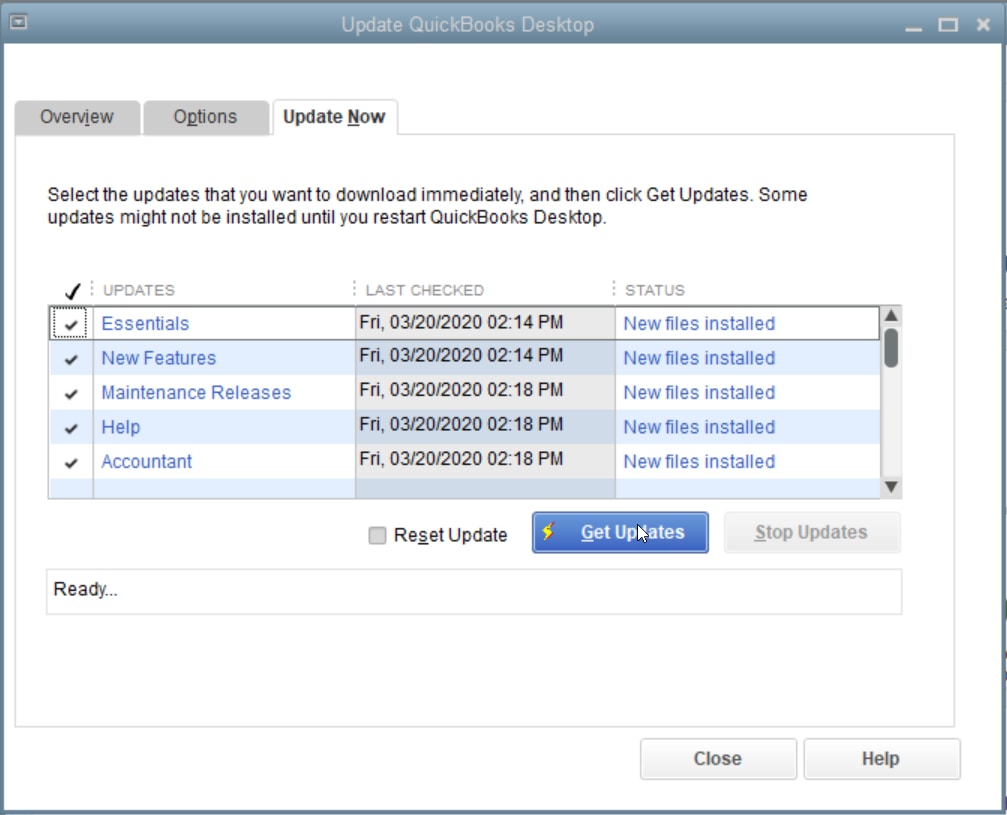
2. Update QuickBooks Desktop
Make sure QuickBooks Desktop is up to date before you begin migration by following these steps to download and install the latest updates:
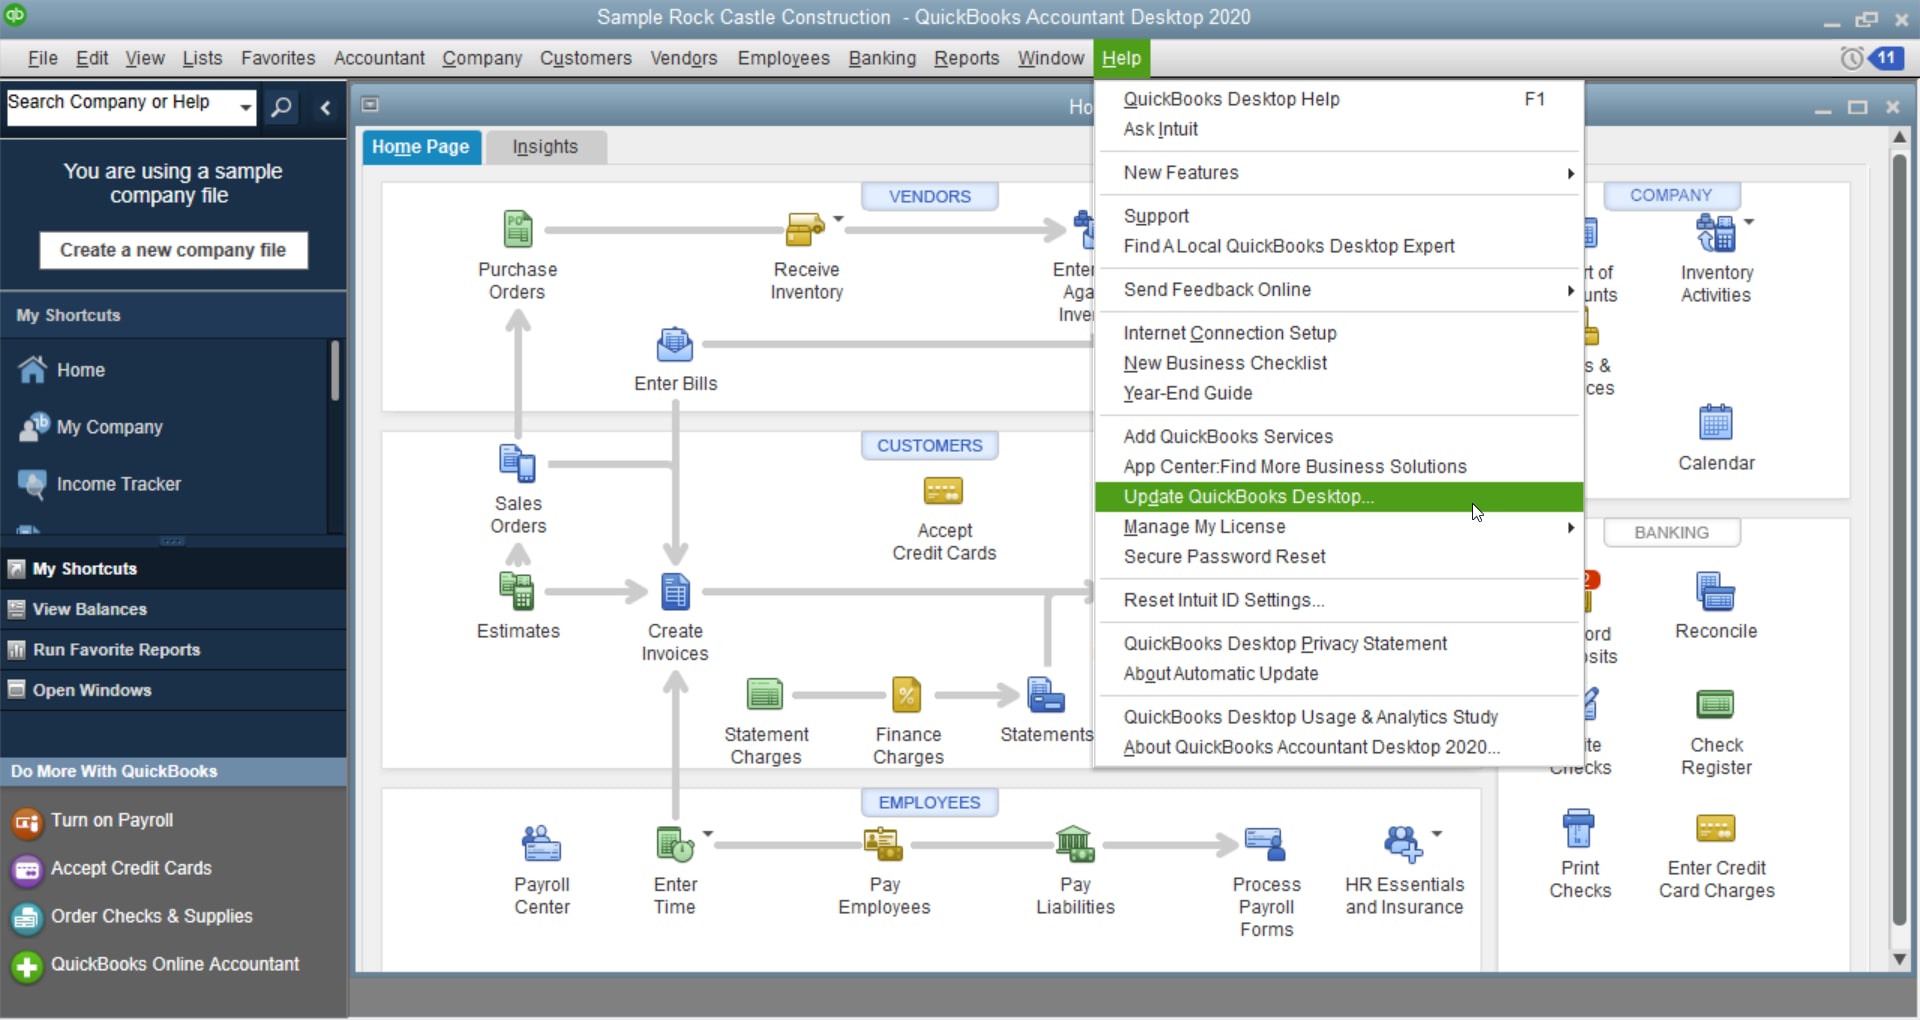
- If you’re currently in multi-user mode, go to the File menu, then select Switch to Single-user Mode.
- Select Help, then Update QuickBooks Desktop...
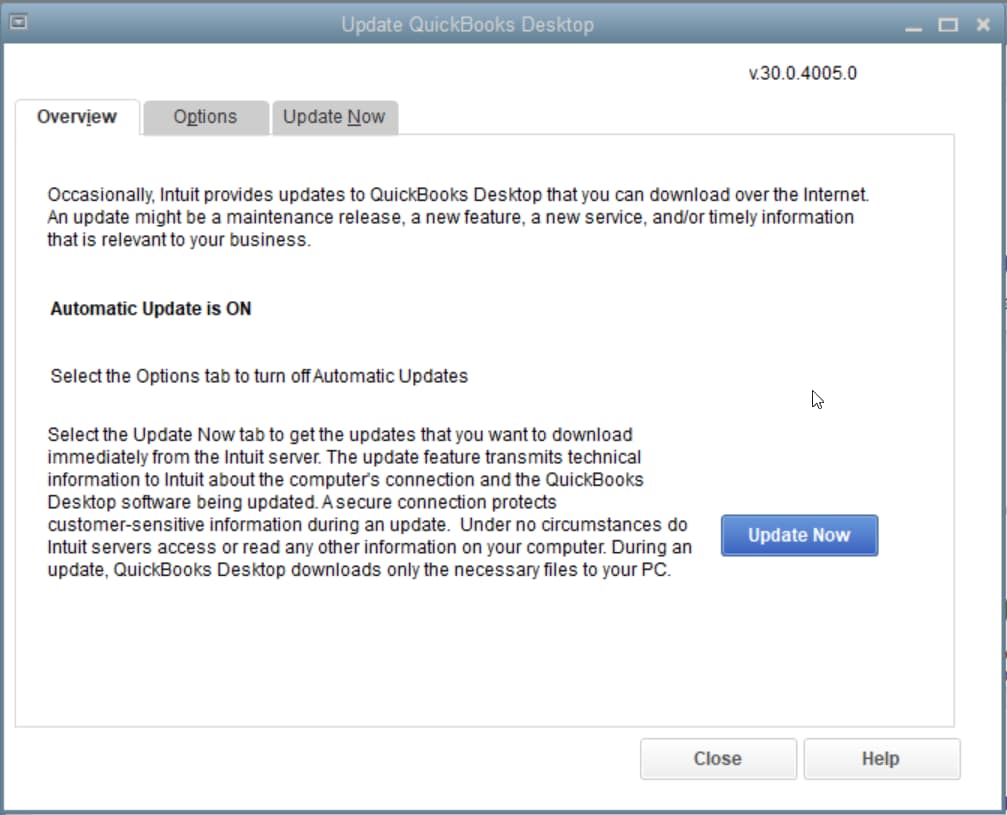
- Select Update Now.
- Select Get Updates, then Close.
- Select File, then Exit.
- Restart QuickBooks Desktop.
- If you have payroll, run it now.
3. Check your Total Targets
Next, check your number of Total Targets. In QuickBooks Desktop, press Ctrl+1 to open the Product Information window. Find your number of Total Targets in the File Information section.
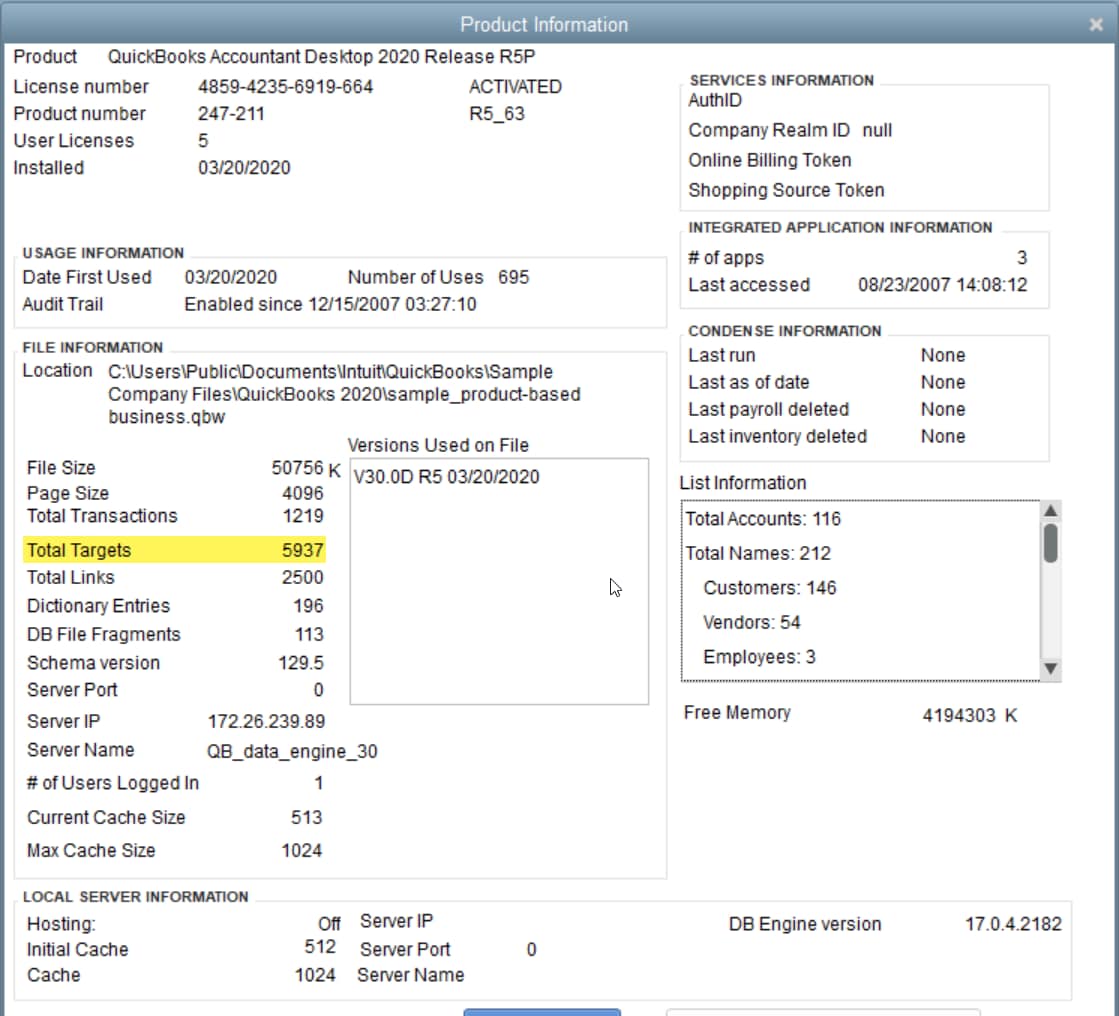
If the Targets number is more than 1,200,000 in Canada or more than 500,000 in the UK and South Africa, you can only get a list and balances conversion. You can find out how to do this in our support articles.
4. Remove Ministere du Revenu (companies outside of Quebec only)
- Navigate to Suppliers, then Supplier Centre.
- Identify Minsitere du Revenu.
- Open the supplier.
- Navigate to Sales Tax Settings.
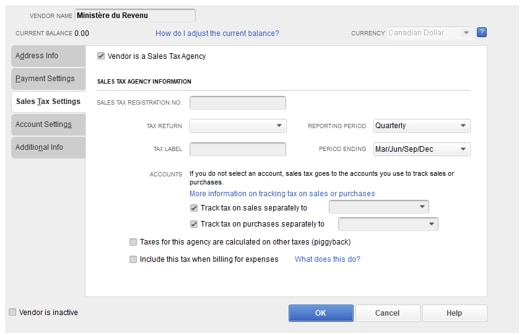
- Uncheck all boxes.
- Mark the supplier as inactive.
- Click OK to close the window.
5. Turn off payroll in the QuickBooks Desktop file
Important: To avoid issues after the migration, it's best to turn off payroll in the QuickBooks Desktop file before starting the migration.
- Select Edit, then select Preferences from the dropdown menu.
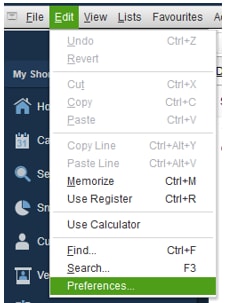
The Preferences window displays.
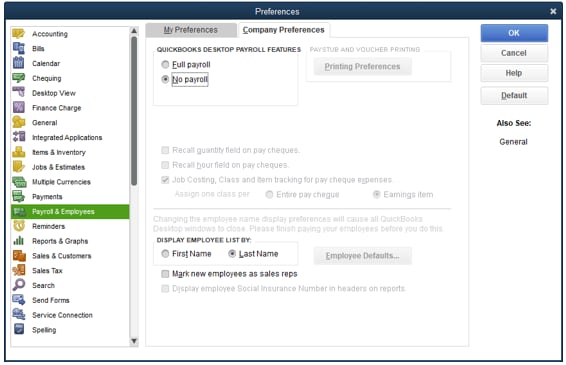
- Select Payroll & Employees from the left-side menu bar.
- Select the Company Preferences tab in the Preferences window.
- Select the No payroll option.
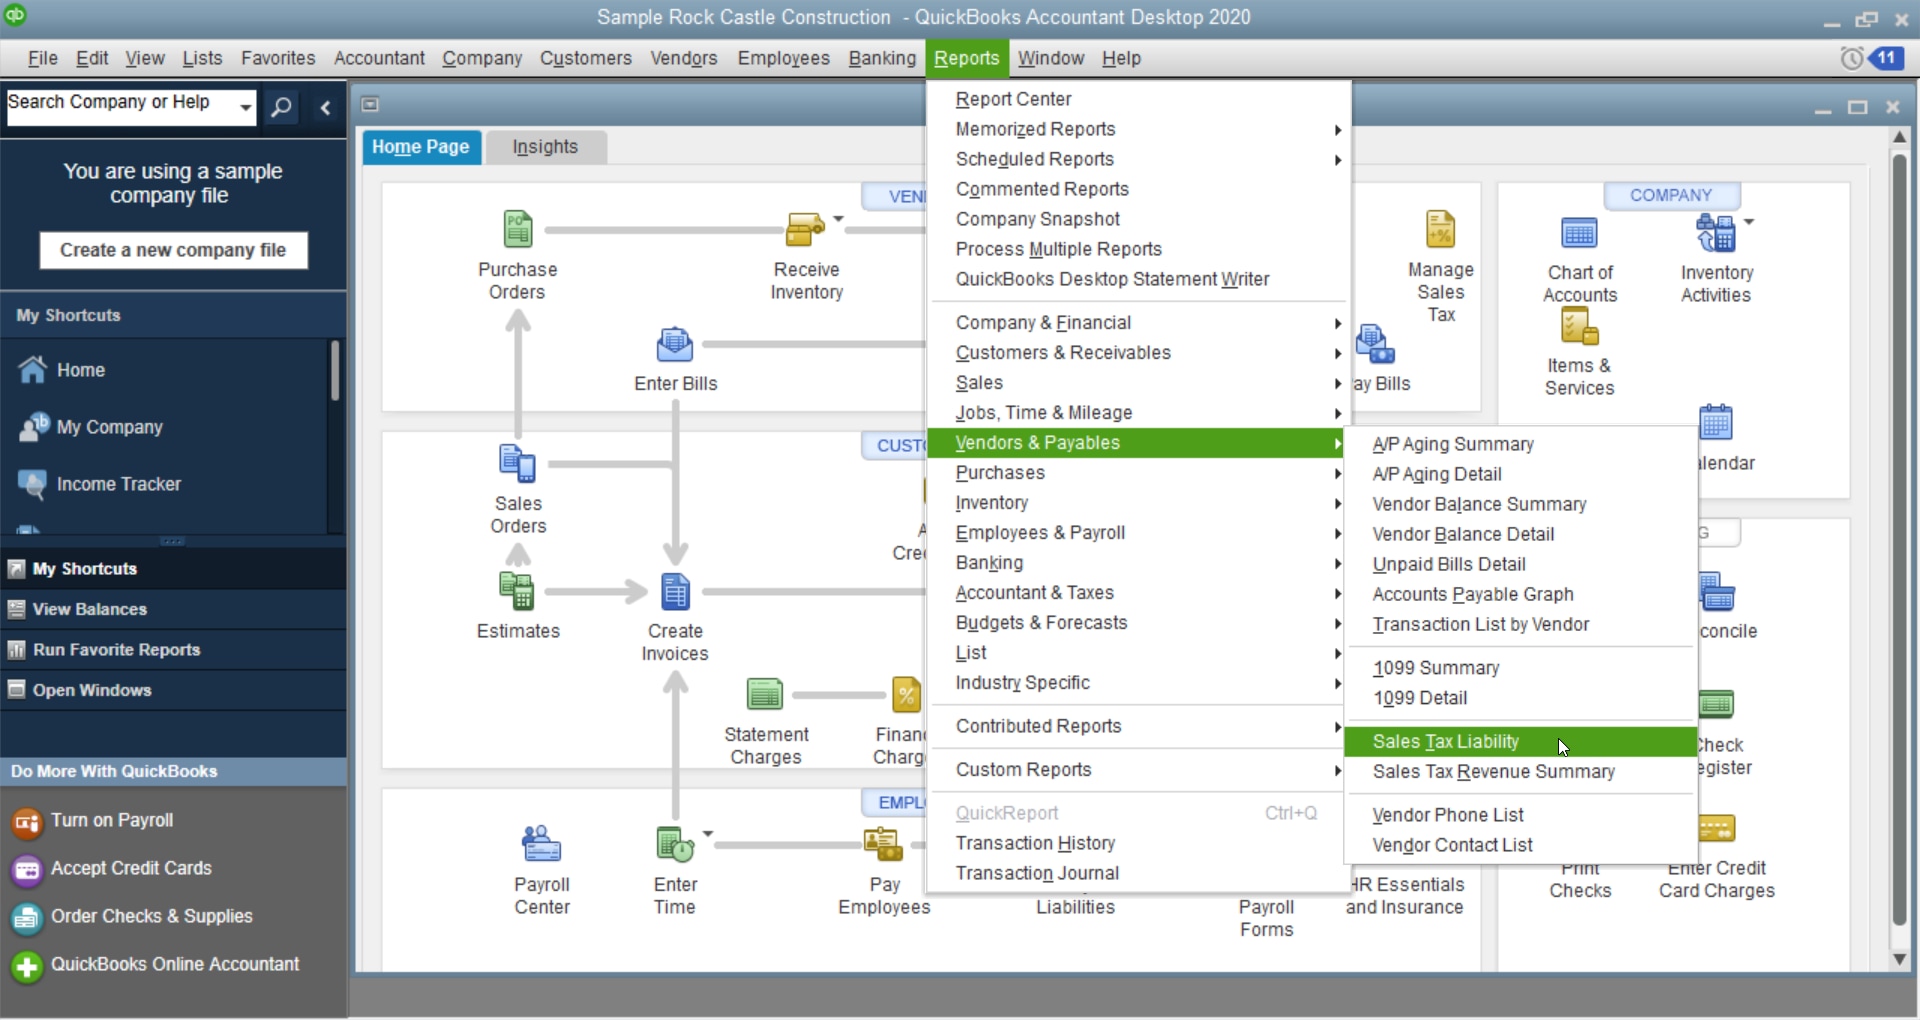
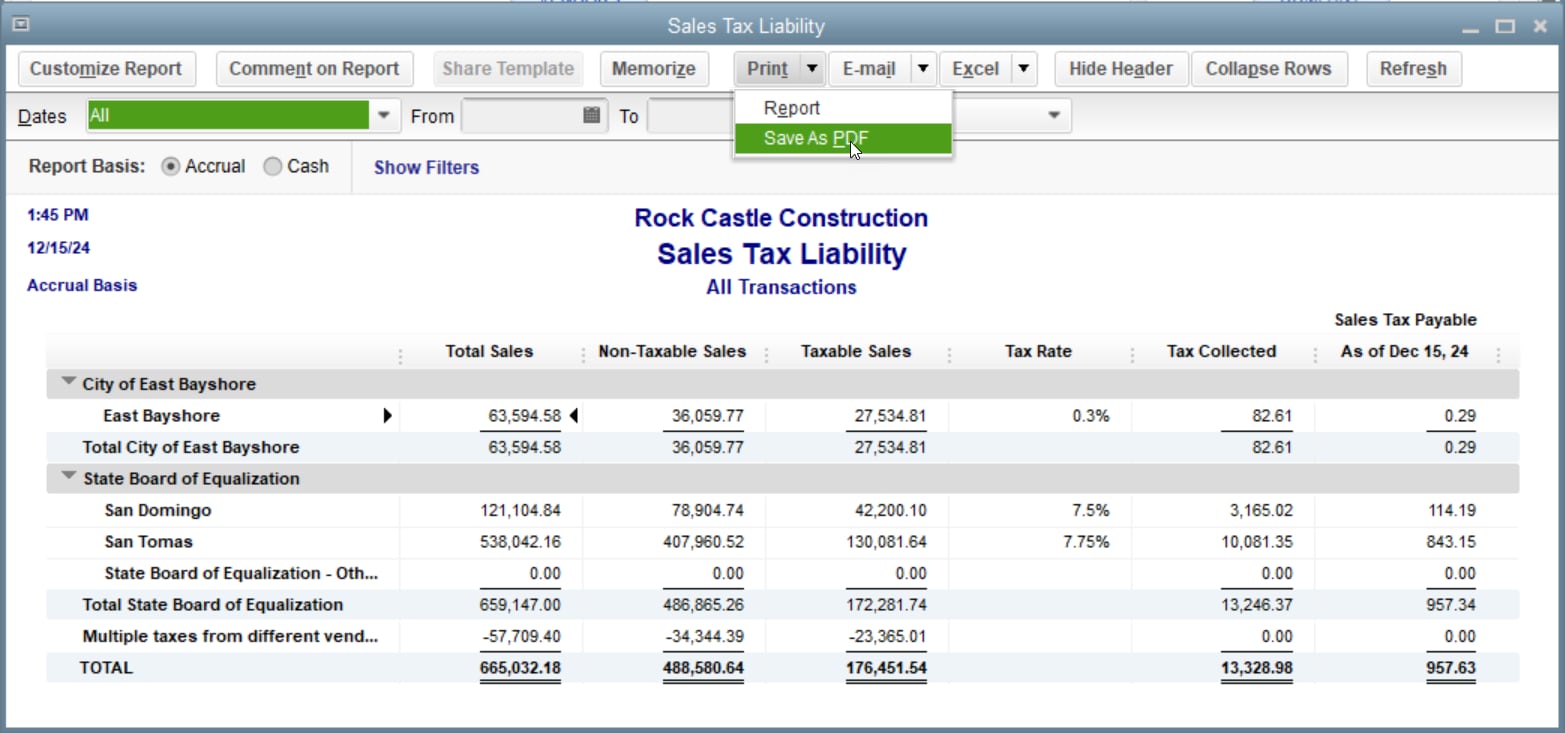
6. Save your Sales Tax Liability report
Save or print a copy of your Sales Tax Liability report. You’ll need it to enter adjustment entries after you migrate. Follow these steps:
- Go to the Reports menu and select Suppliers & Payables.
- Select Sales Tax Liability.
- From the Dates dropdown, select All.
- From the Print dropdown, select Save as PDF.
- Choose the folder you want to save it in, name the file, and select Save.
- After you’ve saved the file, you can print it if you’d like a hard copy.
7. Export your reports and lists
Note: Exporting your reports and lists is optional. this is usually only needed if your company has more than 1,200,000 targets. Otherwise, you can skip to Create a QuickBooks Online account.
Saving your lists before moving saves you from having to set up the items from your lists one-by-one when you start using QuickBooks Online. Here’s how to export your reports and lists from a QuickBooks Desktop company:
- In QuickBooks Desktop, go to the Reports menu and select Report Centre.
- Find and open any report.
- Select the date range you want from the Dates dropdown menu.
- Select Excel on the toolbar. You can also select Print or Email to save the report as a PDF.
- From the Excel dropdown, select Create New Worksheet to create a new Excel file. To add the report data to an existing file, select Update Existing Worksheet.
- Select Export and locate the workbook on your computer.
- If you want to format the data in a specific way, select Advanced. This step is optional.
- If you see a message that says your report has too many columns, select Advanced. Uncheck the Space between columns check box, then select OK.
- Select OK when you’re ready to export.
Repeat these steps for each report or list you’d like to export.

8. Create a QuickBooks Online account
Create your QuickBooks Online subscription and get ready for the move. Review the list of options to select the right plan for you. Review our system requirements before you start to make sure you have what you need for the best QuickBooks Online experience.
Important: You can only move a company file within 60 days of signing up to QuickBooks Online. Make sure you’re ready to convert within that timeframe when you sign in.
When you’re prompted to sign in, use the same user ID and password you used to sign in to your QuickBooks Desktop account. If you don't remember them, reset your QuickBooks Desktop password.
Don’t set up your QuickBooks Online company just yet. We’ll do that in the next step.
How to migrate your data
You’re ready to export your Desktop file to QuickBooks Online. Here's how, depending on your QuickBooks Desktop edition:
QuickBooks Desktop Pro or Premier
- In QuickBooks Desktop, sign in as an admin to the company file you want to import.
- Go to the Company menu, then select Export Company File to QuickBooks Online.
- Select Get started.
- Choose Select destination, then sign in to your QuickBooks Online account.
QuickBooks Desktop Enterprise
- In QuickBooks Desktop, log in as an admin to the company file you need to import.
- Press F2 to open your product information.
- While your product information is open, press CTRL+B+Q then select the OK button at the bottom of the product information page to begin.
If you track inventory in QuickBooks Desktop:
- Select Yes to bring them over, then specify the starting date.
- Select No if you want to set up new items later in QuickBooks Online.
- When the conversion is complete, we’ll send you an email. Select the Complete your setup button in the email.
- Sign in to your QuickBooks Online account.
- Choose the company file you want to open.
The QuickBooks Online dashboard opens.
Move your lists
Earlier you exported your lists from QuickBooks Desktop so that you can import them to QuickBooks Online. Each type of list requires a different step of steps. Choose a list below to view the steps for importing.
Set up inventory
You can turn on inventory tracking in QuickBooks Online by following these steps:
- Go to Settings ⚙️ and select Account and Settings.
- Select Sales.
- Select Edit ✏️ in the Products and services section.
- Turn on Show Product/Service column on sales forms.
- Turn on both Track quantity and price/rate and Track inventory quantity on hand.
- Select Save and then Done.
QuickBooks Online calculates inventory costs from the inventory start date using the First-in-First-Out method (FIFO). Any existing transactions on or after this date are also recalculated under FIFO. This is why we suggest using the first day after your company's last tax filing period to avoid filing amended forms.
| Note: If you prefer not to use FIFO or enable inventory in QuickBooks Online, during setup, select No, don’t turn on inventory and don’t track quantity on hand. You can change these settings later, but if you do, you will need to set up new inventory items. We recommend that you reach out to a tax professional if you need help to make this decision. |
To add inventory products to QuickBooks Online, follow the steps in our article. Once you're set up, it's easy to track inventory in QuickBooks and add products to sales forms. QuickBooks updates the quantity on hand as you work so you don't have to.
For products and services you sell but don’t track as part of your inventory, refer to this guide.
What to do after you migrate
There are still a few tasks you'll need to perform before you start using QuickBooks Online. It's best to complete these as soon as possible before you make any changes to the data or enter new transactions.
After the migration, check the following checklist to make sure all of your data moved as expected. You can also add information that wasn't part of the migration.
1. Check your data by comparing reports
Compare the below reports in QuickBooks Online and in QuickBooks Desktop to ensure that your data was transferred correctly:
- Balance Sheet Report
- Trial Balance – All Dates
- Customer Balance Summary – All Dates
- Supplier Balance Summary – All Dates
- Sales Tax Summary Report for the most recent period
- Any other reports you’d like to check
To check your reports, run the reports by "All Dates" and set your accounting method to Accrual in both QuickBooks Online and QuickBooks Desktop.
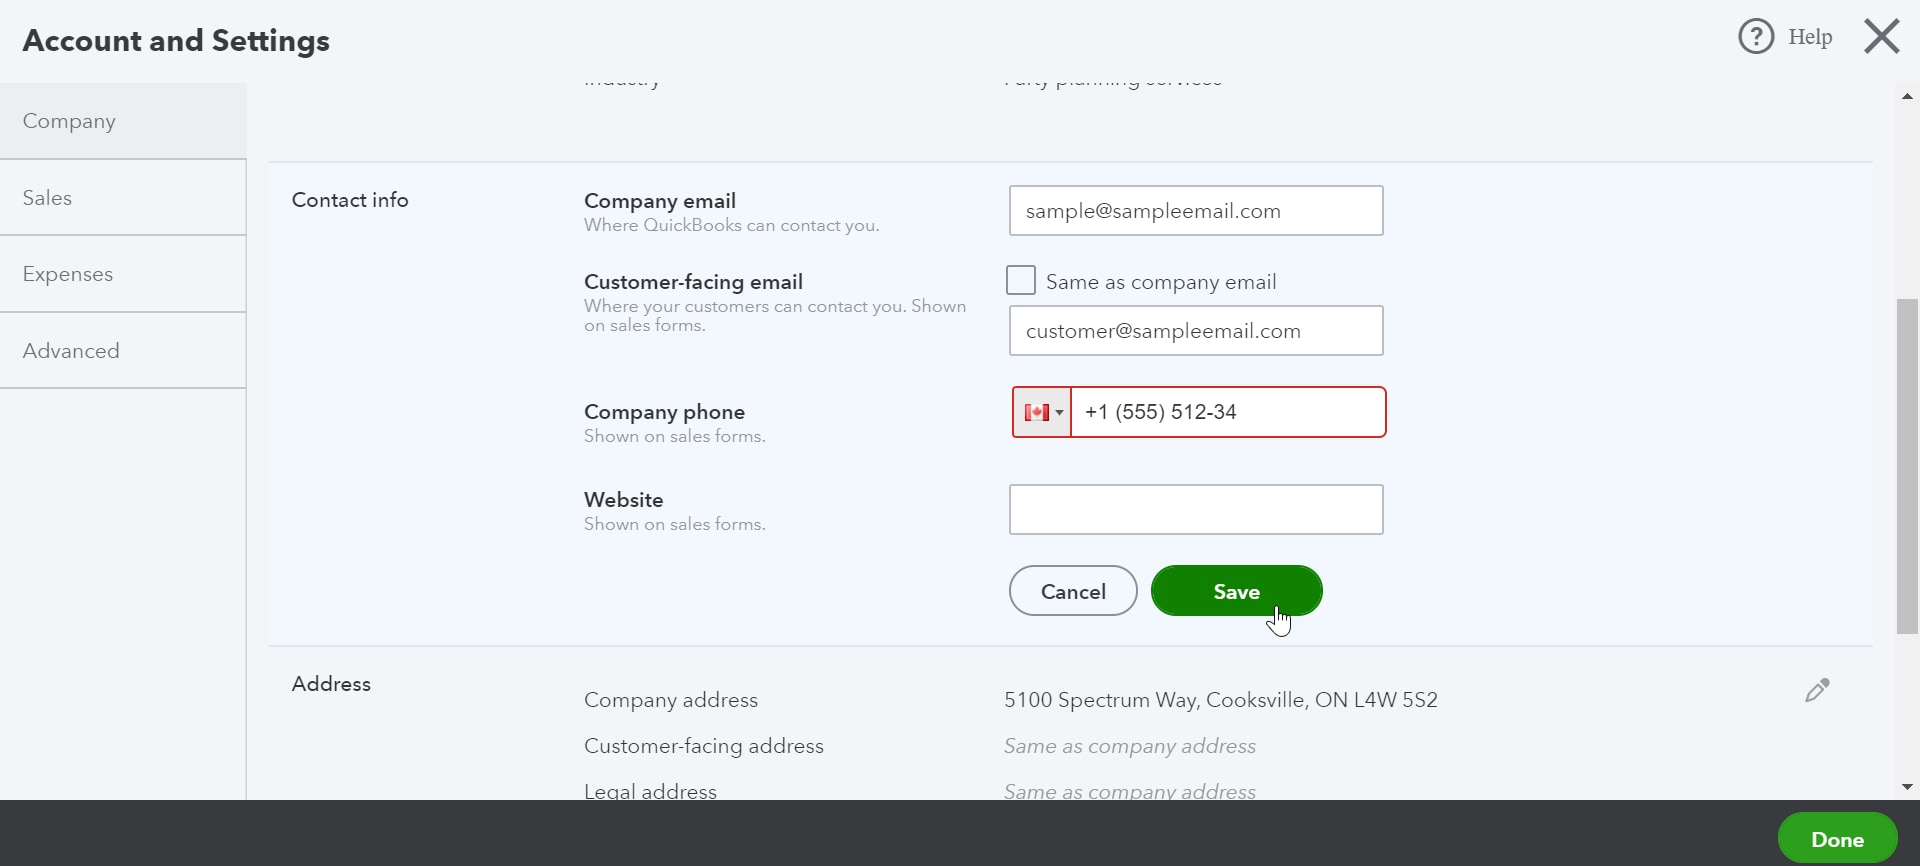
2. Confirm company settings
Although we’re able to move your accounting figures into QuickBooks Online, we don’t carry over information like company name, address, and email details. You'll need to enter this information in your QuickBooks Online company by following the steps below.
- Select the Settings (gear icon) menu, then select Account and settings.
- On the Company tab, enter your company and contact information.
- Enter the email address in the Company email box where you would like to receive the monthly invoices from Intuit for your QuickBooks Online subscription.
- If you don't want to use the company email address for your customers to contact you, enter an email address in the Customer-facing email box.
- Select Save.
3. Configure your sales tax settings
It’s important that QuickBooks Online is set up with the correct CRA Business Number and filing frequency before you start using it. You can skip these steps if your business isn’t registered for sales tax.
- Go to All apps
 , select Sales Tax, then select Overview (Take me there).
 - Select Set up sales tax.
- Choose the province or territory in which you do business, then select Save.
- On the next screen, fill in the required information, then select Next.
- On the next screen, select OK.
- You can go back and edit these settings at any time.
4. Connect bank and credit card accounts
For your safety, bank and credit card information isn’t transferred when you migrate from QuickBooks Desktop to QuickBooks Online. To connect your accounts in QuickBooks Online, follow these steps:
- Go to All apps , select Accounting, then select Bank transactions (Take me there).
- Select Connect Account from the landing page, or select Add account if you've already created an account.
- Search for your bank.
- Select Continue, then enter the username and password you use for your bank's website in the pop-up window.
- Select the accounts you want to connect.
- For each account, select the account type from the dropdown menu. These are accounts currently on your chart of accounts.
- Select the date range for the download.
- Select Connect.
Learn more about connecting bank and credit card accounts to QuickBooks Online.
5. Clean up bank reconciliations
Since you haven't yet performed a bank reconciliation in QuickBooks Online, it assumes that no bank transactions have been reconciled. You need to tell QuickBooks to mark all transactions up to the conversion date as reconciled. This means it only looks at future transactions for reconciliation.
- Select the Settings (gear icon) menu, then select Reconcile.
- Choose the relevant bank account from the dropdown menu, add the Ending balance and Ending date, then select Reconcile Now.
- A list of transactions displays. Select the top checkmark boxes to select all transactions in the list. If the data is in two columns, ensure you’ve selected all transactions in both columns.
- Find and uncheck transactions that are still not cleared. When the Difference is zero, you have completed the reconciliation successfully.
- Select Finish Now.
- Repeat these steps for each account you have connected to QuickBooks Online.
6. Link payments and credits to open invoices
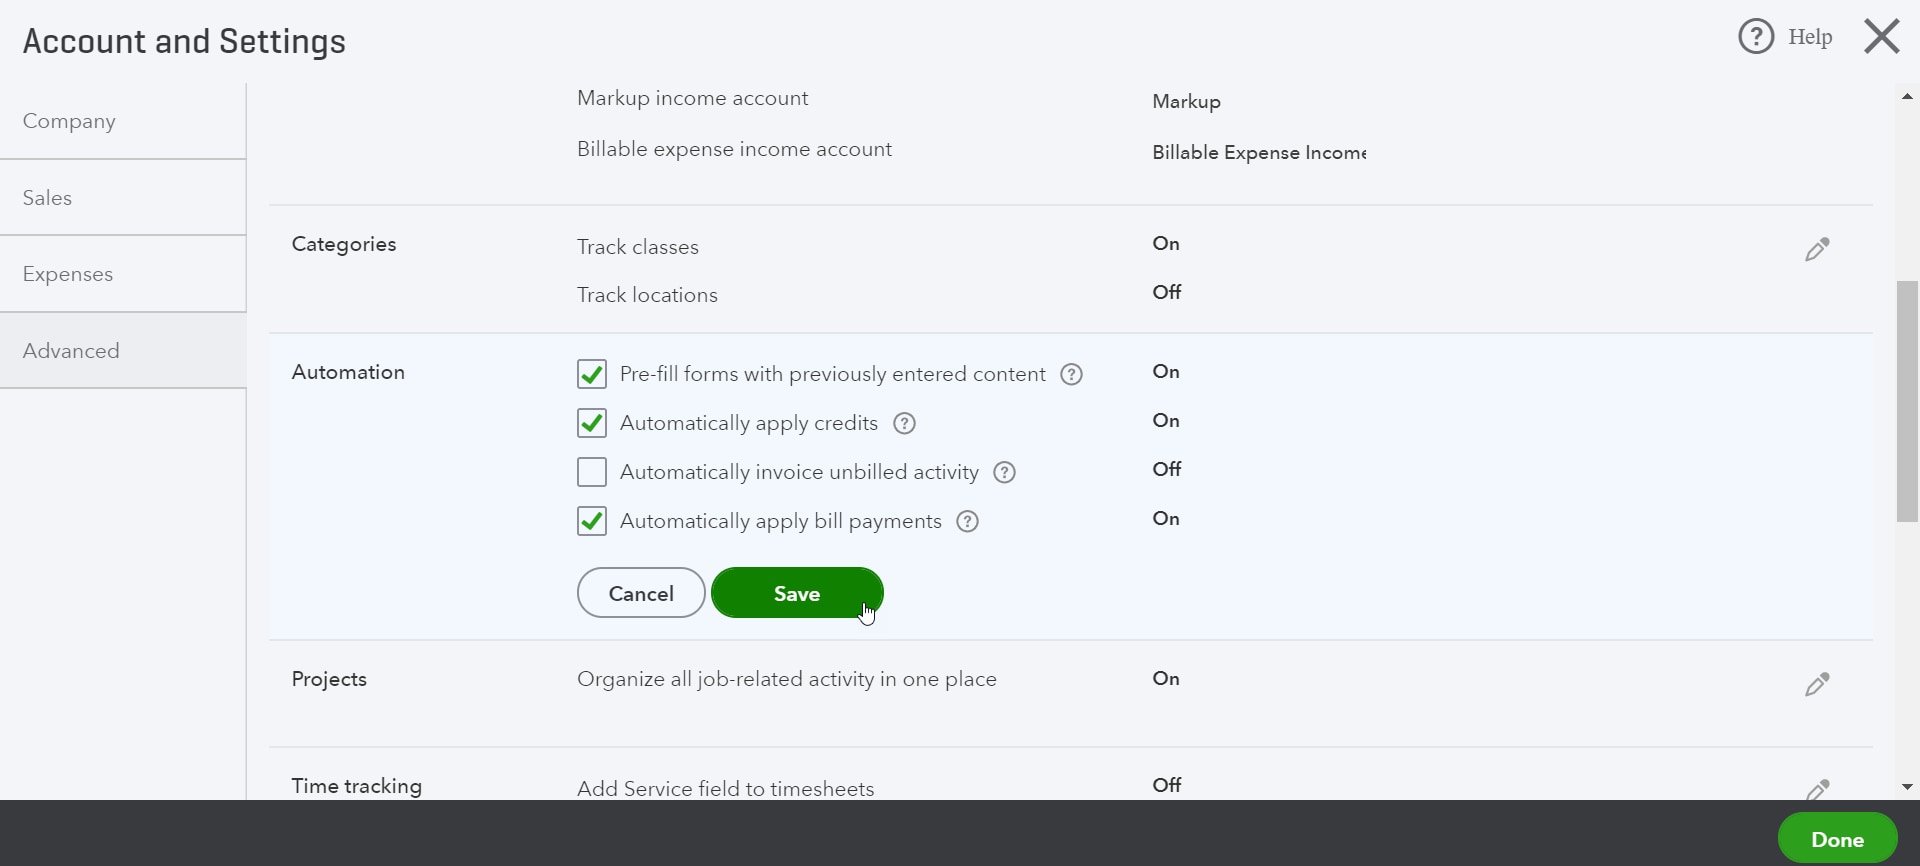
Since the transactions downloaded into QuickBooks Online did not link invoices with their respective payments, you may notice names that have zero balances in your A/R and A/P aging reports. You can easily link credits and payments to your open invoices by turning on the Automatically apply credits preference:
- Select the Settings (gear icon) menu near the top right of the screen, then select Account and settings.
- On the Advanced tab, select Automatically apply credits, then select Save.
7. Review your accounts’ detail types
After conversion, QuickBooks Online keeps your sub-account hierarchy. However, it also uses an additional level of account typing called a Detail type. Detail types allow you to be more specific with your account organization.
The conversion process assigns detail types to accounts where the detail is obvious. For accounts where it isn’t clear what the detail type should be, the conversion process assigns a generic detail type, such as Other Miscellaneous Income. You can correct this now.
Run the Account Listing Report to review and edit your accounts’ detail types:
- Go to Reports
 and select Standard reports (Take me there).
 - Search for and open the Account List report.
- Review your accounts.
- Select the account name to edit an account's detail type.
- Select the correct detail type from the Detail Type dropdown menu.
- Select Save and close.
8. Complete payroll setup
Transactions and payroll accounts are converted to balance your books, but the details behind the transactions such as payroll item breakdowns and employee year-to-date numbers, don't convert.
Liability refunds, adjustment transactions, and opening balance transactions that affect accounts convert to journal entries.
To complete your payroll setup:
- Go to All apps , select Payroll, then select Employees (Take me there).
- In the Paid in [Year] column, ensure each employee who received a pay cheque this year is switched to Yes. Employees who haven't been paid in the current year are automatically listed as No.
- Select Complete payroll setup to enter or verify your year-to-date payroll totals and employee information.
- Follow the onscreen instructions to complete the setup.
- Use Run Payroll once you're ready to pay your employees.
You may be asked to match your payroll items if your pay types from QuickBooks Desktop were not mapped with a standard QuickBooks Online pay type. Follow these steps to map your QuickBooks Desktop pay types with those of QuickBooks Online:
- Select the (choose one) dropdown in the QuickBooks Online column.
- Select the pay type that closely matches how the item was set up in your Desktop file.
- To make sure the pay types match, it's a good practice to check your QuickBooks Desktop file and see how your items are set up.
- Select Save and close after complete the mapping.
- Perform the same process for each item that needs to be mapped, then select Continue.
Don’t see options to choose from? Some pay types imported are not supported in QuickBooks Online Payroll. If this is the case, select Skip for now in the bottom right of the screen. Note that you cannot go back and map your pay types if you select Skip for now. You'll have to manually create pay types for your employees to complete the payroll setup.
9. Link your Payments account
While you can't transfer your existing Payments account to QuickBooks Online, you can create a new one. Follow these steps to enable Payments in QuickBooks Online:
- Select the Settings (gear icon) menu, then select Account and settings.
- Select Payments. In the QuickBooks Payments section, select Learn more.
- Select Set up Payments. A signup window opens with three sections.
- In the Business section, select Start. Fill out the form, then select Next.
- In the Owner/Proprietor section, select Start. Fill out the form and then select Next.
- In the Bank section, select Start. Select Add a new bank connection and search for your bank.
- Select the account you want customer payments to go into.
- Enter the sign-in info you use for your bank, then select Connect.
- When you're finished with all of the sections, select Activate Payments.
Review our article to learn more about signing up for QuickBooks Payments.
10. Add users
Make sure that any users you want to add in QuickBooks Online have the proper access. You can view your current users by selecting the Settings (gear icon) menu, then Manage users.
To add users:
- Select the Settings (gear icon) menu, then Manage users.
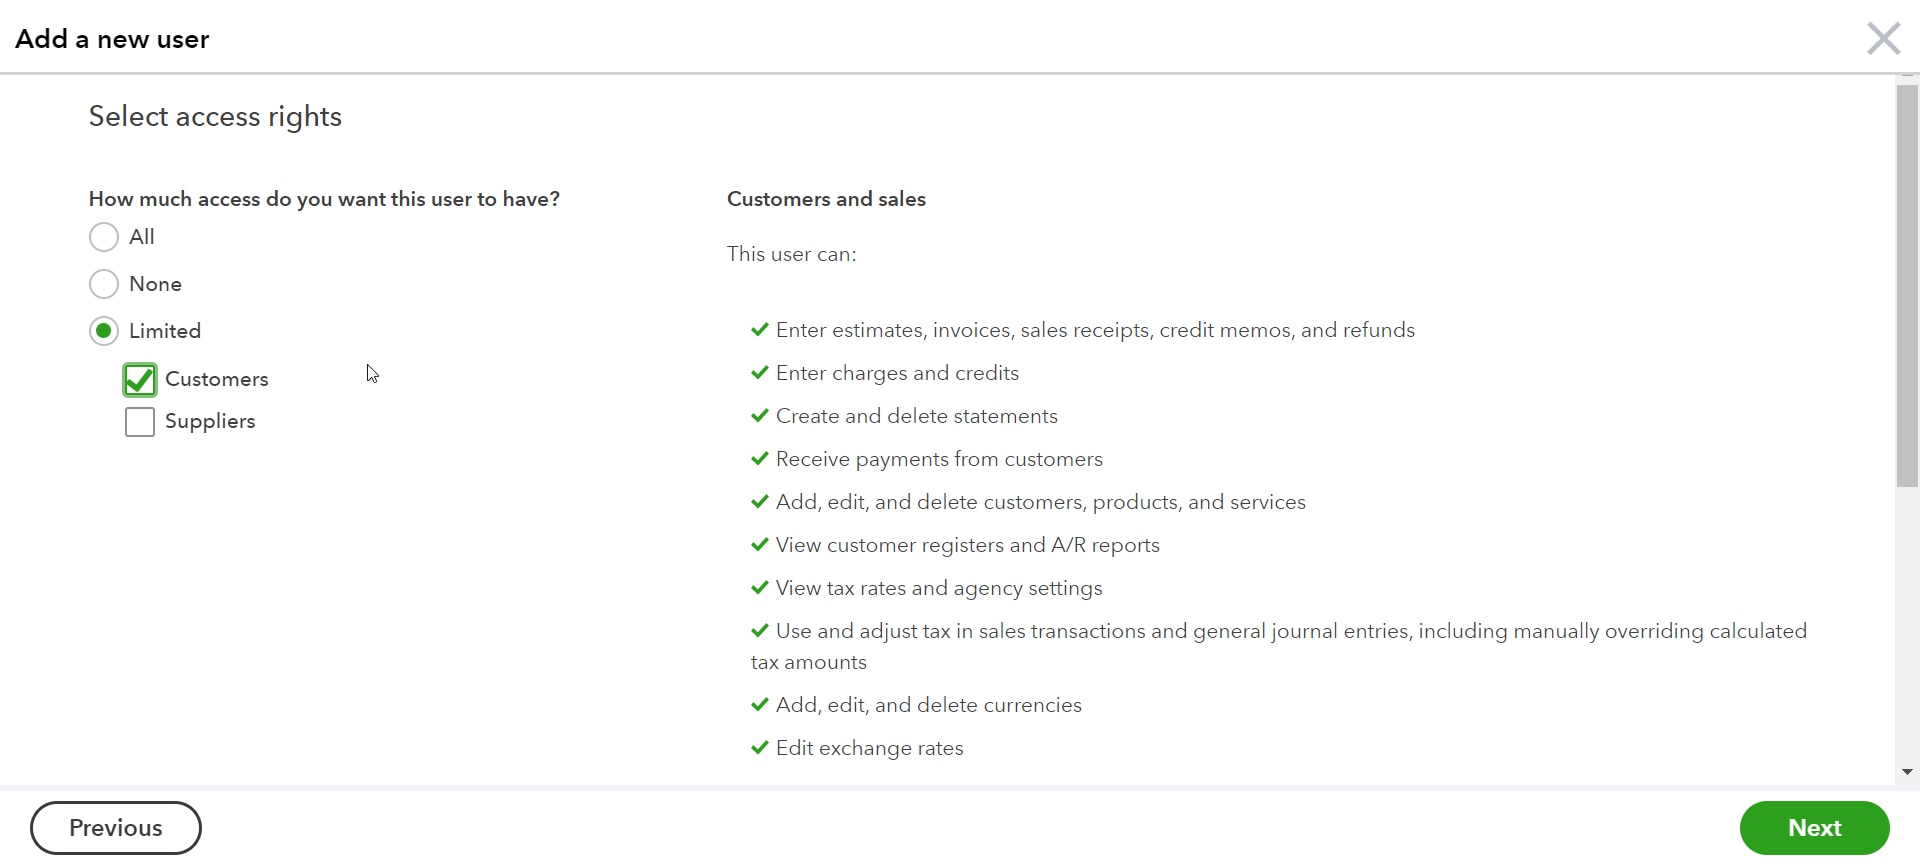
- Select Add user.
- Select the user type you want to create. More options display on the screen depending on the user type you select.
- Enter your new user’s name and email address, then select Save.
After you complete these steps, your new user receives an email from QuickBooks. Ask them to follow the link in the email, which will take them to a sign in or account creation page.
11. Invite an accountant
You can invite up to 2 accountants to work with you in your QuickBooks Online company. To invite an accountant, follow these steps:
- Go to All apps , select Accounting, then select My accountant (Take me there).
- Enter your accountant’s email address and select Invite; or
- Go to the Settings (gear icon) menu and select Manage users.
- Select Accounting firms.
- Select Invite.
- Complete the required fields and select Save.

Troubleshoot migration issues
Converting from QuickBooks Desktop to QuickBooks Online is usually quick, but there are some issues you might face during or after the conversion. Let’s take a look at the most common issues and how they can be resolved.
Rebuilding your company data
If you have trouble importing your company file from QuickBooks Desktop for Windows into QuickBooks Online, you can easily resolve this issue by rebuilding the data file and restarting the export process.
Step 1: Verify your company data
- In QuickBooks Desktop, select Window, then Close All to close all open windows.
- Select File, then Utilities, then select Verify Data.
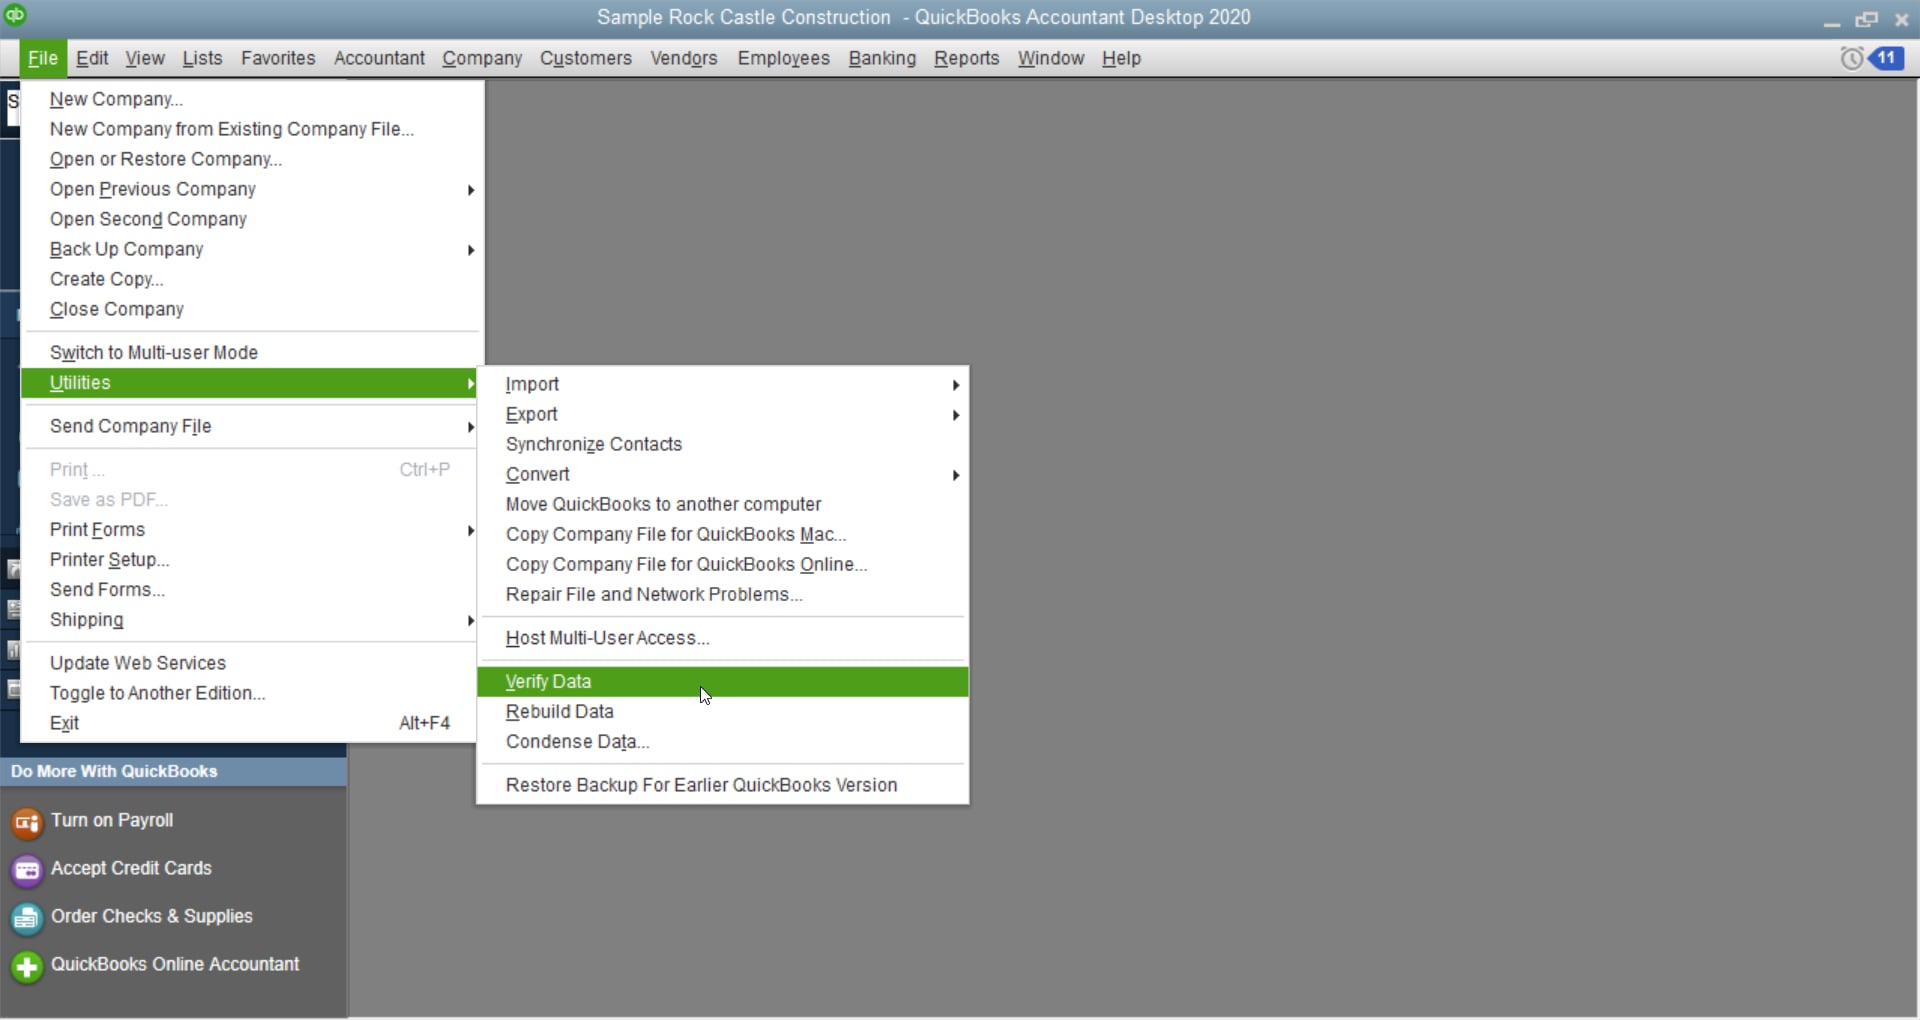
If QuickBooks reports a problem, continue to Step 2: Rebuild your company data to repair problems, below.
Step 2: Rebuild your company data to repair problems
- Select Window, then select Close All to close all open windows.
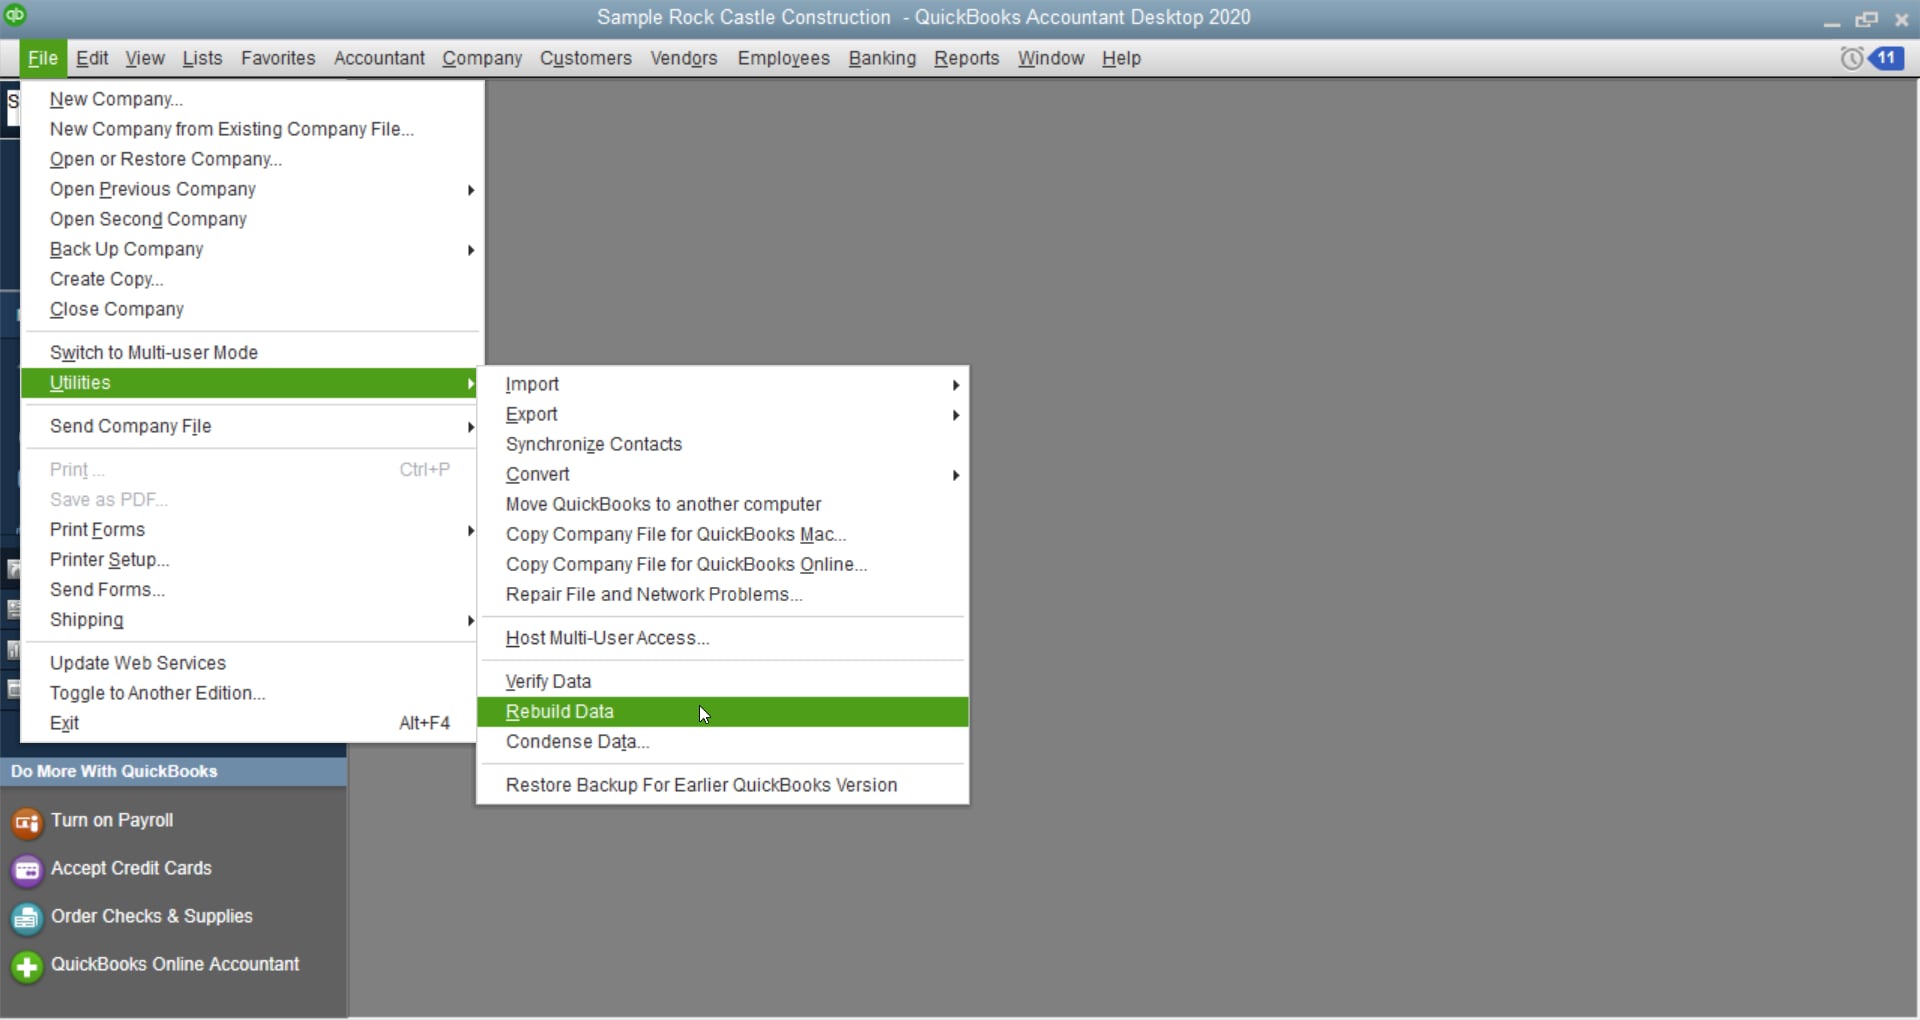
- Select File, go to Utilities, then select Rebuild data.
- If you see the message Rebuild has completed, continue to Step 3: Verify your rebuilt company data, below.
Step 3: Verify your rebuilt company data
- Select Window, then Close All to close all open windows.
- Select File, then Utilities, then Verify Data.
- If you see the message QuickBooks detected no problems with your data, continue to Step 4: Start the export process again, below.
Step 4: Start the export process again
- Update QuickBooks to the latest release: Select Help, then select Update QuickBooks.
- Close and reopen QuickBooks to install the updates.
- Select Company, then Export Company File to QuickBooks Online.
- Follow the onscreen instructions.
Error messages
Some of the most common migration errors can be found in this guide.
Post-conversion issues
Issue: Customer balances are off in QuickBooks Online
If you used journal entries to apply payments to invoices, the links between credits and invoices might break when you import them. This causes the customer balances to be off. To resolve, turn on auto-credits in QuickBooks Online:
- Go to Settings (gear icon), then select Account and Settings.
- Select the Advanced tab, then the Edit the Automation section.
- Click the Automatically apply credits slider.
- Select Save, then select Done.
Don’t want to automatically apply all payments? You can record the payments by matching the journal entry credits to existing invoices. Do this on a customer-by-customer basis.
Issue: Invoices or sales transactions were converted to journal entries after importing to QuickBooks Online
This can happen if you have flat rates (0.00) for sales tax items or groups in your Desktop file. It often happens in Mac files because you can save a sales tax item without a % sign.
To prevent your sales transactions from turning into journal entries, change the sales tax item rates. If you have several items with flat sales tax rates, change all of them to make sure all your transactions import correctly.
Start using QuickBooks Online
Now that you’re set up in QuickBooks Online, learn about its features and functions in our guide to Getting started with QuickBooks Online.
Need a little more help navigating QuickBooks Online? In the video below, we show you how to get around and where you can find the most commonly-used functions:
Or, watch short videos on a variety of topics for tips and tricks and step-by-step guides through the process of using QuickBooks Online.
Other resources for help
Check out some of these additional resources we offer to learn more and remember that we’re always here to help if you need it.
Keyboard shortcuts: QuickBooks Online and QuickBooks Desktop each have their own set of keyboard shortcuts. Speed up your navigation by learning the keyboard shortcuts for QuickBooks Online.
See this video for a tutorial of how to export a company file to QuickBooks Online:
Need additional help?
Completely stuck? Reach out to us for support and we’ll help get you back on track.
More like this