Use and customize form templates
by Intuit•10• Updated 1 month ago
Learn how to use and customize form templates in QuickBooks Desktop.
In QuickBooks Desktop, you can create custom templates for forms. You can customize these templates to control how they look and what information to include.
- Invoices
- Sales receipts
- Estimates
- Statements
- Purchase orders
- Bill payment stubs (available in QuickBooks Desktop 2022 and newer)
Here’s what to do.
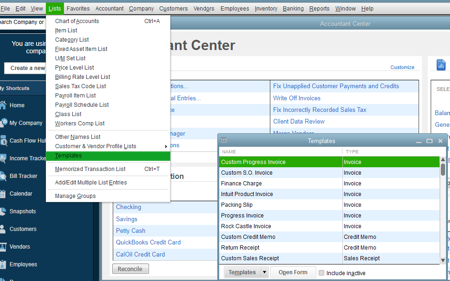
To access the form templates list:
- Go to the Lists menu and select Templates.

How to customize form templates
- Select the type of form you’d like to customize.
- From the form, select the Formatting tab then select Manage Templates.
- Select a template to preview, then select Copy to create a new template or select OK to edit the template.
- Use the basic customization window to:
- Add your logo: Select the Use logo checkbox if you want your company logo to appear on your form. If you want to change your logo, select the Select Logo option to select the image you want to use.
- Change fonts and colours: This section lets you personalize fonts and colours for certain details used in the form, like company name, labels, and data.
- Change company & transaction information: Here you can select the contact information you want to appear on the invoice. You can also change any of this information by selecting Update Information.
- Select Additional Customization to add or remove the items from the header, columns, or footer. Then select Layout Designer to move or resize items on the form.
- When you’re done, select OK.
- Select Print Preview to see your form. If everything looks good, select Close.
- Select OK.
How to duplicate a form template
You can duplicate a form template and apply the design to another template. For example, you can use your invoice template design for packing slips. Here’s how.
- From the Lists menu, select Templates.
- In the Templates list, select the template you want to copy.
- Select the Templates ▼ dropdown, then Duplicate.
- Select the type of form you want this template copy to be used for.
- Select OK.
You can now use the copy of the template with the type of form you choose.
How to import or export form templates
You can copy customized templates from one company file to another. This saves your time in personalizing templates for your estimates, invoices and other forms in case you have multiple company files or you need to start a new company in QuickBooks Desktop.
A few limitations to keep in mind:
- You can’t import customized templates created in newer versions of QuickBooks into older versions.
- You can’t import templates created in one regional version of QuickBooks into another. For example, the Canadian version of QuickBooks can't export templates to the U.S. version.
How to import templates:
- Open the company file that you want to import the template into.
- From the Lists menu, select Templates.
- Select the Templates ▼ dropdown, select Import.
- Select the template you want to import, then select Open.
- Name the imported template. You can keep the original name or change it.
- Select OK. You should now see the imported template on the template list.
How to export templates:
- From the Lists menu, select Templates.
- Select the template you want to export.
- Select the Templates ▼ dropdown, then Export.
- Verify the file name and choose the location of the file on your computer.
- Select Save.
If you run into any problems customizing your templates, here's how to troubleshoot common issues when using and customizing templates.
More like this