Move your QuickBooks Desktop company file to QuickBooks Online
by Intuit•26• Updated about 6 hours ago
Learn how to move your QuickBooks Desktop company file to QuickBooks Online.
Keep track of your data even when you’re away from your desk. Use QuickBooks Online to stay on top of your business anywhere you are. Here’s what you need to do first:
- Get your QuickBooks Desktop company file ready.
- Move your data using the tool in QuickBooks Desktop or the online migration tool.
- After you move your data, finish setting up your new QuickBooks Online company.
If you’re not sure which QuickBooks Online is right for you, check out these resources:
Know what you’ll need before you move your company file
To learn more about names and what transfers, check out our comparison article.
To get set started with your migration, here’s what you’ll need:
- An active QuickBooks Online account in the same country or region as your QuickBooks Desktop account.
- The latest release of QuickBooks Desktop.
- A file with under 4,000,000 targets. Check the number of targets in your company file using the F2 key or Ctrl+1. If you have more targets than that, condense your data.
- Admin access to both your Desktop company file and your QuickBooks Online account.
- A printed or saved copy of your Sales Tax report.
- If you use online banking, categorize and reconcile all bank and credit card transactions.
- Check the following if you use QuickBooks Desktop Payroll:
- Make sure all of your employees' profiles are correct.
- Remove or deactivate any employees who haven’t been paid this year. Then, wait 2 to 3 business days after running payroll to move your data.
- Make sure to move your data at least a few days before your next payroll run.
- Contact support for assistance in setting up your account in QuickBooks Online if you use QuickBooks Time.
Move your QuickBooks Desktop company file
Follow these steps to migrate your data. Migration time depends on a few things, like how complex and large your QuickBooks Desktop company file is.
- Open QuickBooks Desktop then begin the export process.
- QuickBooks Desktop Pro and Premier 2022 or later: Go to Company and select Export Your Company File to QuickBooks Online.
- QuickBooks Desktop Enterprise 2024 or later:
Select Company, then select Migrate to QuickBooks Online. - QuickBooks Desktop Enterprise 2022 or 2023:
Press Ctrl + 1 to open the Product information window. Then press Ctrl + B + Q, then select OK.
- Select Get started.
- Sign in with the user ID and password you set up for your QuickBooks Online subscription.
- You’ll see the What do you want to bring online? page. Select how you want to move your data:
- Bring all your company data.
- Bring only lists and balances.
- Select Continue.
- You’ll see your QuickBooks Online company names and subscriptions listed. Select the company you want to move your data to.
- Select Continue, then select Continue again.
- If you already have data that exists in your QuickBooks Online account, QuickBooks will ask if you want to replace it. Be careful, as this can't be undone. If applicable:
- Select Agree, then select Replace.
- Select Yes, go ahead and replace the data, then select Replace.
- Select Export. You'll see a progression bar as your data is moved over to QuickBooks Online.
Move your company file to QuickBooks Online with an online tool
Use the online tool to move your company file in a more convenient way.
Note: The tool will move data from QuickBooks company files (.QBW), portable files (.QBM), and backup files (.QBB).
You can use this tool if:
- You're an accountant who doesn’t have QuickBooks Desktop and want to help your client move to QuickBooks Online.
- You don't have QuickBooks Desktop, but you have a QuickBooks Desktop file that you want to move to QuickBooks Online.
- Your QuickBooks Desktop company file version is 2021 or later.
Note: If you’re using a company file from 2010 or earlier, follow these steps to run QuickBooks File Doctor.
Step 1: Open the online tool
- Select the link for your QuickBooks version:
- QuickBooks Windows
- Select Get Started, then sign in with your Intuit Account.
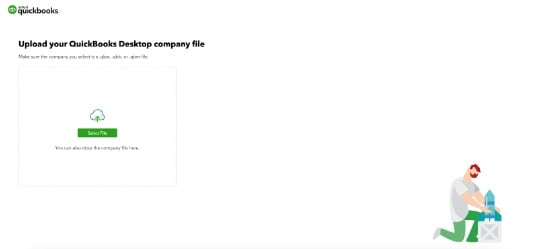
Step 2: Upload your company file
Follow these steps to upload your company file. This helps prevent errors and reduce setup time later.
- Select Select file, then browse to the supported QuickBooks Desktop company file you want to move.
Note: You can only upload one company file at a time. - Select Open to upload the company file, or drag and drop your QuickBooks Desktop company file to upload it.
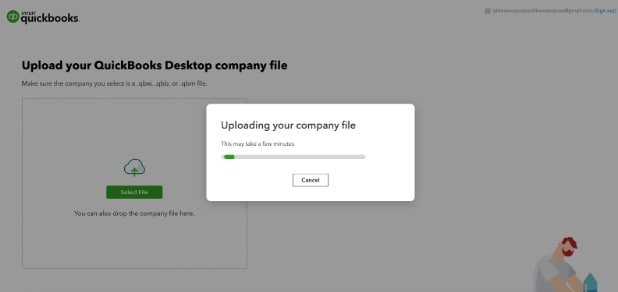
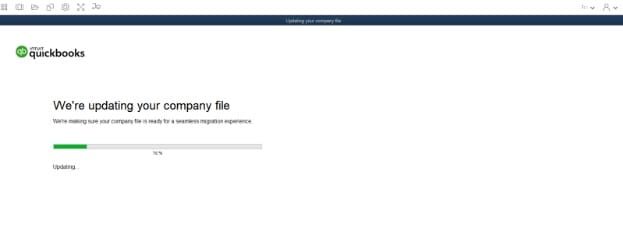
- Once your company file is uploaded, we’ll auto-update it to the latest version of QuickBooks Desktop.
- Next, you'll see an option to move to QuickBooks Online.
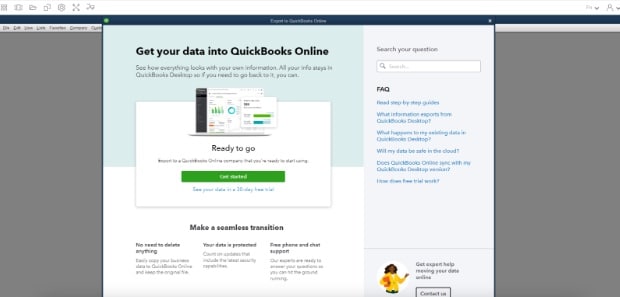
Follow the on-screen instructions to guide you through when you move to QuickBooks Online. You’ll receive an email that says Your company is now Online when the migration has completed.
If your books fail to update to QuickBooks Desktop or move to QuickBooks Online, reach out to our support team.
Next steps
Follow this list of what to set up in your new QuickBooks Online company.
- Get started with QuickBooks Online and Get started and adjust settings after you sign up for QuickBooks Online.
- Connect your bank or credit card account.
- Create and send invoices to your customer.
Note: If you track sales tax, set up location-based sales tax in QuickBooks first. - Track your bills and learn how to pay them in QuickBooks.
- If you use payroll, follow this guide to set up and run your payroll in QuickBooks Online.
Related articles
More like this
- Move your company files to another computerby QuickBooks
- How to set up QuickBooks Desktop to work from homeby QuickBooks
- Can't open company file in QuickBooks Desktopby QuickBooks
- Fix Error 6177, 0by QuickBooks